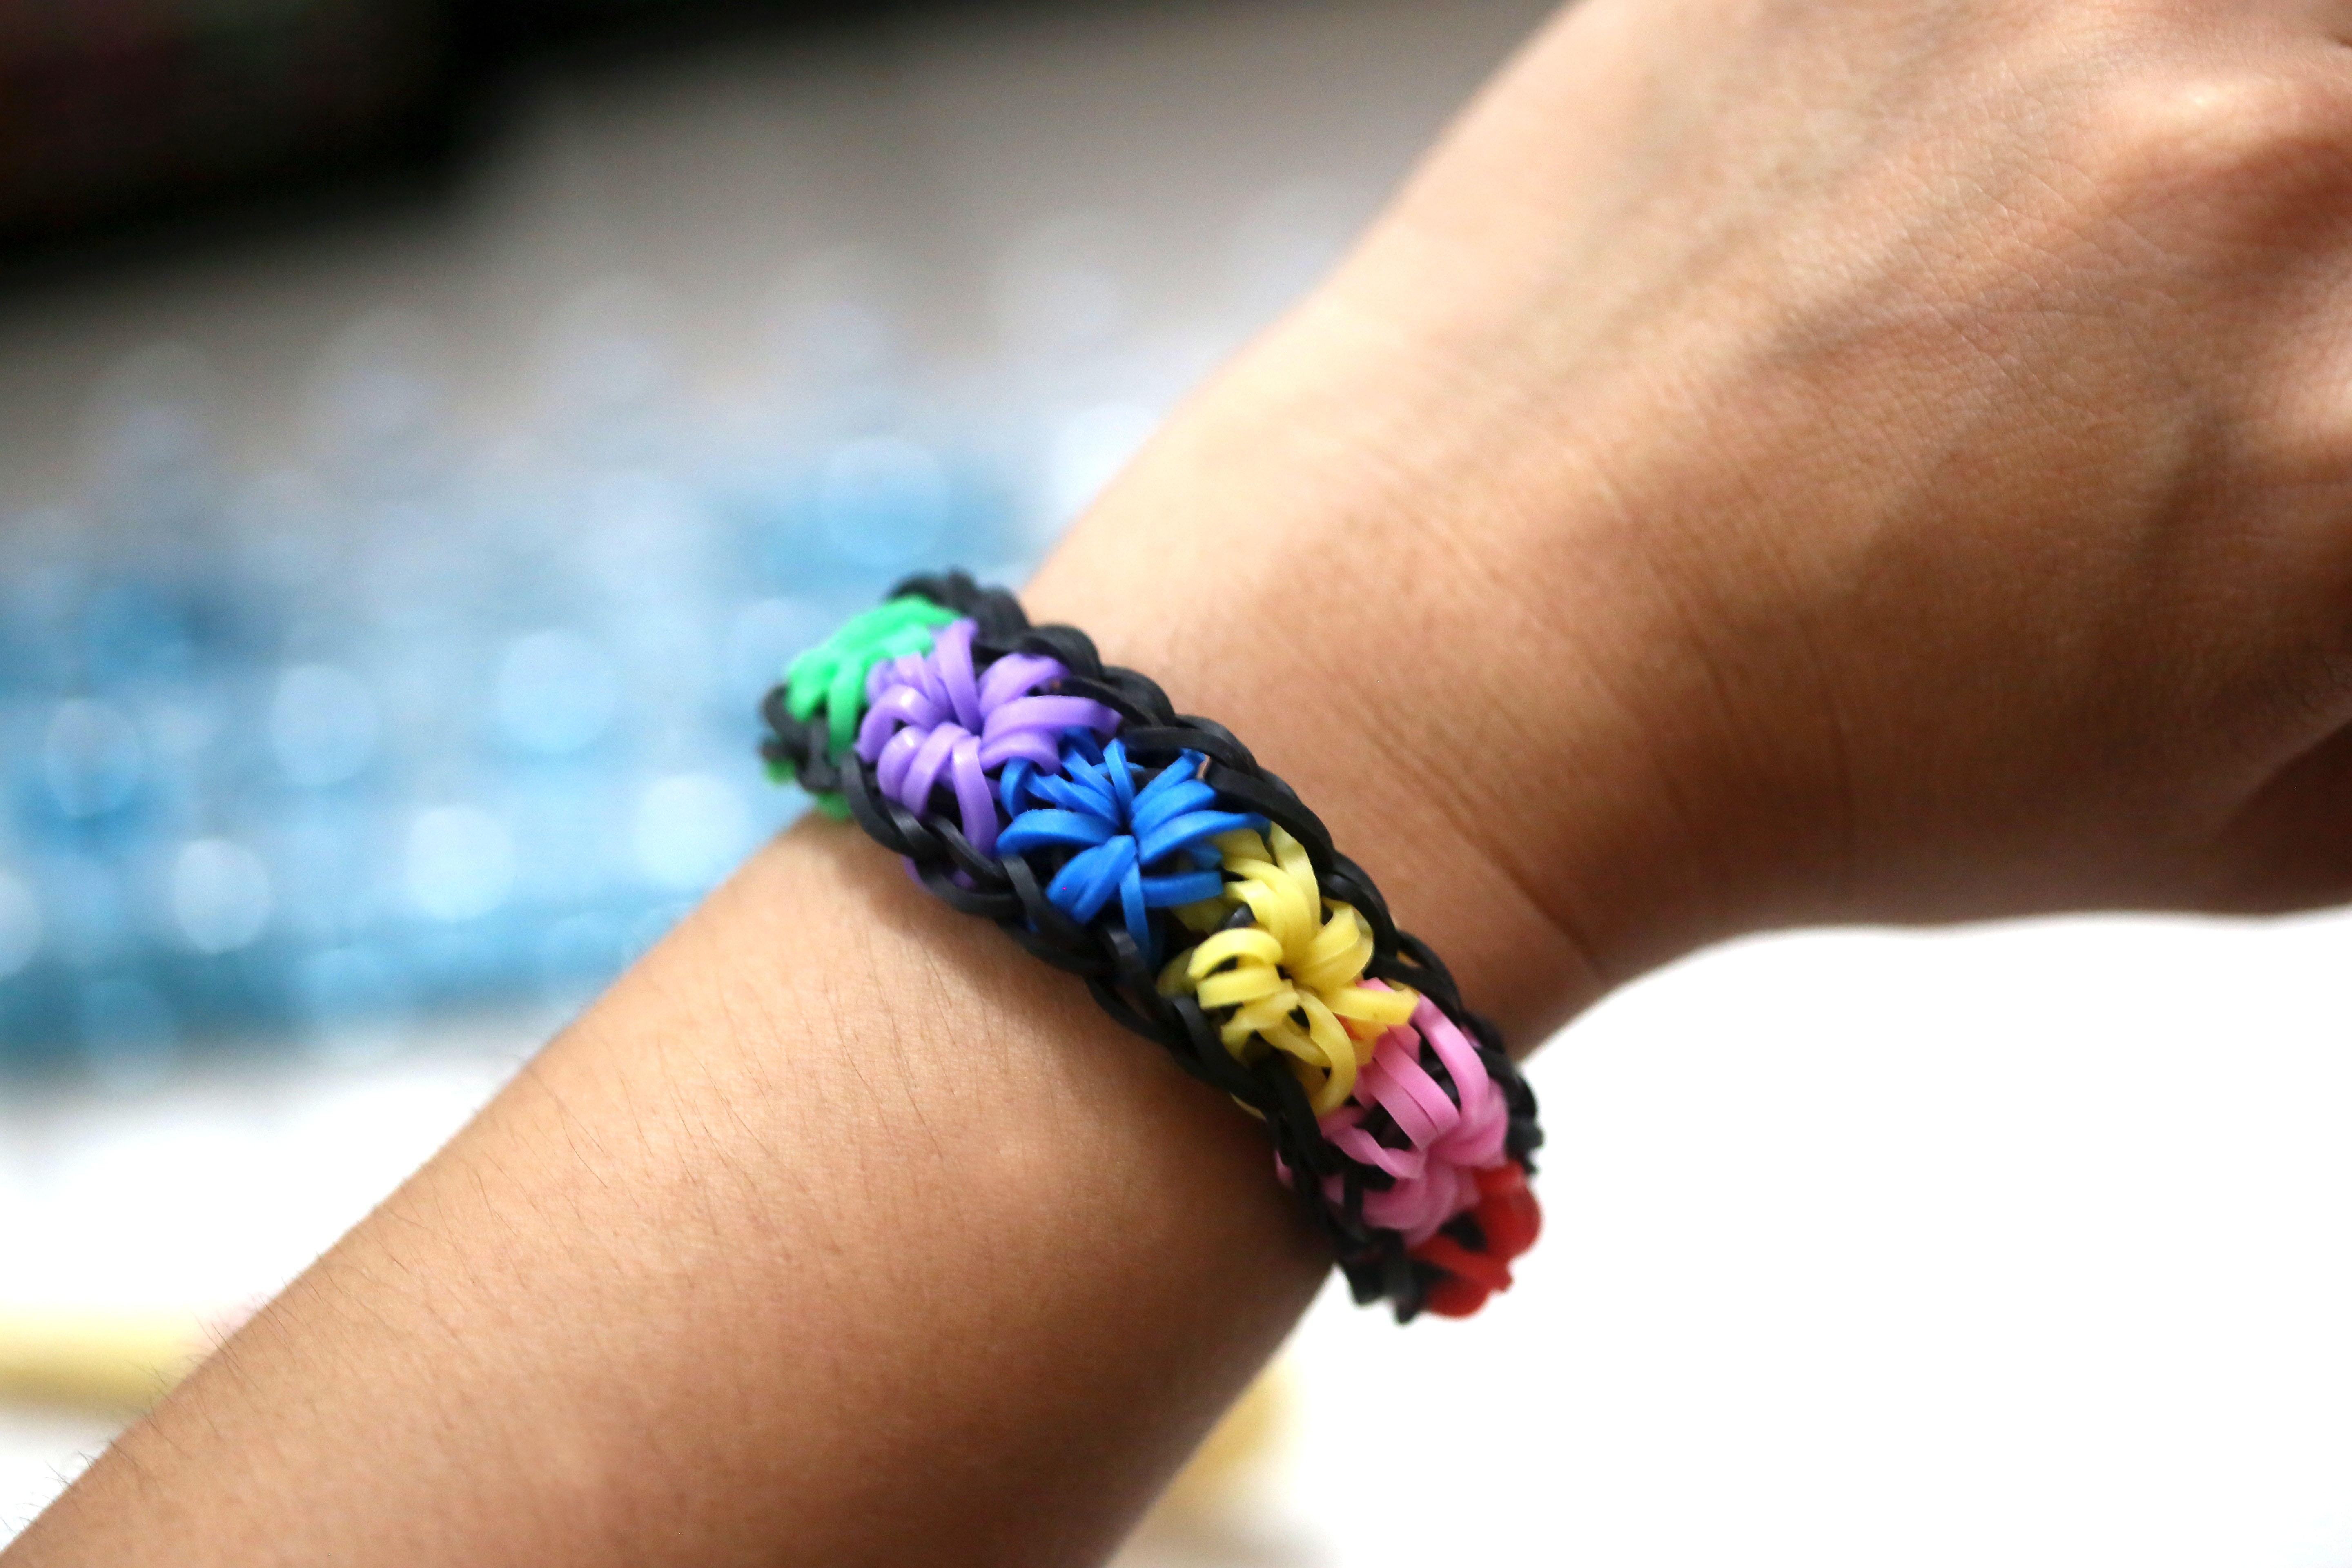

Some bracelets whisper, “I made this during a calm afternoon.” A Starburst bracelet announces, “I wrestled tiny rubber bands into a galaxy and won.” If you have a Rainbow Loom, a hook, a clip, and a pile of colorful loom bands that seem to multiply every time you blink, this project is one of the most satisfying designs you can make.
The Starburst bracelet is famous because it looks complicated in the best possible way. Each section forms a little flower-like burst, framed by a neat border. It is bright, stretchy, giftable, and dramatic enough to make your wrist look like it just joined a parade. Better yet, once you understand the rhythm of placing, capping, looping, and extending, the process becomes much less mysterious.
This guide walks you through how to make a Starburst bracelet using the Rainbow Loom step by step, with practical tips, troubleshooting advice, color ideas, and real experience from making the pattern. The design is best for crafters who already know a basic single bracelet or fishtail bracelet, but a patient beginner can absolutely learn it. Tiny bands, big victory.
What Is a Starburst Rainbow Loom Bracelet?
A Starburst bracelet is a rubber band bracelet made on a Rainbow Loom using repeated circular clusters. Each cluster starts from a center peg and stretches outward like a star, flower, sunburst, or cheerful little firework. A border runs around the outside, holding everything together and giving the bracelet its finished shape.
Compared with a basic Rainbow Loom bracelet, the Starburst bracelet uses more bands and more careful looping. The trickiest part is not brute force; it is order. The bands must be placed in the correct direction, capped properly, and hooked in a sequence that keeps the pattern from falling apart. Think of it like making pancakes: easy once you know when to flip, messy if you panic.
Supplies You Need
Before you start, gather everything in one place. Nothing ruins creative momentum like hunting for a C-clip under the table while your loom sits there looking judgmental.
- One Rainbow Loom or compatible loom with three rows of pegs
- One Rainbow Loom hook or sturdy plastic hook
- One C-clip or S-clip
- About 27 bands for the outside border
- About 36 bands for the starburst centers, usually 6 bands per burst
- Several extra bands for the extension chain
- A flat, well-lit workspace
For a classic look, use white, black, clear, or navy bands for the border and rainbow colors for the bursts. If you want a softer style, try pastel pink, lavender, mint, and pale yellow. For a bolder bracelet, use a black border with neon bursts. The Starburst pattern loves contrast. It is basically the bracelet version of showing up overdressed and being completely right.
Before You Begin: Set Up the Loom Correctly
Place your loom on the table with the arrow pointing away from you. This matters. The arrow direction controls how the bands sit on the pegs and how they are later pulled through. If the loom faces the wrong way at the start, the bracelet may still look okay for a few minutes, but the looping step will become a tiny rubber-band mystery novel with no satisfying ending.
Push each band down the peg as you work. The Starburst bracelet has several layers, and crowded pegs are normal. However, bands sitting too high can slip off, twist strangely, or block the hook. A small push after each section keeps the loom tidy and saves you from muttering things a craft article should not print.
Step-by-Step Guide: How to Make a Starburst Bracelet Using the Rainbow Loom
Step 1: Make the Outside Border
Start at the bottom center peg. Place one border band from the bottom center peg to the first peg on the lower right row. Continue placing border bands up the right side of the loom, moving from peg to peg until you reach the top. Then place a band from the last right-side peg to the top center peg.
Now repeat the same idea on the left side. Start again from the bottom center peg and work up the left side peg by peg, finishing at the top center peg. You should now have a long pointed oval or leaf shape around the loom. This border will frame the starbursts and keep the bracelet wearable instead of becoming modern art for your carpet.
Step 2: Create the First Starburst Cluster
Choose the color for your first burst. Place one band from the center peg of the first cluster to the peg directly above it on the right side. Then place the next bands around the center peg in a clockwise pattern. Each band should stretch from the center peg outward to one surrounding peg.
A typical Starburst cluster uses six bands. Imagine the center peg as the middle of a clock and place bands outward around it. Keep the order consistent for each star. The goal is to create a flower or burst shape with all bands meeting at the center.
After the first cluster is complete, move to the next center peg and repeat the same pattern. Continue up the loom until you have a row of starbursts inside the border. Depending on your loom setup and bracelet size, you will usually make six bursts.
Step 3: Add Capping Bands
Take one border-colored band and twist it into a figure eight. Fold it over itself to make a small double loop. Place this capping band on the center peg of the first starburst. Repeat this on the center peg of every starburst cluster.
Capping bands are small but mighty. They hold the center of each burst in place while you hook the bands back out. Without them, the starburst may loosen or collapse. If this is your first time making the pattern, use a contrasting color for the capping bands so you can see them clearly. Your future self will send you a thank-you card.
Step 4: Turn the Loom Around
Once all starbursts and capping bands are placed, turn the loom so the arrow points toward you. This is the moment when the project changes from placing bands to hooking bands. Do not skip the turn. The hook needs to enter the pegs from the correct direction so it can grab the lower bands and pull them back to their original pegs.
Step 5: Loop the Starbursts
Start with the first starburst closest to you. Insert the hook into the center peg, carefully passing through the capping band. Grab the bottom band that belongs to the first outside peg and pull it back over the center peg to that outside peg. Continue around the starburst in order, pulling each band from the center back to its matching outside peg.
Work slowly. The bands are layered, and grabbing the wrong one can distort the pattern. If a band resists, do not yank it like you are starting a lawn mower. Ease the hook under the correct band, lift gently, and guide it over. Repeat for every starburst cluster until all the bursts have been looped.
Step 6: Loop the Border
After the starbursts are hooked, loop the outside border. Start at the bottom center peg. Reach inside the peg, grab the lower border band, and pull it forward to the next peg along the side. Continue up one side of the border until you reach the top center peg. Then return to the bottom center peg and repeat the process along the other side.
The border should form a chain around the starbursts. This is where the bracelet starts to look less like a loom full of spaghetti and more like something you proudly made on purpose.
Step 7: Secure the Top Band
At the top center peg, insert your hook through all the bands on that peg. Place a fresh border band on the hook and pull it through the stack. Keep both ends of that fresh band on the hook. This creates a temporary holding loop, which keeps the bracelet from unraveling when you remove it from the loom.
Step 8: Remove the Bracelet Carefully
Hold the loom steady with one hand and use the hook to gently lift the bracelet off the pegs. Move slowly from top to bottom. The bracelet will look bunched up at first, which is normal. Once it is fully off the loom, stretch it lightly between your fingers. The starbursts will relax into shape like they just had a spa day.
Step 9: Make the Extension Chain
Most Starburst bracelets need an extension to fit comfortably around the wrist. Place several border-colored bands in a simple chain on the loom. The number depends on wrist size, but 5 to 8 bands is a common range.
Attach the loose end of the Starburst bracelet to the first peg of the extension chain. Loop the extension bands forward one by one, then attach a C-clip or S-clip to the final loop. Connect the clip to the other end of the bracelet. Try it on gently. It should fit snugly without squeezing your wrist like it is trying to win an arm-wrestling contest.
Color Combination Ideas
The Starburst bracelet is one of the best Rainbow Loom designs for experimenting with color. Because each starburst is its own mini-pattern, you can create a very different mood with the same basic steps.
Rainbow Classic
Use a white border and make each burst a different rainbow color: red, orange, yellow, green, blue, and purple. This is the classic “look what my loom can do” version.
Galaxy Style
Use a black or dark blue border with purple, teal, silver, and glow-in-the-dark bands. The result looks like a tiny wearable space party.
Candy Shop
Try a clear or pastel border with pink, mint, lemon, peach, and lavender starbursts. It gives the bracelet a sweet, soft look without requiring actual candy, which is good because rubber bands are not snacks.
School Spirit
Use school colors for the bursts and a neutral border. This makes a fun friendship bracelet, team accessory, or handmade gift for classmates.
Common Mistakes and How to Fix Them
The Bracelet Falls Apart When Removed
This usually means one or more bands were not looped correctly, or the final holding band was not pulled through all the top bands. Before removing the bracelet, check that every starburst has been looped back outward and both sides of the border are chained to the top center peg.
The Starbursts Look Twisted
Twisting often happens when bands are placed in different directions from one cluster to the next. Keep a consistent clockwise placement order. Also make sure the bands are not accidentally crossed over the wrong peg.
The Hook Keeps Catching the Wrong Band
Push bands down as you place them, and use the hook tip to separate layers before pulling. Good lighting helps more than you might expect. A shadowy workspace turns tiny bands into tiny ninjas.
The Bracelet Is Too Short
Add a longer extension chain. The Starburst section is decorative, while the extension controls the final fit. If you are making the bracelet as a gift, leave the extension slightly longer and adjust after the person tries it on.
Safety and Comfort Tips
Rainbow Loom bracelets are fun, but the bands are small. Keep loose rubber bands away from toddlers and pets, and store them in a container with a lid. If someone has sensitive skin or possible latex concerns, use caution, remove the bracelet if irritation appears, and choose bands from reputable sources.
Do not overstretch the bands while placing or removing them. Rubber bands under tension can snap, and nobody wants a surprise wrist zing during craft time. Work gently, replace old or brittle bands, and avoid wearing a bracelet that feels too tight.
Why the Starburst Bracelet Is Worth Learning
The Starburst bracelet is not the fastest Rainbow Loom project, and that is part of its charm. It teaches pattern planning, patience, sequencing, and hand-eye coordination. Every burst depends on the one before it, so the maker learns to slow down and pay attention. That is a pretty good life lesson hiding inside a pile of neon bands.
It is also a great project for creativity. You can make two bracelets with the exact same instructions and end up with completely different personalities. One may look like a summer carnival. Another may look like a galaxy. Another may look like a birthday cake that learned gymnastics. The structure stays the same, but the color choices make it yours.
Extra Experience: Real-World Tips From Making a Starburst Bracelet
The first time you make a Starburst Rainbow Loom bracelet, expect a little confusion. That does not mean you are bad at crafting. It means the pattern has layers, and layers require patience. The biggest lesson is to slow down during setup. Most Starburst problems begin before the hook ever touches the bands. If one star is placed out of order, the mistake may not show until the looping stage. By then, the loom is already full, the bands are stacked like rush-hour traffic, and your hook suddenly feels like a fishing rod in a bowl of noodles.
One helpful habit is to finish one complete starburst cluster before starting the next. Do not place half of one burst, then jump to another color, then return later unless you enjoy detective work. Choose the color, place all six bands around the center peg, push them down, and then move on. This creates a clean rhythm: choose, place, push, repeat. After two or three clusters, your hands begin to remember the motion.
Another useful experience is learning how much tension is enough. Beginners often stretch the bands too hard because they want everything to look secure. The problem is that overstretched bands can become thin, weak, or more likely to snap. A band should reach the peg comfortably. If it feels like you are negotiating with it, use a fresher band. Old bands, dry bands, or low-quality bands can break at the worst moment, usually after you have done 90 percent of the work. Very dramatic. Very unnecessary.
Color planning also matters more than expected. Random colors can look fun, but the Starburst design shines when the border and bursts contrast. A white border makes rainbow colors pop. A black border makes neon colors glow. A clear border gives the bracelet a light, glassy effect. If you use similar shades for everything, the starbursts may disappear into the background. The bracelet will still function, but the pattern will be shy. Starbursts are not meant to be shy.
When removing the bracelet from the loom, use both patience and confidence. Pulling too quickly can stretch or twist the design. Pulling too timidly can make the bracelet snag on every peg. The best method is to hold the securing loop on your hook, lift one section at a time, and let the bracelet release gradually. Once it is off, gently stretch the bracelet lengthwise and sideways. This helps the starbursts settle and makes the border look more even.
If you are teaching a child or younger beginner, do not start by demanding perfection. Let the first bracelet be a learning bracelet. Maybe one burst looks like a star and another looks like it woke up late. That is fine. The second bracelet will be cleaner, and the third will feel much easier. Rainbow Loom crafting rewards repetition. Each try builds better finger control, better sequencing, and better pattern awareness.
Finally, the Starburst bracelet makes an excellent handmade gift because it looks more advanced than many simple loom bracelets. Add the recipient’s favorite colors, school colors, team colors, or birthday colors. A handmade bracelet carries a small message: “I spent time making this for you, and also I survived the capping bands.” That is friendship, craft edition.
Conclusion
Learning how to make a Starburst bracelet using the Rainbow Loom is a little like learning a magic trick. At first, the bands look like chaos. Then you follow the order, loop the layers, pull the bracelet from the loom, and suddenly there it is: a bright chain of tiny starbursts that looks far more impressive than the pile of rubber bands you started with.
The key is preparation. Set the loom in the right direction, build a clean border, place each starburst carefully, use capping bands, loop slowly, and finish with a comfortable extension chain. Once you understand the basic structure, you can customize the design endlessly with different colors, borders, and themes. Whether you make one bracelet or accidentally become the neighborhood loom-band supplier, the Starburst pattern is a classic worth mastering.