
Halloween decorations do not have to shriek, drip fake blood, or require their own storage unit in November. Sometimes the best projects are the ones that make guests smile before they even notice the candy bowl. Cute mummy candle holders fit that description perfectly: they are inexpensive, beginner-friendly, easy to personalize, and wonderfully forgiving. A crooked bandage is not a mistake; it is mummy character development.
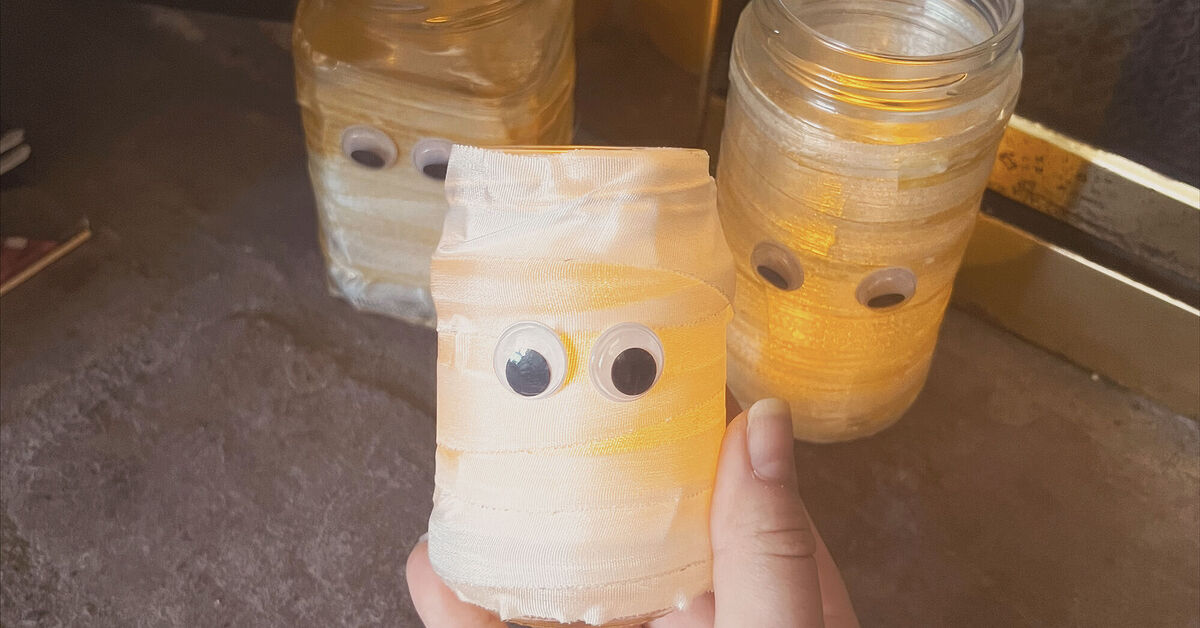
The basic idea is simple. Wrap a clean glass jar with gauze, add expressive eyes, and place a battery-operated tea light inside. The layered fabric softens the glow and creates the appearance of ancient bandages without turning your craft table into an archaeological excavation. A few finished jars can decorate a mantel, brighten a Halloween buffet, line a staircase, or greet trick-or-treaters from a sheltered porch.
This tutorial explains how to make sturdy mummy jar lanterns, avoid common problems, and create a whole cast of glowing characters. It also includes practical lessons learned from making several at oncebecause one mummy is a decoration, while seven mummies are apparently a neighborhood committee.
Why This Easy Halloween Craft Works
Mummy candle holders combine low cost, high visual impact, and almost no need for precision. Recycled jam jars, pasta-sauce jars, baby-food jars, or smooth canning jars can all become Halloween luminaries. White gauze naturally resembles mummy bandages, while a flickering LED light makes the eyes appear animated.
This project works well for family craft sessions, classroom activities, Halloween parties, and adult craft nights. Children can help position eyes and wrap gauze with supervision, while adults handle glass, scissors, strong adhesive, or hot-glue tools.
The secret is to avoid making every bandage perfectly straight. Uneven overlaps, diagonal strips, small gaps, and slightly frayed edges create far more personality than rows that look as though they were measured with a ruler.
Materials and Tools
- Clean glass jars with wide openings
- White cotton gauze rolls, cheesecloth, or narrow muslin strips
- Large googly eyes or flat plastic craft eyes
- Clear-drying adhesive suitable for glass and fabric
- Scissors
- A small paintbrush or foam brush
- Rubbing alcohol and a lint-free cloth
- Battery-operated LED tea lights
- Optional beige or brown craft paint
- Optional twine, ribbon, miniature spiders, tags, or charms
- A protective table covering
Smooth jars are easiest to wrap, although jars with raised logos can still work. A wide opening makes the LED switch easier to reach. Most importantly, use flameless tea lights rather than real candles. Gauze, glue, ribbon, and other craft materials can burn, so an LED provides the cozy flicker without creating a tiny fire-breathing pharaoh.
Prepare the Jars Before Wrapping
Remove Labels and Sticky Residue
Soak the jars in warm, soapy water until the labels loosen. Scrape away the paper with a plastic scraper or an old gift card. Remove stubborn adhesive with rubbing alcohol or a suitable label remover, then wash and dry the jar again.
Clean the Outside Surface
Wipe the glass with rubbing alcohol and a lint-free cloth. This removes dust, fingerprints, and oily residue that could weaken the bond between the jar, glue, and gauze. Allow the glass to dry completely before decorating it.
Inspect the Glass
Check every jar for cracks, chips, or sharp edges. Recycle damaged glass instead of disguising it with gauze. Bandages may repair cartoon mummies, but they cannot make compromised glass safe.
How to Make Cute Mummy Candle Holders
Step 1: Decide Where the Face Goes
Hold two eyes against the front of the jar and test their position. Eyes placed slightly above the midpoint usually look balanced and remain easy to see after wrapping. Set them too low and the mummy looks sleepy; set them too high and it looks as though it just opened the October electric bill.
You can glue the eyes on before wrapping and tuck the gauze around them, or wrap most of the jar first and attach the eyes afterward. The first method creates a buried-in-bandages appearance. The second makes the eyes more prominent.
Step 2: Anchor the Gauze
Apply a thin line or several small dots of glue near the bottom of the jar. Press the end of the gauze into the adhesive and hold it briefly. Avoid covering the entire jar with a thick coat of glue. Excess adhesive can soak through the fabric, create shiny spots, and extend the drying time.
Hot glue sets quickly but may form visible lumps beneath thin gauze. A clear tacky craft adhesive gives beginners more time to adjust the material. Whichever product you choose, follow its label directions.
Step 3: Wrap the Jar
Wind the gauze around the jar using light, even tension. Overlap the passes enough to diffuse the light, but leave occasional narrow gaps so the lantern can glow. Change direction once or twice and cross a few strips diagonally. Controlled messiness creates a better mummy than perfectly spaced horizontal rows.
Keep the gauze below the rim and outside the jar. Do not stuff fabric into the opening. A clean rim makes the project look finished and keeps the LED light easy to remove.
Use one loose layer for a brighter lantern or two layers for a softer glow. Hold the jar near a lamp while wrapping to estimate how much light will pass through the fabric.
Step 4: Reveal the Eyes
When you reach the face, guide the gauze above and below the eyes. A narrow strip crossing one corner of an eye can look funny and expressive. Covering both pupils completely, however, gives your mummy the navigation skills of a wrapped potato.
If you have not attached the eyes yet, leave a small exposed area of glass. Glue them in place after wrapping, then add a short strip over their edges to make them appear tucked into the bandages.
Step 5: Secure the Final Strip
Cut the gauze and secure the end with a small amount of glue. Tuck it beneath an overlapping layer when possible. Trim long threads, but leave a few short frayed edges for texture.
Check the bottom of the jar before the adhesive dries. No fabric should be bunched underneath it, since the completed mummy candle holder needs to sit flat and stable.
Step 6: Let the Adhesive Dry
Place the holder upright on a protected surface and let the adhesive dry according to the manufacturer’s instructions. Moving the gauze too soon may loosen the wrap, smear glue, or send one googly eye sliding south in search of a warmer climate.
Step 7: Add the Flameless Light
Switch on a battery-operated tea light and place it inside the jar. Dim the room lights and inspect the result. Add another short strip if the glow is too bright, or spread the gauze fibers slightly if the face looks hidden.
Warm-white LEDs create a cozy amber glow. Cool-white LEDs make the mummy look more ghostly, while color-changing lights are perfect for playful children’s parties. They may also make your mummy look as though it has joined a very small disco.
Cute Mummy Candle Holder Variations
Create a Mummy Family
Use jars in several sizes and give each one a different expression. A tall jar can be the dramatic parent, a squat jar can be the suspicious uncle, and tiny jars can become the children who definitely know what happened to the missing candy.
Age the Bandages
Dilute a little beige or brown craft paint with water and lightly dab it onto the gauze. Let the fabric dry before wrapping. Keep the color uneven and subtle. Too much brown can make the mummy look less ancient and more like it lost an argument with a coffee maker.
Add More Personality
Angle the eyes, mix eye sizes, or place one eye slightly higher than the other. Add paper eyebrows, a felt hat, a bow, a name tag, or a miniature spider. Small details can turn a simple DIY mummy candle holder into a memorable Halloween character.
Use Cheesecloth for a Ragged Look
Cheesecloth creates a loose, distressed texture and allows more light to pass through. Tear or cut it into strips before wrapping. Because the weave is open, apply adhesive sparingly and use lightweight, flat-backed eyes.
How to Display Mummy Jar Lanterns
Arrange three to five candle holders at different heights for a stronger visual effect. Place them on a mantel with miniature pumpkins, black paper bats, and LED string lights. Use them as a centerpiece around a candy bowl, or put one at each place setting during a Halloween dinner.
On a sheltered porch, position the jars where visitors can see them without kicking or brushing against them. Keep them out of rain unless every component is rated for outdoor use. Indoors, avoid unstable edges and crowded walkways where pets, costumes, or candy-powered children might knock them over.
These lanterns also make inexpensive party favors. Let guests decorate their own mummy, add a name tag, and take it home. It is an activity, decoration, and favor in onethe crafting equivalent of finding a full-size chocolate bar in your trick-or-treat bag.
Common Problems and Quick Fixes
The Gauze Keeps Sliding
The glass may still be oily, the starting edge may be loose, or the gauze may be wrapped without enough tension. Clean the jar again, anchor the first strip firmly, and add tiny dots of glue every few inches.
The Glue Shows Through
Use less adhesive and hide glue dots beneath overlapping strips. Many clear-drying glues look cloudy while wet, so let the project cure before deciding that your mummy has developed mysterious ectoplasm.
The Eyes Fall Off
Use a multi-surface adhesive compatible with the eye material, fabric, and glass. Let the bond cure completely before moving or displaying the holder.
The Light Is Too Dim
Remove one layer of gauze, loosen the weave, or use a brighter LED tea light. Leave a few narrow spaces between the wraps, especially around the face.
The Mummy Looks Too Neat
Add a diagonal strip, loosen one section, or layer a torn piece over the existing wrap. This may be the only decorating project where “I eyeballed it” is both a method and a theme.
Important Safety Tips
Use battery-operated LED lights only. Do not place a real tea light, votive candle, or other open flame inside a gauze-covered jar. Keep the holders on stable surfaces and away from water, heaters, curtains, paper decorations, and busy walking paths.
Follow the LED manufacturer’s directions and keep coin-cell batteries and battery compartments away from small children. Turn the lights off when the display is unattended. Adults should supervise children working with scissors, glass, strong adhesives, or hot-glue tools.
Experience Notes: What I Learned Making a Mummy Crowd
Making one mummy candle holder is quick. Making a dozen reveals which small choices actually matter. The first lesson is to prepare every jar before opening the glue. Removing labels, cleaning the glass, cutting starter strips, and pairing the eyes in advance turns the project into a smooth assembly line. Doing everything one jar at a time creates repeated interruptions and increases the chance of wrapping gauze over a fingerprint, a glue smear, or an impressive patch of forgotten pasta-sauce label.
I also learned that the cheapest gauze is not always the easiest gauze. Very thin medical gauze can stretch into a narrow cord when pulled, while stiff decorative mesh may refuse to follow the curve of the jar. Soft cotton gauze with a little body usually wraps neatly without looking neat, which is exactly the strange target. Cheesecloth produces wonderful texture, but cutting it releases threads everywhere. By the fourth jar, the table may look as though a ghost groomed a long-haired cat on it.
The best-looking mummies were not the most carefully wrapped. My first attempt had evenly spaced horizontal bands and looked less like an ancient monster than a jar wearing a sensible winter sweater. Better versions included diagonal passes, uneven overlaps, and open areas around the eyes. I stopped trying to make identical decorations and gave each jar a mood. One had wide eyes and looked startled. Another had half-covered eyes and looked exhausted. A third had mismatched eyes and looked qualified to manage the snack table.
Eye placement mattered more than expected. Before gluing, I positioned the eyes temporarily and viewed the jar from several feet away. Details that seem obvious at arm’s length can disappear once the lantern joins a larger display. Large eyes generally show up better through gauze and low light. Flat-backed eyes also stayed attached more reliably than bulky novelty eyes.
Testing the glow during the wrapping stage was another useful habit. One layer looked better in a bright room, but two loose layers created a richer nighttime effect. Warm LEDs gave the mummies a friendly amber tone, while cool LEDs made them appear more spectral. Warm light worked best for a family party; cool light won for a haunted hallway.
The most practical discovery was to keep the bottom and rim tidy. Gauze under the base makes a jar wobble, and fabric over the rim complicates access to the light switch. Trimming those areas produced a stable candle holder without sacrificing the ragged texture on the sides.
Finally, groups are far more effective than single jars. Three mummies create a scene; seven create a committee. Varying jar height, eye size, and bandage direction makes an inexpensive collection look thoughtfully designed. The finished display feels playful during the day and surprisingly atmospheric after dark. Better still, the process is forgiving enough for children, beginners, and perfectionists in recovery to make something worth displaying.
Conclusion
Cute mummy candle holders prove that memorable Halloween decor can be simple, inexpensive, and safe. With clean jars, gauze, expressive eyes, suitable adhesive, and LED tea lights, you can create a glowing group of characters in one craft session. Embrace uneven wrapping, test the light as you work, and let every mummy develop a personality. The result is a reusable decoration that looks charming on a mantel, party table, window, or sheltered porchno curse, sarcophagus, or advanced craft degree required.