
Note: This article is written in original, publish-ready American English and is based on practical pegboard organization methods commonly recommended by reputable U.S. home improvement, garage storage, and DIY workshop resources.
If your garage currently looks like a hardware store sneezed, you are not alone. Tools have a sneaky way of multiplying in drawers, hiding behind paint cans, and turning every “quick fix” into a 20-minute treasure hunt for the one screwdriver you swear you just saw yesterday. That is exactly where a pegboard earns its superhero cape.
A pegboard tool organizer is one of the simplest, most affordable, and most flexible ways to bring order to a garage, shed, basement workshop, utility room, or craft corner. Instead of stuffing hammers, pliers, wrenches, tape measures, and drill bits into random boxes, you hang them where you can see them. Suddenly, your tools stop playing hide-and-seek, and your wall becomes a clean, vertical command center.
The best part? You do not need a massive workshop or a professional contractor’s tool collection. A pegboard works for weekend DIYers, renters, gardeners, crafters, woodworkers, homeowners, and anyone who has ever muttered, “Where did I put that Allen wrench?” This guide explains how to organize tools with a pegboard from start to finish, including how to choose the right board, plan your layout, install accessories, arrange tools by purpose, and keep everything neat long after the first burst of organizing excitement fades.
Why Use a Pegboard for Tool Organization?
A pegboard is popular because it solves three common tool storage problems at once: clutter, visibility, and access. Traditional toolboxes are great for portability, but they can turn into mystery drawers if everything lands in one pile. Shelves hold bulky items well, but small hand tools can get lost in bins. A pegboard uses vertical wall space, which is often the most underused storage area in a garage or workshop.
When tools hang on the wall, you can scan your collection in seconds. Need a wrench? It is right there. Need your level? Still hanging proudly where it belongs. Need the hammer? If it is missing, the empty space practically tattles on whoever borrowed it. This visible storage system saves time, reduces frustration, and helps prevent buying duplicates because you forgot you already owned three tape measures.
Pegboards are also customizable. You can move hooks, shelves, baskets, holders, and bins whenever your tool collection changes. Today, your pegboard may hold basic household tools. A year from now, it might support gardening tools, painting supplies, woodworking clamps, battery chargers, and a small army of screwdrivers. Unlike a fixed cabinet, a pegboard can evolve with your projects.
Choose the Right Pegboard for Your Tools
Before you start hanging tools, choose a pegboard that matches your space, budget, and tool weight. Not all pegboards are created equal. Some are perfect for lightweight hand tools, while others are better for heavy-duty garage storage.
Hardboard Pegboard
Traditional hardboard pegboard is the classic brown or white panel many people picture when they think of garage organization. It is affordable, easy to cut, and widely available. It works well for screwdrivers, pliers, measuring tapes, paintbrushes, scissors, small clamps, and lightweight hand tools. If you are organizing a basic home toolkit, hardboard is usually enough.
The downside is that hardboard can warp in damp areas and may not hold heavy tools as well as metal. If your garage is humid or your tools are chunky enough to qualify as gym equipment, consider a stronger option.
Metal Pegboard
Metal pegboard is a strong choice for garages and workshops. It resists warping, handles more weight, and often comes in panels that mount directly to studs or wall framing. Many metal pegboard systems also include slots, hooks, shelves, and brackets made specifically for heavier tools.
Metal panels cost more than basic hardboard, but they are durable and attractive. If your pegboard will hold cordless drills, socket sets, large wrenches, heavy pliers, garden tools, or workshop accessories, metal is worth considering.
Plastic Pegboard
Plastic pegboard is lightweight, moisture-resistant, and useful in laundry rooms, craft rooms, sheds, and small work areas. It is not always the best choice for heavy tools, but it can be excellent for lighter supplies such as tape, safety glasses, small hand tools, gloves, cords, and cleaning accessories.
Custom Wood Pegboard
A custom wood pegboard, sometimes made with larger holes and wooden dowels, can be both practical and stylish. This option works especially well in modern workshops, home offices, craft rooms, and multipurpose spaces where you want storage that looks intentional rather than purely utilitarian.
Plan Your Pegboard Layout Before You Install It
Good pegboard organization starts before the first screw goes into the wall. The biggest mistake people make is mounting the board first and planning later. That is how you end up with the hammer in a great spot and the drill charger dangling like a sad little chandelier.
Start by gathering all the tools you want to organize. Lay them on a table, the floor, or a workbench. Sort them into groups: measuring tools, cutting tools, fastening tools, gripping tools, electrical tools, painting tools, gardening tools, and frequently used items.
Next, think about how you actually work. If you do small home repairs, keep the basics at eye level: hammer, screwdriver set, tape measure, pliers, utility knife, level, and adjustable wrench. If you do woodworking, you may want clamps, squares, chisels, sanding blocks, and pencils near the workbench. If the pegboard is for garden tools, arrange pruning shears, gloves, twine, hand trowels, plant labels, and spray bottles together.
A pegboard should follow your workflow, not just look pretty. Pretty is nice. Functional pretty is better. That is the organizing equivalent of finding a parking spot right by the entrance.
Install the Pegboard the Right Way
A pegboard needs space behind it so hooks can fit through the holes. If you mount a standard hardboard pegboard flat against the wall, most hooks will not sit correctly. Use furring strips, spacers, or a frame behind the board to create a gap.
Basic Installation Steps
- Choose the location: Pick a wall near your workbench, garage entry, potting bench, or main project area.
- Find the studs: Use a stud finder so the board is securely attached to the wall structure.
- Add furring strips: Attach wood strips horizontally or vertically to the wall, ideally anchored into studs.
- Mount the pegboard: Screw the pegboard into the furring strips, keeping it level.
- Test the hooks: Insert a few hooks to confirm there is enough room behind the board.
- Add accessories: Install hooks, baskets, shelves, bins, brackets, and tool holders based on your layout.
If you are installing a metal pegboard system, follow the manufacturer’s instructions carefully. Some metal panels are designed with built-in flanges or standoff edges, so they do not need separate furring strips. Always check weight limits, especially if you plan to hang power tools or heavy equipment.
Organize Tools by Category
Once the board is ready, organize your tools in zones. This is where the magic happens. Instead of sprinkling random tools across the board like confetti, create specific areas for each type of item.
Hand Tool Zone
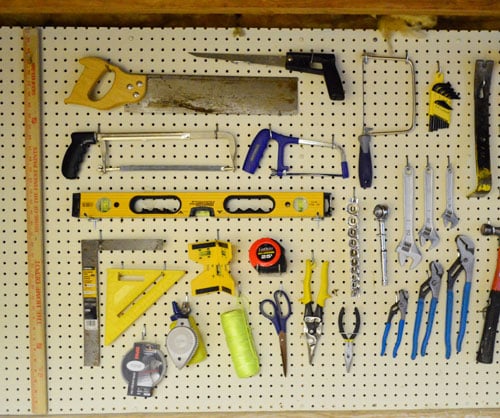
Keep everyday hand tools in the easiest-to-reach area. This zone can include hammers, screwdrivers, pliers, adjustable wrenches, hex keys, wire cutters, and utility knives. Arrange similar tools together and place the most frequently used pieces at eye level.
Measuring and Marking Zone
Group tape measures, rulers, levels, squares, pencils, chalk lines, and marking tools together. This makes layout work faster and helps prevent your tape measure from wandering into another dimension.
Power Tool Zone
Power tools can be stored on heavy-duty hooks, shelves, or brackets. Cordless drills, impact drivers, sanders, and small saws may fit well on sturdy shelves attached to the pegboard. Keep batteries and chargers nearby, but avoid overloading basic hooks.
Fastener and Hardware Zone
Small bins or clear cups are perfect for screws, nails, wall anchors, washers, zip ties, picture hangers, and other tiny items that love to scatter. Label each bin clearly. Nothing ruins momentum like opening six containers to find one drywall anchor.
Painting and Finishing Zone
If you paint or stain often, use pegboard hooks and baskets for brushes, rollers, painter’s tape, sanding sponges, scrapers, and drop cloth clips. Keep liquids such as paint, stain, and solvents on shelves or in cabinets rather than hanging them on the board.
Gardening Zone
A pegboard in a shed or garage can hold hand trowels, pruners, gloves, plant ties, seed packets, small watering accessories, and garden scissors. Add baskets for twine, labels, and plant clips. Larger long-handled tools may need wall-mounted hooks beside the pegboard instead of on it.
Use the Right Pegboard Accessories
Hooks are only the beginning. A well-organized pegboard usually combines several accessories to handle different shapes and sizes.
Single Hooks
Single hooks work well for tools with hanging holes, such as wrenches, scissors, pliers, and small hand tools. Use shorter hooks for lightweight items and longer hooks for tools that need more support.
Double Hooks
Double hooks provide more stability for hammers, mallets, small saws, and tools that tend to twist on single hooks. They are especially useful for heavier or awkwardly shaped items.
Baskets and Bins
Baskets are ideal for items that do not hang neatly, such as sanding blocks, gloves, tape rolls, extension cord accessories, safety glasses, and small clamps. Bins are better for hardware and small parts.
Shelves
Small shelves give you a place for chargers, jars, oils, glue bottles, and boxed accessories. Use shelves sparingly, though. If every inch of pegboard becomes a shelf, you have basically reinvented a cluttered bookcase with holes.
Specialty Holders
Look for pegboard holders designed for screwdrivers, sockets, drill bits, paper towel rolls, spray cans, and cordless tool batteries. Specialty accessories can make a pegboard feel custom-built without requiring advanced carpentry skills.
Arrange Tools by Frequency of Use
The golden rule of pegboard organization is simple: the more often you use it, the easier it should be to grab. Your hammer, tape measure, screwdriver, pliers, and utility knife should live in prime real estate. Seasonal or specialty tools can go higher, lower, or off to the side.
Think of your pegboard like a kitchen. You would not store your coffee mug behind the holiday roasting pan if you use it every morning. The same logic applies to tools. Daily and weekly tools belong at eye level. Occasional tools can take the less convenient spots.
Make a Shadow Board for Easy Maintenance
A shadow board is a pegboard layout where each tool has a clearly marked outline or label. You can trace around each tool with a marker, paint pen, or vinyl decal. When the tool is removed, the empty outline shows exactly where it belongs.
This method is especially helpful in shared garages, family workshops, small businesses, and busy DIY spaces. It prevents the classic “I put it somewhere safe” problem, which is usually code for “nobody will find it until next spring.”
If you do not want to trace outlines, use labels instead. Label zones such as “measuring,” “cutting,” “electrical,” “painting,” and “garden.” You can also label individual hooks for tools that frequently go missing.
Keep Heavy Tools Safe
Safety matters. A pegboard should make your workspace better, not turn your wrench collection into a wall-mounted avalanche. Always check the board material, hook strength, mounting method, and weight rating of accessories.
Heavy tools should hang from hooks attached to strong panels, preferably mounted into studs. For very heavy items, consider wall-mounted rails, dedicated brackets, cabinets, or shelving instead of relying on a basic hardboard pegboard. Store sharp tools with blades facing down or protected by covers. Keep hazardous items, chemicals, and anything dangerous for children in locked storage rather than open pegboard space.
Small Garage Pegboard Ideas
You do not need an enormous wall to make a pegboard useful. Even a small panel can transform a tight garage or apartment storage area.
- Mount a narrow pegboard above a workbench for essential hand tools.
- Use a pegboard inside a cabinet door for measuring tools and small accessories.
- Create a vertical drill station with hooks for tools and baskets for batteries.
- Add a mini pegboard near the garage door for dog leashes, flashlights, keys, and gloves.
- Install a pegboard over a potting bench for garden tools and seed supplies.
Small pegboards work best when they are focused. Do not try to store every tool you own on a tiny panel. Choose a theme, such as “quick repairs,” “bike maintenance,” “painting supplies,” or “gardening basics.”
Common Pegboard Organization Mistakes
Even a great pegboard can become messy if it is planned poorly. Avoid these common mistakes:
Hanging Everything You Own
A pegboard should display useful tools, not become a museum of every object that has ever entered your garage. If you have broken tools, duplicates, rusty mystery gadgets, or accessories for appliances you no longer own, let them go.
Ignoring Weight Limits
Not every hook can hold every tool. Match heavy items with heavy-duty hardware and secure mounting. When in doubt, use shelves or cabinets for bulky tools.
Forgetting Room to Grow
Leave a little empty space. Tool collections change, and a packed pegboard becomes hard to use. Empty space is not wasted space; it is breathing room for future projects.
Organizing by Looks Only
A perfectly symmetrical pegboard may photograph well, but it should also work well. Put tools where they make sense for how you move, build, repair, and clean.
How to Maintain Your Pegboard Tool Organizer
Once your pegboard is organized, build a quick maintenance habit. Spend five minutes at the end of each project returning tools to their spots. Wipe dusty tools before hanging them. Check hooks occasionally to make sure they are secure. Rework the layout if you notice that certain tools keep ending up on the workbench instead of the board.
A good pegboard is not frozen in time. It should adapt. If you start doing more plumbing projects, create a plumbing zone. If woodworking becomes your new weekend hobby, make space for clamps, squares, chisels, and sanding supplies. If you realize you own seven nearly identical screwdrivers and only use two, congratulations: you have discovered the decluttering bonus round.
Real-World Experience: What Actually Works When Organizing Tools With a Pegboard
After organizing tools with pegboards in real garages, sheds, and small workspaces, one lesson becomes obvious: the best pegboard is not the one with the most hooks. It is the one that matches your habits. A pegboard that looks amazing on day one but becomes chaotic by day ten is not really organized; it is just temporarily well-behaved.
One practical experience is to start with fewer tools than you think you need. Many people get excited, buy a giant pegboard accessory kit, and immediately hang everything from socket wrenches to old paint can openers. At first, it feels productive. Then the board becomes crowded, and the useful tools are buried among rarely used items. A better approach is to begin with the tools you reach for most: hammer, tape measure, level, pliers, utility knife, screwdrivers, adjustable wrench, safety glasses, and drill accessories. Once those have perfect homes, add secondary tools slowly.
Another useful tip is to place the pegboard close to the actual work area. A beautiful tool wall across the garage may look impressive, but if you must walk back and forth every two minutes, you will eventually leave tools on the bench. The most successful pegboard setups are usually above or beside a workbench, near the garage door for outdoor tools, or directly behind a potting table for gardening supplies. Convenience beats perfection every time.
Labels are also more helpful than people expect. At first, labeling a hammer spot may feel unnecessary. After all, it is a hammer, not a rare museum artifact. But labels help maintain the system when other people use the tools. Kids, spouses, roommates, neighbors, and helpful friends are more likely to return tools correctly when the board tells them where things belong. Labels also make it easier to spot missing tools before you start a project.
In small garages, vertical layering works well. Put the most-used tools between shoulder and waist height. Place lighter, occasional tools higher up. Use baskets lower down for gloves, sanding pads, tape, and cords. Keep sharp tools out of casual reach, especially if children visit the area. If the pegboard is in a shared household space, clean lines and simple categories make the setup easier for everyone to respect.
Another experience-based recommendation is to combine pegboard storage with drawers or bins. A pegboard is excellent for tools you want to see and grab quickly, but it is not the best home for everything. Tiny drill bits, loose nails, specialty screws, and delicate measuring tools often do better in labeled containers. The strongest organization systems use pegboards for visibility and drawers or bins for containment.
Finally, do not be afraid to rearrange the pegboard after a few weeks. The first layout is a guess. Your real habits will show you what belongs where. If the pliers keep landing near the electrical supplies, move them there. If the tape measure always ends up by the saw, give it a hook nearby. A pegboard is meant to be flexible, which is the entire point. Let it work with you, not against you.
Conclusion
Learning how to organize tools with a pegboard is one of the easiest ways to make a garage, workshop, shed, or utility area more efficient. With the right board, secure installation, smart accessories, and a layout based on real-life use, you can turn a cluttered wall into a practical tool command center.
Start simple. Sort your tools, group them by category, hang the most-used items where they are easiest to reach, and use baskets or bins for small parts. Add labels or outlines if you want the system to stay tidy with less effort. Most importantly, let your pegboard evolve. The best organization system is not the fanciest one; it is the one you actually use.
Once your tools are visible, accessible, and neatly arranged, small repairs become less annoying, weekend projects move faster, and your garage suddenly feels less like a junk drawer with a roof. That is the humble power of a pegboard: it turns chaos into order, one hook at a time.
SEO Tags