
Real stained glass requires carefully cut glass, metal came or copper foil, soldering equipment, and the confidence to handle materials that can bite back. Faux stained glass is considerably friendlier. With clear glue, acrylic craft paint, and a simple pattern, you can turn an ordinary pane into a colorful window without converting the dining room into a medieval glass workshop.
This paint-and-glue technique works particularly well on picture-frame glass, acrylic sheets, glass cabinet inserts, and decorative interior windows. It is inexpensive, customizable, and forgiving enough for beginners. Best of all, a slightly uneven line often makes the finished design look more handcrafted rather than less polished. That is excellent news for anyone whose straight lines occasionally wander off to explore.
What Is a Paint-and-Glue Stained Glass Window?
A paint-and-glue stained glass window is a decorative imitation of traditional stained glass. Raised black glue represents the metal framework, or “leading,” while translucent mixtures of clear glue and acrylic paint create colored sections that allow light to pass through.
The method changes the appearance of a window rather than its construction. It does not involve cutting the existing pane, and it does not make the glass stronger, more private, or more energy efficient. Consider it decorative window artnot a structural window upgrade.
Homemade Mixture Versus Commercial Window Paint
Commercial stained glass effect paints are formulated to level smoothly and adhere to glass or acrylic. Some products can be peeled from a temporary work surface and transferred to a window. A homemade mixture of clear school glue and acrylic craft paint is cheaper and easier to customize, but its durability and removability are less predictable.
For a permanent-looking decorative panel, either option can work. For a rental, historic window, coated pane, or surface you may need to restore perfectly, create the design on a separate acrylic sheet or test the mixture in an inconspicuous corner first.
Materials and Tools
Gather everything before opening the glue. Wet leading has a mysterious ability to detect the exact moment you leave the room in search of a toothpick.
| Material | Purpose | Helpful Detail |
|---|---|---|
| Clear school glue | Creates translucent colored paint | Clear glue transmits more light than white glue |
| White or clear school glue | Forms the raised leading | Use a bottle with a narrow applicator tip |
| Black acrylic craft paint | Colors the leading mixture | Add gradually so the glue remains easy to squeeze |
| Colored acrylic craft paint | Tints the clear glue | Transparent or lightly pigmented colors produce the brightest result |
| Glass, acrylic, or clear plastic sheet | Provides the working surface | A removable picture-frame pane is ideal for a first project |
| Printed pattern and tape | Guides the design | Choose broad shapes rather than tiny details |
| Small cups and craft sticks | Mix individual colors | Use one stick per color to avoid accidental mud brown |
| Soft brushes, droppers, or squeeze bottles | Moves color into each section | A toothpick helps reach narrow corners and pop bubbles |
| Lint-free cloth and mild dish soap | Cleans the surface | Dust and skin oils can cause gaps or poor adhesion |
| Gloves and a protective covering | Keep hands and furniture clean | Acrylic paint is talented at finding sleeves |
Before You Begin: Choose a Safe Surface
For the easiest project, remove the glass from an inexpensive picture frame and place it flat on a protected table. Have an adult handle glass removal, sharp edges, and any cutting tools. If the edges are exposed, cover them temporarily with painter’s tape.
Do not apply homemade paint directly to automotive glass, oven doors, fireplace glass, shower enclosures, or panes exposed to constant moisture and heat. Avoid damaged, cracked, antique, tinted, etched, or specially coated windows unless a qualified professional confirms that the surface is suitable.
Use water-based craft products labeled for the intended age group, follow every manufacturer warning, and work with ventilation. Keep paint and glue away from food, pets, and small children. A product described as nontoxic still is not a snack, no matter how cheerful the color.
How to Make Faux Stained Glass With Paint and Glue
Step 1: Select or Draw a Pattern
Start with a design made from medium or large enclosed shapes. Flowers, leaves, sunbursts, geometric mosaics, birds, and simple landscapes are dependable choices. Every colored area must be surrounded by a continuous line, just as individual pieces are separated in authentic stained glass.
Print the pattern at the correct size. For a larger window, divide the image across several sheets and tape them together. Place the pattern beneath the glass with the printed side facing up, then tape it to prevent shifting.
Step 2: Clean and Dry the Glass
Wash the surface with mild dish soap and water, rinse it, and dry it with a lint-free cloth. If the product instructions permit it, a final wipe with rubbing alcohol can remove fingerprints and oily residue. Let the pane dry completely before applying glue.
Clean only the side you plan to decorate, then avoid touching it. A single fingerprint beneath a transparent blue section can become surprisingly famous whenever sunlight hits the window.
Step 3: Mix the Black Leading
Pour a small amount of glue from its squeeze bottle to create mixing space. Add black acrylic paint a little at a time and stir slowly with a craft stick. The mixture should become nearly black while retaining the consistency of thick glue.
Too much paint can make the leading thin, brittle, or difficult to control. Test a short line on scrap glass or plastic. The mixture should leave a rounded cord that holds its shape rather than spreading into a puddle.
Step 4: Trace the Design
Hold the applicator slightly above the pane and allow the leading to fall onto the glass while you guide it along the pattern. This produces a smoother line than dragging the nozzle across the surface. Work from the center outward so your hand is less likely to land in finished sections.
Keep the line thickness consistent and connect every junction. If a line breaks, add a small dot of glue to bridge the gap. Use a damp cotton swab to remove mistakes while they are still wet.
Leave the outlined panel flat until the leading is thoroughly dry. A few hours may be sufficient for thin lines, but overnight drying is safer. The exact time depends on humidity, line thickness, and the glue formula.
Step 5: Mix the Transparent Colors
For each color, begin with approximately three tablespoons of clear school glue and add three to six drops of acrylic craft paint. Stir gently and judge the mixture against a light source. Add more paint one drop at a time if the color looks too pale.
Resist the urge to pour in a heroic amount of pigment. A mixture that looks bold in the cup can dry too opaque on the window. The glue should remain dominant because it supplies the translucent body of the faux stained glass paint.
For new shades, mix paint colors separately before adding them to the glue. Red and yellow create orange, while blue and yellow create green. Purple can be temperamental, so test it before committing an entire peacock feather to the cause.
Step 6: Fill Each Enclosed Section
Apply color around the perimeter of one section, then fill the center. Use a soft brush, dropper, toothpick, or narrow squeeze bottle to push the mixture into every corner. Let it meet or slightly overlap the raised black border so no clear halos remain.
Use enough mixture to form an even layer, but do not flood the compartment. Extremely thick pools take longer to dry and may remain cloudy. Work on one color at a time, checking the design for repeated sections before washing the brush or switching tools.
Air bubbles can be popped immediately with a toothpick. A few tiny bubbles may resemble the texture of antique glass, but a bubble the size of a blueberry is less “Old World cathedral” and more “craft emergency.”
Step 7: Create Glass-Like Texture
A perfectly flat finish is optional. Gently stipple wet color with a soft brush for a hammered-glass effect, or pull a toothpick through it in loose curves to imitate rippled glass. A small amount of clear glitter glue can add sparkle, although restraint keeps the panel looking luminous rather than ready for a disco.
For shaded petals or leaves, place a darker tint near one edge and a lighter tint beside it. Blend only where the colors meet. Excessive stirring combines the shades into one uniform color and removes the dimensional effect.
Step 8: Let the Panel Cure Flat
Place the project in a dust-free area where it will not be disturbed. The colored glue may appear milky at first and become clearer as the water evaporates. Allow at least 24 hours for a thin design and longer for thick applications or humid conditions.
Do not reinstall the panel merely because the surface feels dry. A thick center can remain soft after the edges have cured. When the entire design looks uniformly clear and no section dents under very gentle pressure, it is ready to display.
Step 9: Install or Display the Artwork
Return picture-frame glass to its frame with the decorated side protected from handling. A clear acrylic panel can be placed inside a window recess or hung in front of a sunny window. Positioning the painted side toward the room generally protects it from exterior weather.
If you used a commercial peelable window-color system, follow that product’s transfer instructions. Do not assume a homemade glue-and-paint design will peel and transfer intact; formulations vary, and some mixtures stretch, tear, or cling stubbornly to the original surface.
Design Ideas That Look Good in Sunlight
Arts and Crafts Floral Panel
Use an amber border around green stems, rust-colored flowers, and small sections of cobalt blue. Strong outlines and repeating botanical shapes suit the handmade character of raised glue leading.
Modern Geometric Window
Divide the pane into rectangles, triangles, and arcs. Leave selected sections clear to balance saturated red, yellow, and blue. This approach is easy to scale and forgiving when measurements are not mathematically heroic.
Nature-Inspired Privacy Panel
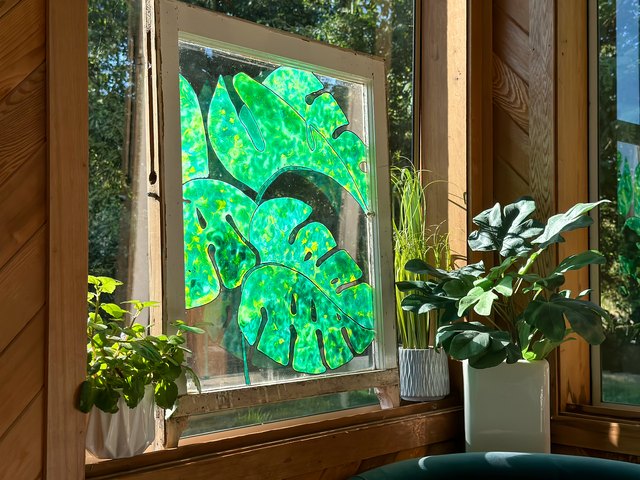
Create overlapping leaves in several translucent greens, then add pale blue between them. The pattern visually interrupts the view while still admitting light, although it should not be treated as reliable privacy after dark.
Seasonal Removable Insert
Decorate a separate acrylic sheet with snowflakes, fall leaves, spring blossoms, or a bright summer sun. Store the insert flat when the season changes instead of repainting the window four times a year.
Common Problems and How to Fix Them
The Color Dries Too Dark or Opaque
Use less acrylic paint in the next batch and increase the proportion of clear glue. Test colors on scrap material and let them dry before judging them, because wet mixtures often change in clarity and intensity.
The Leading Spreads
The mixture may contain too much paint, or the applicator opening may be too large. Add a little more glue, mix gently, and retest. Keeping the pane perfectly level also prevents lines from leaning downhill.
The Paint Pulls Away From the Edges
Oil, dust, or moisture may be interfering with adhesion. Clean future panels thoroughly and push wet color slightly onto the raised leading. Small dry gaps can be patched with a matching mixture.
The Surface Stays Cloudy
Cloudiness commonly means the glue is still drying. Give the panel more time in a dry, ventilated room. A very thick layer may need several days. If it never clears, the glue itself may dry translucent rather than transparent.
The Finished Design Peels or Cracks
Homemade mixtures are vulnerable to water, temperature swings, direct weather, and repeated cleaning. Display the work indoors and avoid flexing it. For a longer-lasting window treatment, use paint specifically formulated for glass and follow its curing directions.
Cleaning and Caring for Faux Stained Glass
Dust the decorated surface with a soft, dry cloth. When deeper cleaning is necessary, lightly wipe it with a barely damp cloth and mild soap, provided the materials are water resistant after curing. Avoid soaking the design, spraying cleaner directly onto it, or scrubbing with abrasive pads.
Do not use a razor scraper, strong solvent, or ammonia-based cleaner on the artwork unless the product manufacturer specifically approves it. Clean the undecorated side of the glass normally, taking care to prevent liquid from running around the edges and beneath the painted layer.
Conclusion
Making stained glass windows with paint and glue is an approachable way to capture the color and character of decorative glass without cutting or soldering. The most important ingredients are a clean flat surface, continuous leading lines, lightly tinted clear glue, and enough drying time.
Begin with a small removable panel, test every mixture, and let natural light guide your color choices. Once you understand how the glue flows and dries, you can tackle more ambitious flowers, mosaics, landscapes, and geometric window designs. Your first panel may not belong in a cathedral, but it can certainly make the kitchen window feel less ordinary.
Practical Experiences and Lessons From Paint-and-Glue Projects
The first lesson many makers encounter is that the wet project and the dry project can look like distant relatives. Fresh clear glue often appears cloudy, while acrylic color looks stronger in the mixing cup than it does against sunlight. A panel that seems dull on the table may glow beautifully after curing. For that reason, experienced crafters make small color samples on scrap glass and allow them to dry before filling the main design. Ten minutes spent testing can prevent several hours of politely pretending to like an opaque brown sunflower.
Leading technique usually improves after only a few practice lines. Beginners often press the nozzle directly against the glass, producing flat, shaky marks. Holding it just above the surface lets the glue descend in a controlled strand. Pulling the line toward the body is generally steadier than pushing it away. Rotating a small pane also helps, provided the wet portions remain safely out of reach.
Another common experience is underestimating drying time. The outer skin of a thick colored section can become firm while the mixture below remains soft. When the panel is lifted too soon, the color shifts, wrinkles, or slides toward one edge. Leaving the work flat overnightand sometimes for several daysproduces a more even result. Humid weather makes patience especially valuable.
Color planning also changes with experience. New makers frequently try to use every available shade, resulting in a busy panel with no visual resting place. Stronger designs often repeat a limited palette of three to five colors and include a few clear or pale sections. Dark blue, violet, and red can dominate a window, so smaller areas of these colors balance larger fields of yellow, amber, or light green.
People working on vertical windows often discover that gravity has artistic ambitions of its own. Homemade glue mixtures can sag before they set, especially when applied heavily. Creating the artwork on a removable horizontal panel is far easier. If direct vertical application is unavoidable, thicker mixtures, smaller sections, and thin layers reduce dripping, but testing remains essential.
Minor imperfections tend to become less noticeable once the panel is illuminated. A wobbly leading line, several tiny bubbles, or a lightly textured color field can mimic the irregularities that give handmade glass its charm. The defects that matter most are open borders, uncovered corners, and thick pools that never cure. Concentrating on sound construction rather than microscopic perfection makes the process more enjoyable.
Cleanup habits improve quickly too. Wiping the applicator tip after every few lines prevents dried glue from redirecting the stream sideways. Covering mixed colors between uses keeps them from forming skins. Keeping damp cotton swabs nearby makes corrections easy while the material is wet; after curing, corrections can become a slow archaeological excavation.
Finally, successful makers treat the first panel as a sample rather than a masterpiece under examination. A small geometric design reveals how particular brands of glue, paint, and glass interact. That information is more useful than any universal recipe because craft products vary. Once the behavior of the mixture is familiar, larger projects become faster, cleaner, and considerably less surprising.