
Note: The image blocks in this article are written as publishing-ready screenshot placeholders. Replace each image file path with your own screenshots before posting the article online.
Printing a long Excel spreadsheet without headers on every page is a little like reading a restaurant menu where only page one tells you what the columns mean. By page four, you are staring at numbers, dates, and totals with the confidence of someone assembling furniture without instructions. Good news: Excel has a built-in feature that solves this neatly. It is called Print Titles, and it lets you repeat header rows or left-side label columns on every printed page.
In this guide, you will learn how to print headers on each page in Excel, how to repeat the top row, how to repeat multiple rows, how to repeat columns on the left, how to preview the result, and what to do when the Print Titles option is grayed out. The steps apply mainly to the Excel desktop app for Windows and Mac. Excel for the web may not offer the same full print-title controls, so if the feature is missing online, open the workbook in the desktop version of Excel.

What Does “Print Headers on Each Page” Mean in Excel?
In Excel, “headers” can mean two different things, so let’s clear the fog before we start clicking buttons like we are defusing a spreadsheet bomb.
Column Headers You Create
These are the labels you type into your worksheet, usually in the first row. For example, a sales report might use headers such as Date, Customer Name, Invoice Number, Amount, and Status. When people say they want to print headers on each page in Excel, this is usually what they mean.
Excel Row and Column Headings
Excel also has built-in row numbers and column letters, such as row 1, row 2, column A, column B, and so on. These are called row and column headings. You can print those too, but they are different from your custom worksheet headers.
This article focuses mainly on repeating your own header row on every printed page. Later, we will also cover how to print Excel’s row numbers and column letters if you need them.
Why Repeat Header Rows When Printing Excel Sheets?
If your worksheet fits on one page, you probably do not need repeated headers. But once your spreadsheet spills onto page two, page three, or page thirty-seven, repeated headers become a lifesaver.
Repeating headers helps readers understand the data without flipping back to the first page. It is especially useful for invoices, inventory lists, class rosters, payroll reports, financial statements, project trackers, and large data tables. In business settings, repeated headers also make printed reports look more professional and reduce the risk of misreading a column.
Imagine printing a product inventory report. Page one clearly shows columns like SKU, Product Name, Quantity, Warehouse, and Reorder Level. Page two, however, contains only rows of data. Without headers, the reader has to guess what each number means. That is not reporting. That is spreadsheet archaeology.
How to Print Headers on Each Page in Excel
The main tool you need is Print Titles. This feature tells Excel which row or rows should repeat at the top of every printed page.
Step 1: Open Your Excel Worksheet
Open the workbook that contains the spreadsheet you want to print. Click the worksheet tab you want to format. If your workbook has multiple sheets, make sure only one sheet is selected. When multiple worksheet tabs are grouped, Excel may disable the Rows to repeat at top option.

Step 2: Go to the Page Layout Tab
Look at the ribbon at the top of Excel and click Page Layout. This tab contains print-related settings such as margins, orientation, size, print area, breaks, background, and print titles.

Step 3: Click Print Titles
In the Page Setup group, click Print Titles. Excel will open the Page Setup dialog box. You should land on the Sheet tab. If not, click the Sheet tab manually.

Step 4: Choose Rows to Repeat at Top
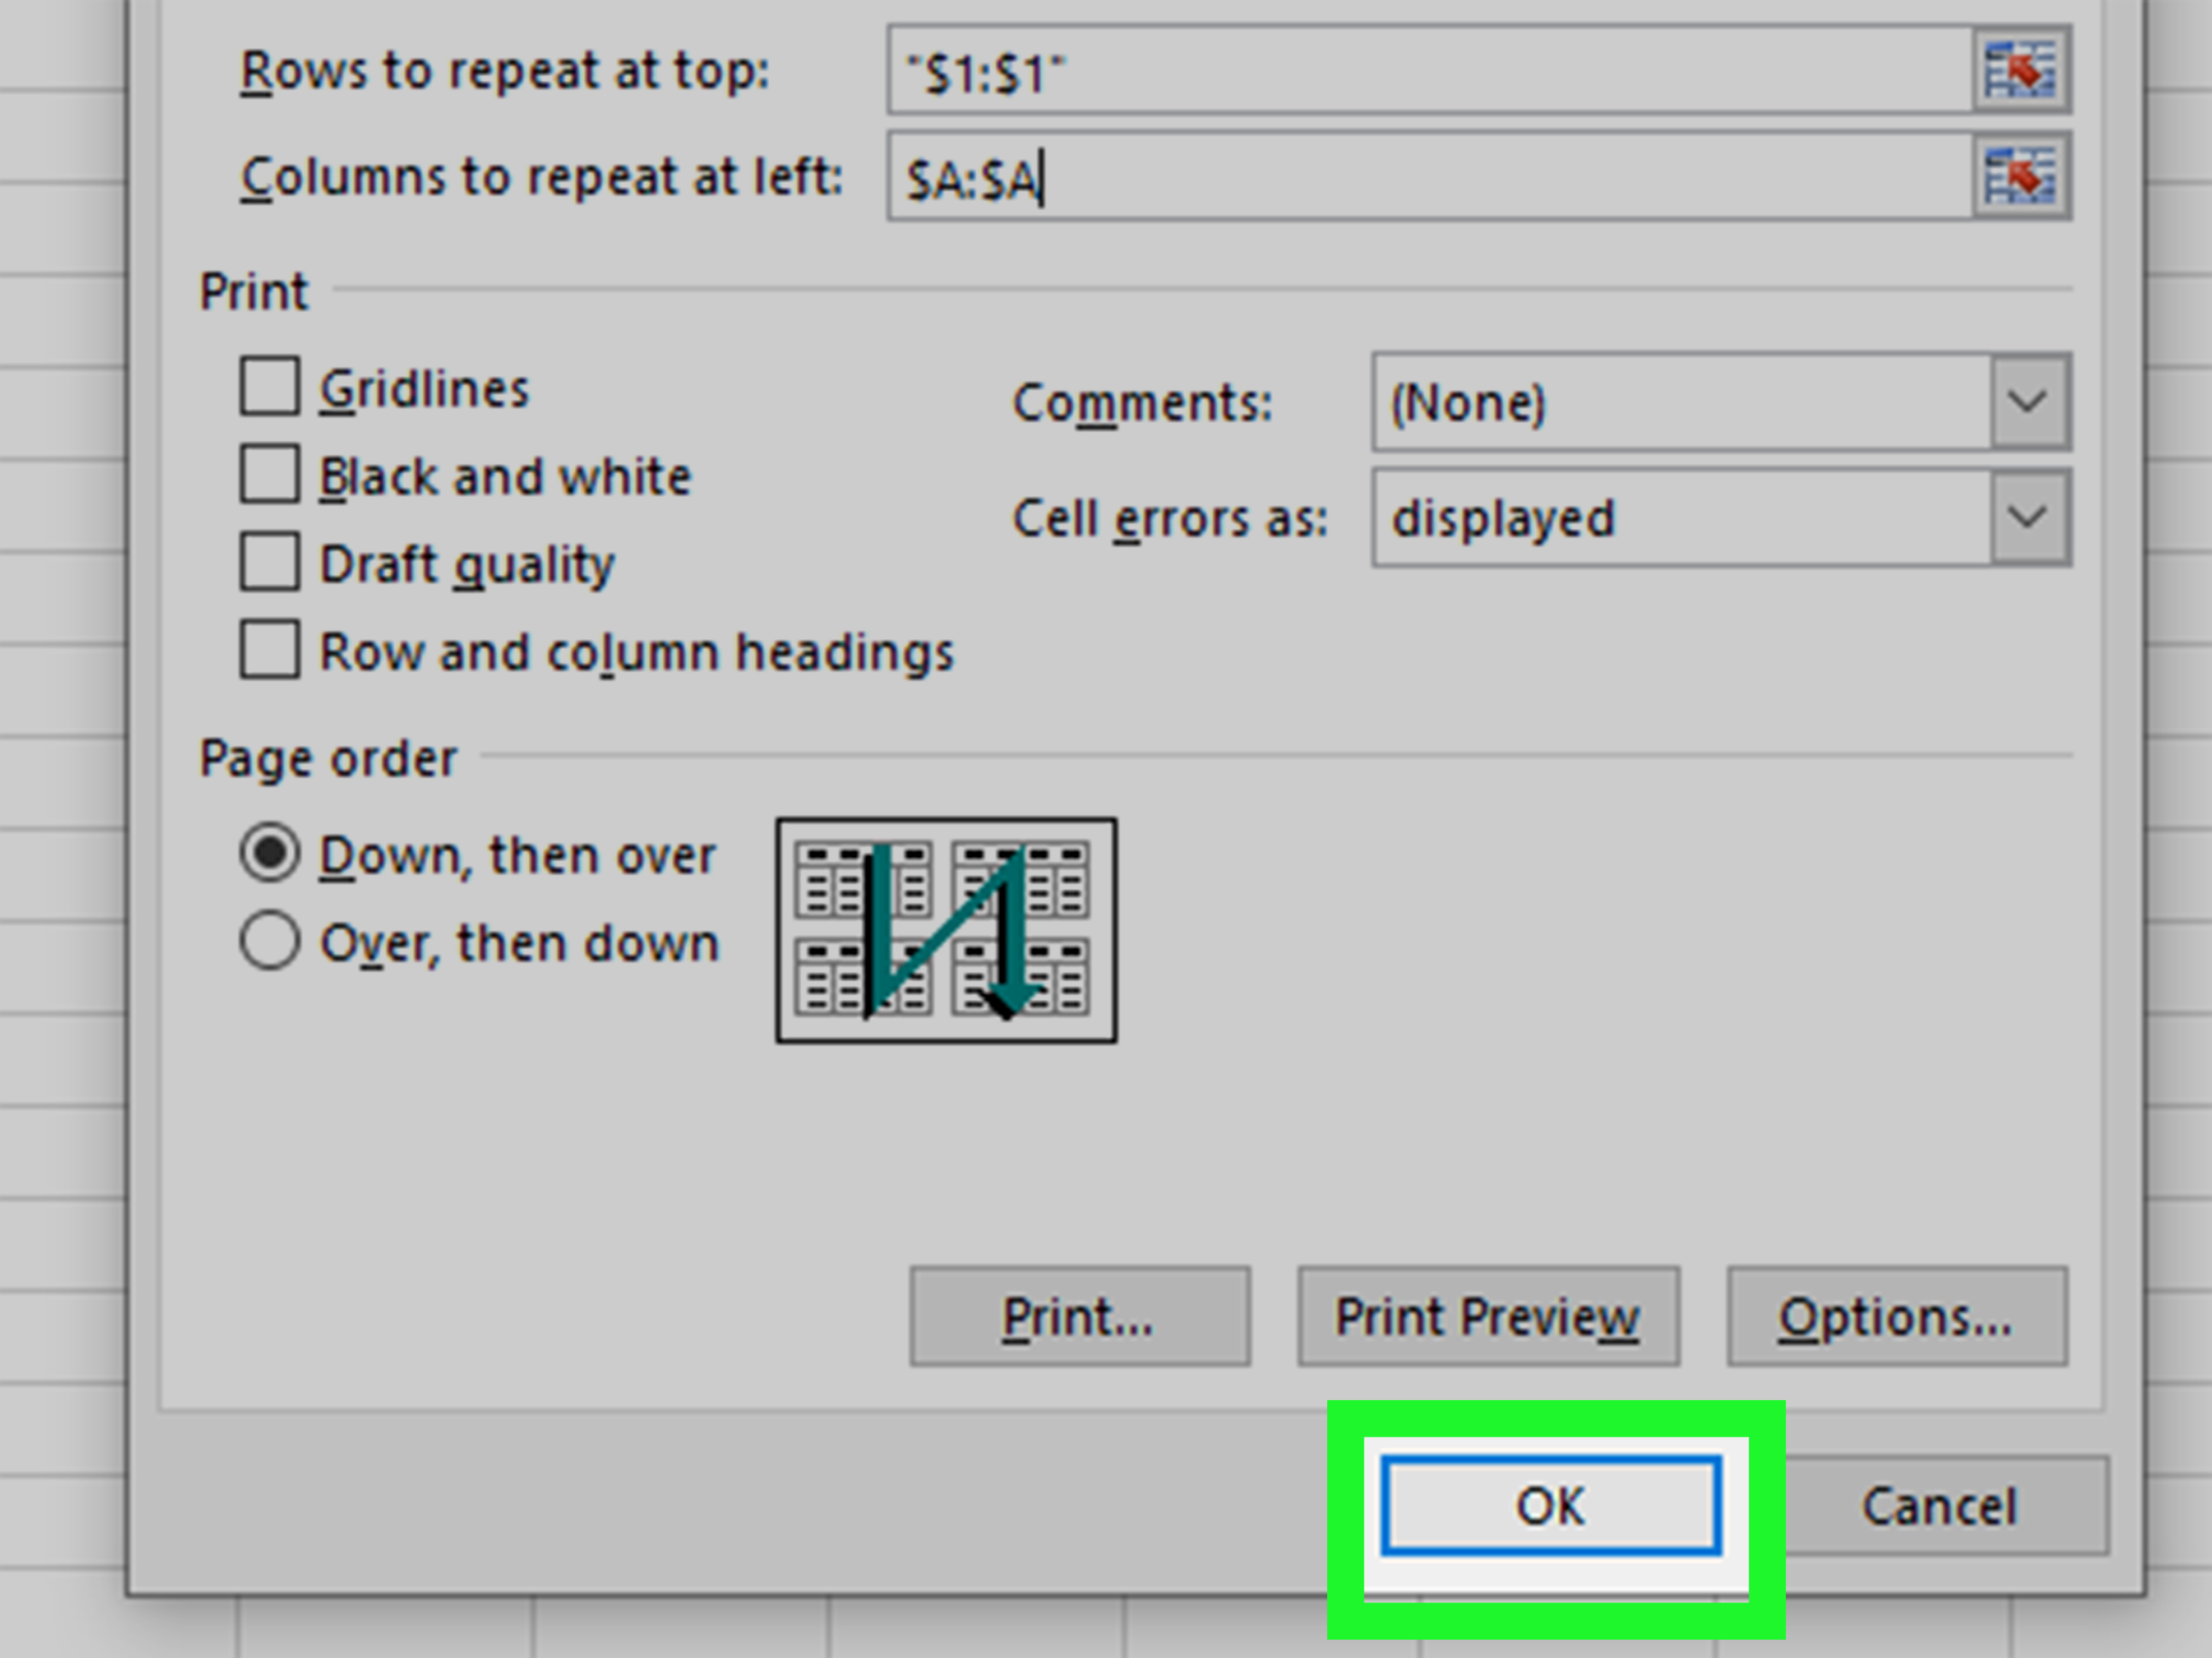
In the Page Setup dialog box, find the section called Print titles. Click inside the box labeled Rows to repeat at top.
Now select the row that contains your column headers. If your headers are in row 1, click the row number 1 on the left side of the worksheet. Excel will enter the reference $1:$1 in the box. This means row 1 will print at the top of every page.

Step 5: Repeat Multiple Header Rows If Needed
If your worksheet uses more than one header row, you can repeat multiple rows. For example, if rows 1 and 2 both contain important labels, select both rows. Excel will enter $1:$2. If your title area takes up the first three rows, use $1:$3.
This is helpful when your spreadsheet has a report title in row 1 and column labels in row 2. Just be careful not to repeat too many rows, or your printed pages may end up with more header than data. Nobody wants a spreadsheet wearing a hat bigger than its body.
Step 6: Click OK
After selecting the row or rows you want to repeat, click OK. Excel saves the print title setting for that worksheet.
Step 7: Preview Before Printing
Go to File > Print to open Print Preview. Scroll through the pages in the preview pane. Your selected header row should appear at the top of every printed page.

How to Repeat Columns on the Left of Each Printed Page
Sometimes your important labels are not at the top. They are on the left side. For example, a budget spreadsheet may list department names in column A, while the months stretch across many columns. If the sheet prints across multiple pages horizontally, repeating the left column can make the report much easier to read.
To repeat a column on the left of each printed page, follow the same basic path:
- Click the worksheet you want to print.
- Go to Page Layout.
- Click Print Titles.
- Go to the Sheet tab.
- Click inside Columns to repeat at left.
- Select the column you want to repeat, such as column A.
- Click OK.
If you select column A, Excel will enter $A:$A. If you want columns A and B to repeat, the reference will look like $A:$B.

How to Print Excel Row Numbers and Column Letters
If you want to print Excel’s built-in row numbers and column letters, use the Headings print option. This is different from repeating your own header row.
Go to Page Layout. In the Sheet Options group, look for Headings. Under Headings, check the Print box. When you print the worksheet, Excel will include the row numbers and column letters.
This option is useful for drafts, audits, spreadsheet reviews, or training materials where you need people to refer to exact cell locations. For polished reports, however, printing row and column headings may look too technical. Use it when it helps the reader, not just because the checkbox looks lonely.

How to Add a Printed Page Header in Excel
Excel also lets you add a page header, such as a report name, company name, date, file name, or page number. This is not the same as repeating column headers. A page header appears in the top margin of the printed page, while repeated header rows appear inside the worksheet grid.
To add a printed page header, go to Insert > Header & Footer. Excel switches to Page Layout view and shows header boxes at the top of the page. You can type text into the left, center, or right header area. You can also use built-in options such as page number, number of pages, current date, current time, file path, file name, or sheet name.
Use this when you want every printed page to show a report title or company label. Use Print Titles when you want every printed page to show your worksheet’s column labels. Many professional reports use both.
Common Example: Repeat the First Row on Every Page
Let’s say you have a customer order list with headers in row 1:
| Order Date | Customer | Product | Quantity | Total | Status |
|---|---|---|---|---|---|
| Jan. 5 | Green Valley Market | Coffee Beans | 12 | $240 | Shipped |
| Jan. 6 | Northside Cafe | Tea Sampler | 8 | $176 | Pending |
If the list prints across six pages, only page one will show those labels by default. To fix that, set Rows to repeat at top to $1:$1. Now each printed page begins with the same column labels, making the entire report easier to follow.
What If Print Titles Is Grayed Out?
If the Print Titles button or the Rows to repeat at top field is grayed out, do not panic. Excel is not judging you. It is usually one of a few common issues.
You Are Editing a Cell
If your cursor is inside a cell and Excel is in edit mode, press Enter or Esc. Then try Page Layout > Print Titles again.
A Chart Is Selected
If a chart is selected, click a regular worksheet cell. Then reopen the Print Titles dialog box.
Multiple Worksheets Are Selected
If several sheet tabs are grouped, Excel may disable the Rows to repeat at top and Columns to repeat at left boxes. Right-click a selected sheet tab and choose Ungroup Sheets, or click a sheet tab that is not part of the group.
No Printer Is Installed
On some systems, Excel may dim print-related features if no printer is set up. Install or select a printer, including a virtual printer such as Microsoft Print to PDF, and try again.
You Opened Page Setup from Print Preview
Some print-title settings may be unavailable when accessed from certain Print Preview paths. Return to the worksheet, then use Page Layout > Print Titles.
Best Practices for Printing Headers in Excel
Before printing a large spreadsheet, take a few minutes to clean up the layout. Small adjustments can save paper, ink, and forehead wrinkles.
Freeze Panes Does Not Control Printing
Many users confuse Freeze Panes with Print Titles. Freeze Panes keeps rows or columns visible while you scroll on screen. Print Titles repeats rows or columns when you print. They are cousins, not twins.
Set the Print Area
If your worksheet includes notes, extra calculations, or unfinished data off to the side, set a print area. Select the range you want to print, then go to Page Layout > Print Area > Set Print Area.
Use Landscape Orientation for Wide Tables
If your table has many columns, switch from portrait to landscape orientation. Go to Page Layout > Orientation > Landscape. This gives your columns more breathing room.
Adjust Scaling Carefully
Excel lets you fit a sheet to one page wide, one page tall, or a custom scale. This can be useful, but do not shrink a large table until the font looks like it was designed for ants. Use Print Preview to make sure the report is readable.
Use Clear Header Names
Repeated headers help only if the labels are understandable. Instead of vague labels like Amt or Info, use clearer terms such as Invoice Amount or Customer Notes.
Printing Headers in Excel for Mac
Excel for Mac also supports repeating row and column titles when printing, although the interface may look slightly different depending on your version. Select the worksheet, go to Page Layout, open Page Setup, and use the Sheet tab. Under Print Titles, choose the rows to repeat at top or the columns to repeat at left. Then click OK and check the print preview.
If you do not see the same buttons as a Windows tutorial, look for Page Setup options in the Page Layout ribbon or the File > Page Setup area. The names are usually similar, even when the exact button placement changes.
Can You Print Headers on Each Page in Excel Online?
Excel for the web is excellent for quick editing, sharing, and collaboration, but it does not always include every advanced print feature found in the desktop app. If you cannot find the Print Titles option online, open the workbook in the Excel desktop app. Once the print titles are set in the desktop version, save the file and preview or print from the desktop app for the most reliable result.
Quick Troubleshooting Checklist
- Make sure your header row is inside the printable area.
- Use Page Layout > Print Titles instead of relying only on Print Preview settings.
- Check that only one worksheet is selected.
- Click a normal cell if a chart or object is selected.
- Press Enter or Esc if you are editing a cell.
- Confirm that a printer or PDF printer is available.
- Use Print Preview before printing the final document.
Real-World Experience: What Printing Excel Headers Teaches You
After working with enough spreadsheets, you start to notice a pattern: nobody thinks about printing until five minutes before a meeting. The workbook looks perfect on screen. The filters are tidy, the totals are bold, and the colors say, “I am a responsible adult.” Then someone presses Ctrl+P, and suddenly page two has no headers, the columns are split across three sheets of paper, and the report looks like it escaped from a copier during a thunderstorm.
The biggest lesson is that printing is its own skill in Excel. A worksheet can be beautifully organized for screen use but still print badly. Repeating headers is one of the simplest fixes with the biggest payoff. It instantly makes a long report more readable because every page explains itself. This matters when reports are passed around a conference table, attached to audit files, reviewed by managers, or handed to clients who do not know your spreadsheet layout.
One practical habit is to set print titles as soon as a spreadsheet becomes longer than one page. Do not wait until the final print job. If row 1 contains your labels, set $1:$1 early. If rows 1 and 2 contain a title and subheaders, set $1:$2. Then use Print Preview every time you make major layout changes. This takes less than a minute and can prevent the classic “Why does page four make no sense?” problem.
Another useful experience-based tip is to avoid oversized header sections. Some people repeat a giant title block, logo, merged-cell banner, notes section, and three rows of labels on every page. Technically, Excel will do it. Practically, your data will be squeezed like a suitcase before vacation. Repeat only what readers need to understand the page. Usually, that means the column labels and maybe one report title row.
Also, be careful with merged cells in header rows. Merged headers may look nice on screen, but they can behave awkwardly when printing, sorting, filtering, or adjusting column widths. If you want a polished report title, consider using the page header area instead of merging cells across the worksheet. Keep the repeated worksheet headers clean and functional.
When troubleshooting, the most common surprise is the grayed-out Print Titles setting. In real use, this often happens because multiple sheets are selected or because the user is trying to change the setting from the wrong print dialog path. The fix is usually simple: return to the worksheet, ungroup sheets, click a normal cell, and open Print Titles from the Page Layout tab.
Finally, always preview the last page, not just the first page. The first page usually looks fine because it naturally includes the original header row. The real test is page two and beyond. If the repeated header appears there, you have done it correctly. If the page is readable, well-scaled, and not chopped into awkward pieces, congratulations: your spreadsheet has officially become printer-friendly. Somewhere, a confused coworker is silently grateful.
Conclusion
Learning how to print headers on each page in Excel is a small skill that makes a big difference. By using Page Layout > Print Titles, you can repeat the top row, multiple header rows, or left-side columns on every printed page. This keeps long reports readable, professional, and much easier to review.
The most important setting is Rows to repeat at top. For a simple spreadsheet with headers in row 1, use $1:$1. For two header rows, use $1:$2. For left-side labels, use Columns to repeat at left. Before printing, always check Print Preview so you can catch layout issues before your printer starts its dramatic paper-eating performance.
Whether you are preparing a financial report, inventory list, class schedule, project tracker, or client-ready spreadsheet, repeated headers help every page stand on its own. And in the world of printed Excel sheets, that is a beautiful thing.
SEO Tags