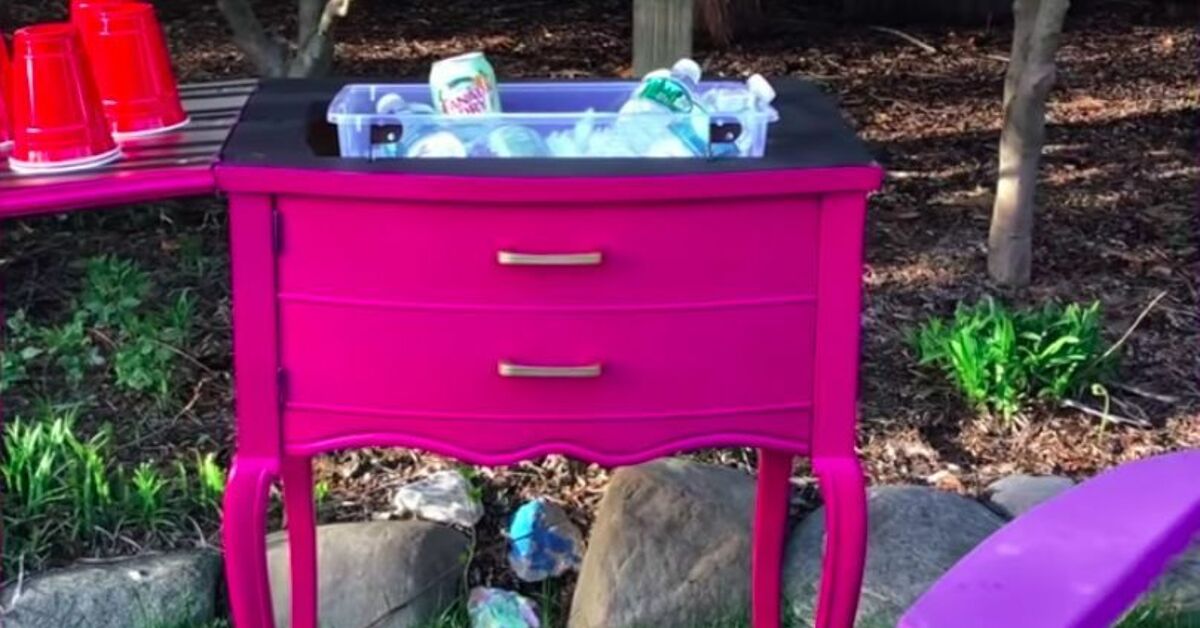

Have an old sewing table collecting dust in the corner? Before you haul it to the curb (or let it become a spider hotel in the garage), consider this: that quirky vintage piece is secretly a ready-made DIY cooler just waiting for its glow-up. The built-in cavity where the sewing machine once lived is basically begging to hold ice and drinks. With a little planning, some basic tools, and a free weekend, you can turn Grandma’s sewing station into the life of your backyard party.
In this guide, we’ll walk through how to transform a sewing table into a stylish, functional DIY cooler and drink station. We’ll talk tools, cutting and reinforcing the top, adding a cooler insert or tub, protecting the wood from moisture, and styling it so it fits your patio, porch, or craft room vibe. Think of it as the perfect mashup of upcycling, outdoor entertaining, and “wait, you made that?!”
Why a Sewing Table Makes the Perfect DIY Cooler
Not every piece of furniture is cut out (literally) for cooler duty. Sewing tables, however, are almost overqualified. Many vintage sewing cabinets and tables share a few features that make them ideal for a sewing table cooler project:
- Built-in cavity: The original sewing machine sat in a recessed opening that often folds or drops down. That void is the perfect place for a cooler insert, plastic tote, or galvanized tub.
- Compact footprint: Sewing tables were designed to tuck into small rooms, so they make excellent coolers for decks, patios, balconies, and small yards.
- Sturdy legs and frame: Even if the veneer is rough, the structure is usually solid hardwood or heavy composite, strong enough to hold ice, water, and drinks.
- Hidden storage and fold-out tops: Many sewing tables have flip-top lids or side leaves. That means you can hide the cooler when not in use and still have a serving surface when it’s open.
- Vintage character: A painted or stained sewing table cooler looks charming and intentional, not like you dragged a plastic chest out of the garage five minutes before guests arrived.
In short, a repurposed sewing table drink station gives you style, storage, and function all in one compact piece of furniture.
Planning Your DIY Sewing Table Cooler
Before you start cutting into anything, spend a little time planning your project. A bit of prep now saves you from emergency “why is everything wobbly and leaking?” repairs later.
Choose the Right Sewing Table
Start by scouting the perfect candidate. You might already have one at home, or you can hunt at thrift stores, flea markets, yard sales, or online marketplaces. Look for:
- Solid frame: The table should feel stable when you wiggle it. Cosmetic damage is fine; structural damage, not so much.
- Enough depth: Measure the cavity under the top. Ideally, you want at least 8–10 inches of depth so your cooler can hold a decent amount of ice.
- Simple interior: Fewer internal braces and moving parts make it easier to fit a tub or cooler insert.
- Outdoor potential: Solid wood and simple hardware are easier to seal and protect for outdoor use.
Pick a Cooler Insert or Tub
Next, decide what will actually hold your ice. Popular options for a DIY sewing table cooler insert include:
- Plastic storage tote: Affordable, easy to drill for drainage, and available in many sizes.
- Galvanized bucket or tub: Great for farmhouse or industrial style, and it looks good even when the lid is open.
- Small cooler chest: If you want maximum insulation, you can drop a small store-bought cooler into the cavity.
- Repurposed sink basin: For a more built-in look, some DIYers use a bar sink or old sink with a drain.
Measure the insert’s height, width, and length. You’ll use these measurements to mark your cut lines on the sewing table top.
Decide on Drainage and Placement
You have two main options:
- No drain: Lift out the tub to dump melted ice water. This is the simplest option and requires the least drilling.
- Built-in drain: Add a drain fitting and hose so water can drain into a bucket under the table or straight off the patio. This is more work up front but easier during parties.
Also think about where the cooler will live. If it’s going outdoors full-time, you’ll need weather-resistant paint, sealer, or spar urethane, and ideally metal or plastic wheels that can handle being outside.
Tools and Materials You’ll Need
Your exact list will depend on the table and insert you choose, but most DIY cooler table projects call for:
- Drill and bits (including a hole saw for drainage if needed)
- Jigsaw (for cutting the opening in the top)
- Measuring tape and pencil
- Speed square or straight edge
- Sandpaper (80–220 grit) or an orbital sander
- Wood filler (for old hardware holes and chips)
- Exterior primer and paint, or stain plus outdoor sealer
- Cooler insert (tub, bucket, sink, or cooler)
- Scrap 1x or 2x lumber for braces/supports
- Exterior wood screws
- Optional: caster wheels, towel bar, bottle opener, hooks, cup holders
Step-by-Step: How to Turn a Sewing Table Into a DIY Cooler
Step 1: Clean and Prep the Sewing Table
First, give your sewing table a good cleaning. Remove any drawers, hardware, and the old sewing machine if it’s still there. Vacuum out dust and cobwebs, then wipe everything down with a degreaser or a mix of mild soap and water.
Once it’s dry, inspect the veneer and frame. Fill any deep chips or holes with wood filler. If the old finish is flaking, sand the surface lightly to give your primer a good grip. You don’t have to sand down to bare wood unless the finish is really failing.
Step 2: Measure and Mark the Opening
Flip open the top or lid of the sewing table and look at the exposed area. Place your cooler insert upside down on the surface and center it where you want it to sit. Trace around it with a pencil, then mark a second line inside that outline about 1/4 inch smaller on all sidesthis is your cut line, so the lip of the cooler will rest on the table.
Use a square or straight edge to clean up your lines. Triple-check your measurements. You want a snug, supportive fit, not a gap that your cooler could fall through.
Step 3: Cut the Opening Safely
Before cutting, look underneath the tabletop and identify any support braces or hinges. You may need to adjust your opening so you’re not sawing through critical supports. If needed, you can add new braces later to maintain strength.
- Drill a starter hole just inside your cut line, large enough for your jigsaw blade.
- Carefully cut along the marked line with the jigsaw, staying just inside the line and taking your time around corners.
- Remove the cut-out section and test-fit your cooler insert. If it doesn’t sit quite right, shave off small amounts until it fits snugly.
Lightly sand around the cut edge to smooth any splinters. This will also help your paint or sealer adhere cleanly.
Step 4: Add Internal Supports for the Cooler
Even if your cooler has a lip that rests on the tabletop, it’s a good idea to add supports inside the sewing table to carry the weight of ice and drinks.
- Cut scrap boards to span the width or length of the cavity under the opening.
- Screw these to the inside walls of the sewing table, just below where the cooler will sit.
- For extra strength, create a simple “frame” using 1x or 2x lumber around the interior perimeter.
When you drop the cooler insert into place, its bottom should rest on these supports or at least have them close enough to prevent sagging or cracking.
Step 5: Add Drainage (Optional but Handy)
If you’d like a drain, follow these basic steps:
- Mark a spot in the lowest part of the cooler insert and drill a hole using a hole saw or a bit sized for your drain fitting.
- Install a bar sink drain kit or bulkhead fitting with rubber washers to prevent leaks.
- Attach a short length of tubing or hose to the drain and route it through another hole in the bottom or side of the sewing table.
- Place a bucket under the hose end or direct it away from traffic areas.
Test your setup with water before your first party. It’s much better to discover leaks now than when everything is full of sodas and ice.
Step 6: Prime, Paint, and Protect
With the structural work done, it’s time for the fun partmaking your DIY cooler sewing table look amazing.
- Lightly sand all surfaces again and wipe away dust.
- Apply an exterior-rated primer to help paint adhere and protect the wood.
- Once dry, add 1–2 coats of exterior paint or outdoor-friendly chalk-style paint for a vintage look.
- If you prefer stained wood, use an exterior stain and then top it with multiple coats of outdoor sealer or spar urethane.
Pay special attention to the cut edges and any bare wood inside the cavity. These are the areas most vulnerable to moisture, so seal them thoroughly.
Step 7: Add Wheels and Accessories
To make your cooler easy to move, flip the table carefully and attach caster wheels to each leg. Locking casters are ideal so your drink station doesn’t wander off mid-party.
Then, customize your new cooler:
- Mount a bottle opener on the side.
- Add a towel bar or hooks for bar towels.
- Install hooks for bottle openers, tongs, or grilling tools.
- Use drawers or cabinets to store cups, napkins, and utensils.
Drop your cooler insert in, fill it with ice and drinks, and just like that, your upcycled sewing table drink station is open for business.
Using and Maintaining Your DIY Cooler Table
To keep your project looking fresh and functioning well, adopt a few simple habits:
- Always drain and dry: Don’t leave water sitting in the cooler insert. Drain and towel dry it after each use.
- Give it airflow: Leave lids slightly open once everything is dry so moisture doesn’t get trapped inside.
- Touch up the finish: If you see chips or worn spots, lightly sand and touch up with paint or sealer to protect the wood.
- Cover it outdoors: If the cooler lives outside, invest in a small outdoor furniture cover to protect it from sun and rain.
With occasional maintenance, your sewing table cooler can last for many seasonsand you’ll get to brag about it at every cookout.
Fun Styling Ideas for Your Sewing Table Cooler
Once your DIY cooler is built, you can style it to match your space and personality:
- Farmhouse look: Paint it creamy white or soft gray, add black hardware, and use a galvanized tub as the insert.
- Coastal vibe: Go for soft blues or seafoam green with rope handles, and stock it with sparkling water and citrus.
- Bright and bold: Choose a saturated color like teal, coral, or sunflower yellow and pair it with patterned bar towels.
- Industrial chic: Combine dark stain, matte black hardware, and a metal cooler insert for a modern edge.
No matter your style, the mix of vintage details and modern function makes a repurposed sewing table cooler stand out in the best way.
Real-Life Lessons From Turning Sewing Tables Into Coolers
If you’ve never cut into furniture before, the idea of converting a sewing table into a cooler might feel a little intimidating. Here are some “wish I’d known sooner” lessons and experiences that can help your project go more smoothly:
Lesson 1: Don’t Skip the Dry Run
One of the easiest mistakes to make is cutting the opening before you’ve tested how everything will fit together. Take the time to do a complete dry run:
- Set the cooler insert in place and mark where supports need to go.
- Mock up support boards inside the cabinet with clamps or temporary screws.
- Check that the lid can still open and close without hitting the cooler.
This pre-build rehearsal helps you catch issueslike a hinge in the way or a leg brace that needs reinforcingbefore the point of no return.
Lesson 2: Old Furniture Has Surprises
Vintage sewing tables are charming, but they can be full of surprises. You might discover hidden metal brackets, non-standard screws, or interior hinges that don’t show up at first glance. Expect to spend a little time figuring out how the original mechanism worked.
The good news? You’re not rebuilding a grand piano. If you remove parts you don’t need (like lift mechanisms for the machine) and reinforce the frame with a few well-placed screws or braces, the table will usually be stronger than when you found it.
Lesson 3: Measure for Real-Life Use, Not Just the Build
It’s tempting to design the cooler insert purely around what fits inside the table. But think ahead to how you’ll actually use it:
- Is the cooler deep enough for a mix of cans and bottles?
- Can you comfortably reach the bottom without climbing on your toes?
- Do guests have space to stand around it without bumping into the table legs?
Sometimes making the opening slightly smaller and letting the cooler sit higher makes it much more comfortable to use, especially if you have kids or older guests.
Lesson 4: Drainage Is Worth the Extra Effort
Lifting a heavy tub full of melted ice gets old fast. Adding a drain might feel like overkill for a simple DIY project, but in real life it’s incredibly convenient. Being able to pop open a drain plug and let the water flow into a bucket is easier on your back and reduces the chance of spills indoors or on your deck.
If you’re nervous about plumbing, start with a simple bulkhead fitting and flexible tubing. As long as you use rubber washers and tighten everything snugly, you’ll end up with a leak-resistant setup that’s surprisingly low-maintenance.
Lesson 5: Treat It as Both Furniture and Outdoor Gear
A sewing table cooler lives in an in-between world: it needs to look nice like a piece of furniture, but act tough like outdoor gear. That means:
- Using exterior primer and paint or outdoor-rated stain and sealer.
- Sealing edges, screw holes, and any exposed end grain thoroughly.
- Choosing caster wheels and hardware that won’t rust at the first hint of moisture.
When you approach it with both appearance and durability in mind, your cooler won’t just survive one summerit’ll become part of your long-term entertaining setup.
Lesson 6: The “Wow” Factor Is Real
One of the best parts of a DIY sewing table cooler is the reaction it gets. Guests love realizing that what looks like a charming vintage cabinet is actually a fully functional drink station. People tend to ask:
- “Wait, was this really a sewing table?”
- “How did you put the cooler inside?”
- “Can you help me make one from my grandma’s old cabinet?”
It’s more than just furniture; it’s a conversation starter and a way to give a sentimental piece a useful new life. Instead of storing fabric and thread, it now holds cold drinks and good memories.
Lesson 7: Start Simple, Upgrade Later
Finally, don’t feel like you have to build the ultimate, fully loaded cooler on day one. Start with the basics: a clean, sturdy sewing table, a fitted cooler insert, and a protective finish. Use it for a season and note what you wish it hadmaybe a bottle opener, more storage, or a better towel hook.
The beauty of this project is that you can keep adding features over time. Your first version might be simple, but every party will give you new ideas for improvements. Before long, you’ll have a cooler station that’s dialed in to exactly how you entertain.
Conclusion
Turning a sewing table into a DIY cooler is one of those projects that looks complicated but is surprisingly achievable with basic tools and a bit of patience. You’re reusing a well-built piece of furniture, adding a cooler insert and supports, and giving it a durable finish that can handle real-world entertaining. In return, you get a unique, space-saving drink station that feels both nostalgic and fresh.
Whether you host relaxed backyard barbecues, quiet evenings on the deck, or big family celebrations, your sewing table DIY cooler can become a go-to centerpiece. It keeps drinks cold, keeps clutter contained, and lets you show off your creativity every time someone asks, “You made that yourself?”
SEO JSON