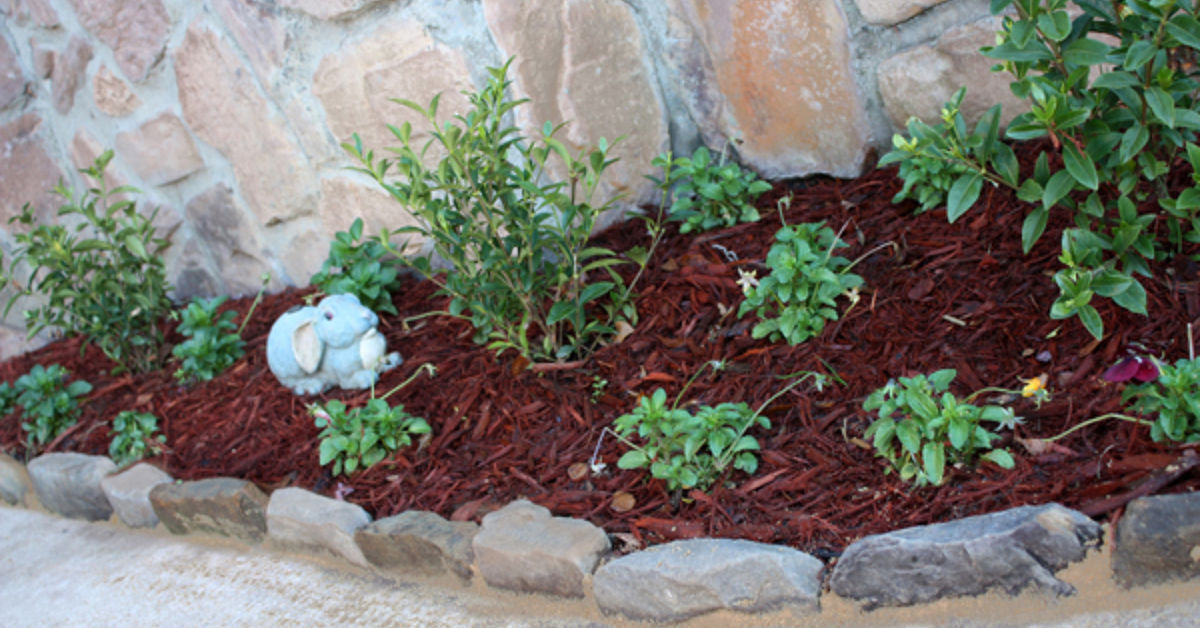

Natural stone landscape edging can turn an ordinary flower bed into a polished garden feroper places. Unlike plastic strips that attempt to disappear, stone becomes part of the design. It adds color, texture, shadow, and enough visual weight to make a landscape look intentional.
Stone edging is also practical. It can simplify mowing, slow soil erosion, contain loose materials, and create clear transitions between planting beds, lawns, walkways, patios, and driveways. Installed correctly, it can remain attractive for decades. Installed carelessly, it may wobble, sink, or tilt like a row of tired teeth.
This guide explains how to select natural stone, plan an attractive border, prepare a stable base, install edging on level or sloped ground, and avoid the mistakes that shorten its useful life.
Why Use Natural Stone for Landscape Edging?
A garden without defined boundaries can look unfinished even when its plants are thriving. Mulch migrates into the lawn, grass sends runners into planting soil, and decorative gravel somehow travels farther than anyone remembers throwing it.
Natural stone landscape edging provides a physical and visual separation between these materials. It can perform several jobs at once:
- Define garden beds: Stone gives planting areas a clear, deliberate shape.
- Contain loose materials: It helps prevent mulch, gravel, and soil from spreading after rain or maintenance.
- Discourage grass intrusion: A sufficiently wide border makes it harder for turf to cross into the bed.
- Improve mowing access: Flat stones can form a surface for mower wheels, reducing the need for string trimming.
- Manage small grade changes: One or two courses can hold a modest amount of soil on gentle slopes.
- Connect landscape elements: Repeating stone used in a patio, walkway, wall, or foundation helps unify the property.
Stone edging should not be mistaken for a structural retaining wall. A low border can contain mulch or support a shallow transition, but a tall bank of soil creates pressure and drainage concerns that may require an engineered retaining system.
Choosing the Best Stone for Landscape Edging
The right stone must do more than look attractive on a display pallet. It should be suitable for the local climate, compatible with the home, strong enough for the intended use, and practical to install.
Granite
Granite is dense, durable, and available in gray, charcoal, pink, black, and mixed mineral patterns. Cut granite cobblestones produce a tailored border that works well with brick homes, formal gardens, driveways, and traditional walkways.
Uniform granite blocks are easier to align than irregular fieldstone, but they are heavy. Granite may be elegant, but it has no interest in protecting your lower back.
Fieldstone
Fieldstone offers an informal, regional appearance. It is especially appropriate for cottage gardens, woodland landscapes, native plant beds, and rustic homes.
Because the pieces vary in shape and thickness, fieldstone requires sorting and experimentation. Purchase more than the exact measured amount because some pieces will not fit the intended layout.
Flagstone and Bluestone
Flat flagstone can be installed horizontally as a broad mowing strip or partially buried upright to form a taller edge. Bluestone works particularly well when the property already has blue-gray patios, steps, or pathways.
Flat stones are useful where easy lawn maintenance matters. A mower wheel can travel along the surface while the blade reaches the grass beside the bed.
Limestone
Limestone provides warm cream, tan, buff, and gray tones. It complements brick, stucco, traditional gardens, and Mediterranean-style landscapes.
However, limestone varieties differ considerably in porosity and exterior durability. In areas with repeated freezing and thawing, select a stone with a proven history of local outdoor use. Not every attractive limestone is suitable for ground contact in a cold climate. >Sandstone
Sandstone is available in earthy reds, golds, browns, tans, and grays. Its layered texture looks natural beside informal planting beds and desert-inspired landscapes.
Strength and water absorption vary by quarry and stone variety, so exterior suitability should be verified with the supplier.
Slate
Slate creates a crisp, layered border and may feature charcoal, green, plum, rust, or multicolored surfaces. It suits modern, woodland, and Asian-inspired landscapes.
Some slate performs very well outdoors, while other varieties can flake or separate after repeated moisture and freeze-thaw exposure. Use material rated for the intended climate.
River Rock
Rounded river rock creates a relaxed border near ponds, dry creek beds, rain gardens, or naturalistic plantings. Because rounded stones do not lock together as firmly as angular stone, they should be partially buried or contained within a defined trench.
How to Match Stone Edging to Your Landscape
Stone edging looks most convincing when it repeats something already present on the property. Gray granite can echo a stone foundation. Warm sandstone can complement brick. Irregular fieldstone may connect a cultivated garden to surrounding woods.
For a formal appearance, choose stones with similar dimensions, squared faces, narrow joints, and a consistent top line. For a relaxed appearance, mix sizes and allow modest height variations while keeping every piece stable.
Natural does not have to mean random. There is a difference between charming irregularity and a row of rocks that appears to be waiting for roadside collection.
Straight Lines or Curves?
Straight lines work well in modern landscapes, vegetable gardens, and areas aligned with architecture. Curves suit cottage gardens, island beds, and informal planting designs.
When creating curves, use long, confident arcs instead of numerous tiny bends. Smooth curves are easier to mow, easier to install, and more restful to view.
How Much Stone Will You Need?
Measure straight borders with a tape. For curved beds, place a garden hose or rope along the proposed line, mark its endpoints, straighten it, and measure the total length.
If stone is sold by the piece, divide the border length by the average visible width of one stone. Add at least 10 percent for cutting, breakage, sorting, and future repairs. Irregular fieldstone may require a larger allowance.
If stone is sold by weight, ask the supplier for an estimated coverage rate based on the selected dimensions and installation method.
Before placing a large order, build a short sample. A five-foot test section can reveal whether the stone is too large for the bed, too small beside the house, difficult to level, or inconvenient for mowing. Discovering that before a truck unloads several tons is one of landscaping’s more affordable victories.
Tools and Materials
A typical dry-laid stone edging project may require:
- Natural edging stone
- Garden hose, rope, marking paint, stakes, or string
- Square shovel and trenching spade
- Hand trowel and garden rake
- Wheelbarrow
- Hand tamper or plate compactor
- Compactable crushed stone
- Bedding sand or stone screenings
- Rubber mallet
- Level and straight board
- Work gloves, eye protection, and sturdy footwear
- Masonry chisel, hammer, or appropriate masonry saw
Have underground utilities marked before excavation. Even a shallow trench can encounter irrigation tubing, lighting cables, invisible pet-fence wire, or other buried surprises. The objective is a handsome garden border, not an unexpected neighborhood blackout.
How to Install Natural Stone Landscape Edging
Step 1: Lay Out the Border
Use a garden hose or rope to design curves. Use stakes and string for straight sections. View the proposed line from the street, patio, windows, and main walkway before digging.
Adjust narrow corners and awkward bends now. A line that looks graceful while standing beside it may appear strangely lopsided from the kitchen window.
Step 2: Check Mower Clearance
Where the border meets lawn, place the mower beside the proposed edge. Check whether its wheel can ride on the stone and whether the mower deck will strike raised pieces.
A horizontal or slightly recessed mowing strip usually requires less maintenance. Taller edging creates stronger visual definition but often requires trimming along the lawn side.
Step 3: Excavate the Trench
Cut and remove sod, roots, loose soil, and organic material. Make the trench wide enough for the stone plus working space.
The necessary depth depends on stone shape, soil, climate, and desired height. As a general approach, bury enough of each piece to prevent rocking or tipping. Many low borders are more stable when approximately one-third of the stone sits below finished grade.
Step 4: Prepare the Base
Compact the exposed soil. Where additional drainage or stability is needed, install compactable crushed stone and tamp it firmly. A thin layer of sand or stone screenings can make final leveling easier.
The base should be consistent along the entire run. Soft pockets beneath individual pieces frequently cause uneven settling.
Well-prepared gravel and sand bases are commonly recommended for durable stone or masonry edging. >Step 5: Set the Stones
Begin with the largest or most visually important pieces. Place each stone on the prepared bed, tap it with a rubber mallet, and check its height and stability.
Rotate irregular stones until they sit securely. The first position is rarely the best. Stone installation is partly construction and partly three-dimensional puzzle therapy.
For formal edging, maintain a consistent top line. Rustic borders may vary slightly, but abrupt high points can catch shoes, mower decks, hoses, or wheelbarrows.
Step 6: Fill the Joints
Keep joints reasonably tight when the border needs to contain mulch or gravel. Pack small gaps with stone screenings, sand, or soil, depending on the design.
Wider joints can hold low-growing plants, but avoid aggressive species that may spread into the lawn or displace the stones.
Step 7: Backfill Both Sides
Backfill in shallow layers and compact carefully. On the planting-bed side, keep soil or mulch slightly below the top of the stone so it is less likely to wash over.
On the lawn side, restore soil and turf at a height that allows practical mowing without leaving a deep groove beside the border.
Step 8: Inspect the Border After Rain
The first heavy rain provides a valuable performance test. Look for ponding, washed-out joints, tilted stones, escaping mulch, and soil settlement.
Stone edging can alter water movement, so it should not block necessary drainage or direct runoff toward a foundation, walkway, or neighboring property. Stone and brick edging can help define rain gardens and reduce grass intrusion, but the overflow path must remain safe and clear. ion>
Installing Stone Edging on a Slope
A slope changes the project from simple outlining to minor grade management. Install stones in level or gently stepped sections instead of allowing the entire border to lean dramatically downhill.
Use larger or deeper stones at low points and compact the base carefully. For small elevation changes, two or three dry-stacked courses may create a neat raised border. Stagger the joints so vertical seams do not align from one course to the next.
As the border becomes taller, drainage, footing depth, stone mass, soil pressure, and structural stability become more important. A substantial slope or raised bed should be evaluated as a retaining-wall project rather than ordinary landscape edging.
Common Installation Mistakes
- Setting stone on loose topsoil: Organic soil compresses and settles unevenly.
- Skipping compaction: A loose base allows individual pieces to sink or rotate.
- Ignoring drainage: A continuous border can act like a small dam.
- Using unsuitable stone: Exterior durability varies, especially in freeze-thaw climates.
- Making the border too narrow: Grass can bridge a thin edge, and mower wheels may lack a stable surface.
- Following every small bump: Smooth lines look more intentional and are easier to maintain.
- Leaving stones perched too high: Shallow placement increases rocking and tipping.
- Using mortar without a proper footing: Rigid installations still require drainage and structural preparation.
- Skipping the sample section: Scale, color, joint width, and mowing clearance are easier to judge in the yard than in imagination.
Maintenance and Long-Term Care
Natural stone edging is low maintenance, but it is not completely maintenance-free. Inspect it every spring and after unusually heavy storms.
Reset rocking pieces, replace missing joint material, remove turf runners, and clear soil or mulch that has accumulated over the visible face. Most edging materials extend only a limited distance into the ground, so persistent grasses and plants with deep underground stems may still cross the border. lean outdoor stone with water, a stiff nylon brush, and a product approved for the specific stone. Avoid assuming that vinegar or another acidic household cleaner is safe. Acid-sensitive stone, including many limestones, may become etched or discolored.
Use pressure washers cautiously. A concentrated jet can remove joint material, disturb bedding, and damage softer stone surfaces.
Sealing is not always necessary. Some porous stones benefit from a breathable penetrating sealer, while other installations perform better untreated. Test any sealer on a spare stone because it may darken the surface or alter its sheen. The Natural Stone Institute notes that sealing can be useful in some situations but unnecessary or undesirable in others. ion>
Cost and Value
The price of natural stone landscape edging depends on stone type, local availability, cutting, freight, project access, base preparation, curves, grade changes, and labor.
Locally sourced fieldstone may be relatively economical. Precision-cut granite, imported stone, and custom dimensions generally cost more. Delivery can also represent a significant part of the budget because natural stone possesses many admirable qualities, and being lightweight is not one of them.
DIY installation can reduce costs for a simple dry-laid border. Professional installation becomes more valuable when the project requires extensive cutting, exact elevations, masonry footings, drainage correction, large stones, or multiple courses.
A durable stone border may provide better long-term value than inexpensive edging that fades, warps, becomes brittle, or requires frequent replacement. Natural stone is widely used in exterior hardscapes because of its durability, versatility, and ability to age naturally. ion>
Experience-Based Lessons from Stone Edging Projects
The first practical lesson is that layout deserves more time than most people give it. On paper, a bed may appear to need a simple curve. In the yard, that curve must relate to the house, lawn, mature plants, walking direction, irrigation, and mower.
Moving a garden hose only six inches can change a border from cramped to confident. Leave the hose in place overnight and review it the next morning. Fresh eyes are much cheaper than moving a ton of granite after installation.
Sorting stone before work begins also saves considerable effort. Separate pieces into broad groups: long faces, short fillers, flat tops, corner candidates, thick pieces, and attractive feature stones.
Without sorting, installers often grab the nearest stone, force it into an unsuitable space, and compensate with unnecessary digging. That method can work, but so can opening a paint can with a shovel. A little organization creates tighter joints and a more consistent border.
The hidden base is more important than the visible stone. Beginners naturally focus on color and shape while treating the material underneath as boring filler. In reality, the base performs most of the quiet structural work.
Where the soil is firm and well drained, a simple compacted bed may perform adequately for low edging. Where the ground is soft, recently disturbed, clay-heavy, or frequently wet, compactable aggregate can help prevent uneven settling.
Mowing should be tested before final placement. A tall edge may look impressive beside fresh mulch, but the excitement fades when every mowing session requires a second trip with a string trimmer.
For lawn-adjacent beds, a broad, nearly flush band of stone is often the most useful arrangement. The mower wheel rides on the stone while the blade reaches the grass edge. The border becomes decoration and maintenance equipment at the same timea rare case in which beauty volunteers to do chores.
Irregular stone rewards patience. A piece that rocks in one orientation may become stable after a quarter turn. A lumpy underside can sometimes be settled into the bedding layer instead of being cut.
The goal is not to make every piece identical. The goal is to make every piece look intentional. Rustic edging can include gentle height changes, but the eye will still notice sudden peaks and dips. Placing a straight board over several stones helps identify problems before they spread along the border.
Rain exposes mistakes faster than visual inspection. After a storm, check where mulch collects, soil washes through joints, or water ponds. One low stone can become an unwanted spillway. One tightly packed section can function as a miniature dam.
Correcting drainage and settlement early is easier than waiting until plant roots, turf, and repeated foot traffic surround the problem.
Finally, keep several matching stones after completing the installation. Landscapes change. Beds are widened, roots lift sections, irrigation lines are repaired, and wheelbarrows occasionally arrive with more enthusiasm than steering accuracy.
Matching the original material several years later can be difficult because quarry colors, finishes, and stocked sizes change. A small pile of spare stones behind the shed is not clutter. It is landscaping insurance.
Conclusion
Successful natural stone landscape edging combines attractive design with practical construction. Select stone suited to the climate, repeat colors or textures already present on the property, create smooth and deliberate lines, and prepare a compacted base that allows water to drain.
Set each piece securely, plan the lawn side around realistic mower clearance, and inspect the border after heavy rain. When appearance, drainage, and maintenance are considered together, natural stone can organize a yard without making it feel rigid.
The finished border should look as though it has always belonged in the landscapenot as though the flower bed recently acquired a stone necklace.