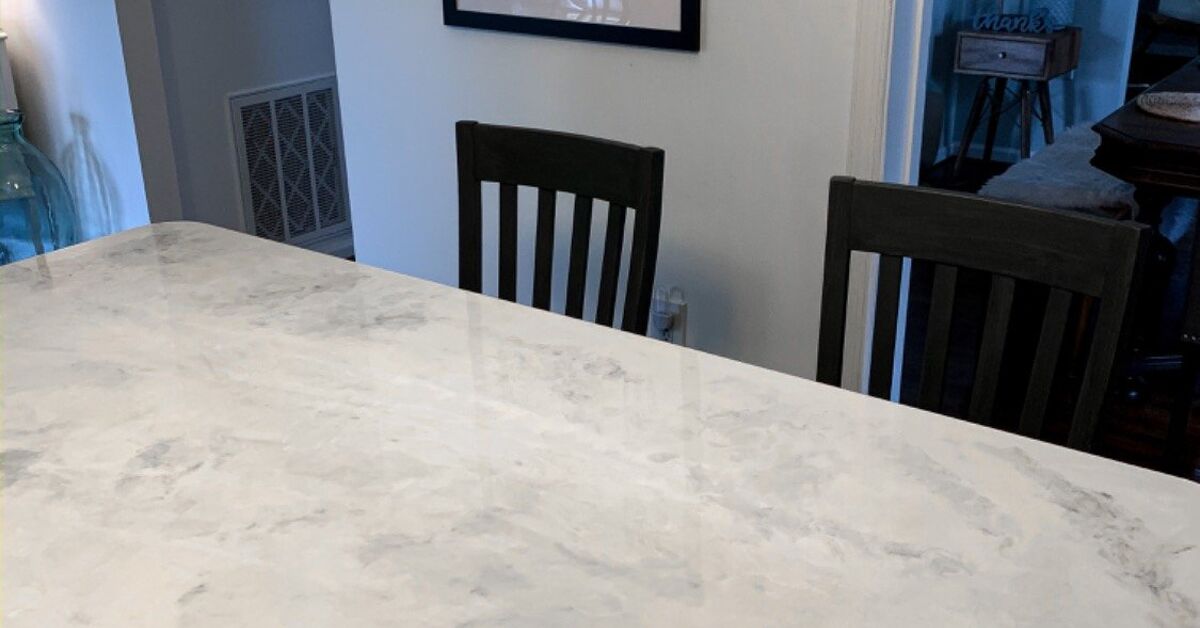

Stone Coat Countertops have become the DIY world’s shiny, swirly answer to the question: “Can I make my old laminate counters look like marble without selling a kidney?” The short answer is yesif you prepare carefully, follow the timing rules, and accept that epoxy is part home improvement, part chemistry class, and part performance art.
Epoxy countertops are poured surface coatings made from resin and hardener. When mixed correctly, the two components cure into a glossy, durable, nonporous finish that can mimic marble, granite, quartz, concrete, or a dramatic custom design that looks like a thunderstorm got invited to brunch. Stone Coat Countertops is one of the best-known brands in this space because it markets complete DIY-friendly epoxy systems for kitchens, bathrooms, bar tops, tabletops, vanities, and creative resin projects.
This guide explains what Stone Coat epoxy countertops are, how they work, what they cost, where they shine, where they can disappoint, and what real-world experience teaches you after the excitement of the first pour wears off. Spoiler: surface prep is not optional, bubbles are tiny villains, and hot pans still belong on trivets.
What Are Stone Coat Countertops?
Stone Coat Countertops are resurfaced countertops created with a specialized epoxy coating system. Instead of tearing out old counters and installing new slabs, you coat the existing surface with primer, color, epoxy, and often a protective topcoat. The goal is to create the look of stoneespecially marble, granite, or quartzover laminate, MDF, wood, tile, concrete, or another stable countertop base.
The appeal is obvious. A full countertop replacement can involve demolition, plumbing disruption, templating, fabrication, installation scheduling, and the emotional trauma of eating takeout over a cardboard box for two weeks. Epoxy resurfacing, by comparison, can refresh a kitchen or bathroom for much less money if you are comfortable with a hands-on project.
How Epoxy Countertops Work
Epoxy countertops rely on a chemical reaction. The resin and hardener are mixed together in the correct ratio, then poured over the prepared surface. As the mixture cures, it hardens into a smooth, glossy, water-resistant layer. Pigments, metallic powders, spray paints, mica, glitter, and decorative veining techniques can be added to create custom patterns.
With Stone Coat-style projects, the general process usually follows four big stages: prep, prime, pour, and protect. That sounds simple, but each step matters. Epoxy is not like paint where you can casually slap on another coat while wearing flip-flops and optimism. Once it starts curing, the clock is ticking.
1. Prep the Surface
Preparation is the foundation of a good epoxy countertop. The old surface must be cleaned, degreased, sanded, and repaired. Any chips, seams, loose laminate, silicone, wax, or greasy residue can interfere with adhesion. If the counter has damage, those flaws should be filled and leveled before primer goes on.
Good prep also means protecting everything nearby. Cabinets, floors, appliances, sinks, walls, and backsplashes should be taped and covered. Epoxy flows, drips, and explores. It has the curiosity of a toddler and the stickiness of regret.
2. Prime and Undercoat
Primer helps epoxy grip the existing countertop. Many systems use a bonding primer and an undercoat color, especially when creating a white marble, black granite, or dramatic stone effect. The undercoat gives the design visual depth and prevents the old countertop pattern from showing through.
3. Pour the Epoxy
The mixed epoxy is poured onto the surface and spread evenly. Colors and veining are added while the epoxy is still workable. Many DIYers use a notched trowel, brush, gloved hands, squeegee, or chop brush to move the product. A heat gun or torch may be used carefully to pop bubbles, but too much heat can create problems, so this step requires patience.
4. Protect the Finish
Once cured, many countertop systems benefit from a protective topcoat. A topcoat can reduce the super-glossy “wet look,” improve scratch resistance, and create a more practical daily-use surface. Some homeowners prefer a satin finish because it hides fingerprints, crumbs, and tiny scratches better than a mirror-gloss countertop.
Why Homeowners Choose Stone Coat Epoxy Countertops
The biggest reason people choose Stone Coat countertops is transformation. A tired laminate counter can become a faux Carrara marble surface. A basic bathroom vanity can look custom. A basement bar can suddenly develop main-character energy. Epoxy allows dramatic design changes without replacing the underlying countertop.
Another advantage is customization. With stone slabs, you choose from what exists. With epoxy, you can create exactly the movement, color, and personality you want. Want soft white marble with gray veins? Easy. Want black countertops with gold metallic ribbons? Very possible. Want ocean-blue waves over a bar top? The epoxy community has entered the chat.
Epoxy is also nonporous after curing, which makes it easier to wipe clean than porous stone surfaces that may need sealing. It resists water well, making it attractive for kitchens, bathrooms, laundry rooms, and bars. When properly installed and cared for, epoxy countertops can last for years.
The Honest Pros and Cons
Pros of Stone Coat Countertops
They can be budget-friendly. DIY epoxy countertop kits can cost far less than replacing counters with quartz, granite, marble, or custom concrete. Professional epoxy installation costs more, but it may still be competitive compared with premium slab materials.
The design options are huge. Epoxy can mimic natural stone, metallic finishes, terrazzo-inspired looks, river tables, concrete, or high-drama artistic surfaces. No two pours are exactly alike.
The surface is glossy and seamless. A poured epoxy layer can create a smooth, continuous finish that helps hide dated patterns underneath.
It works over many existing surfaces. Laminate, wood, concrete, tile, and MDF can often be resurfaced if they are structurally sound and properly prepared.
It is water-resistant after curing. Epoxy does well in areas where splashes happen regularly, though standing water around seams and sinks should still be avoided.
Cons of Stone Coat Countertops
The learning curve is real. Epoxy is time-sensitive. Mixing errors, temperature issues, uneven spreading, poor prep, and dust contamination can all affect the final result.
Repairs can be tricky. Small scratches or dull spots may be buffed or recoated, but deep chips, burns, or major mistakes can require sanding and refinishing a larger area.
Heat resistance is not the same as invincibility. Many epoxy countertop products are marketed as heat resistant, but you should still use trivets under hot pans, slow cookers, air fryers, and baking sheets. “Heat resistant” does not mean “please park a cast-iron skillet here straight from the stove.”
Glossy finishes show wear. High-gloss epoxy looks stunning in photos, but fingerprints, crumbs, micro-scratches, and dust may be more visible than on matte or textured surfaces.
Ventilation and safety matter. Even low-odor or zero-VOC products should be used responsibly. Gloves, eye protection, long sleeves, good ventilation, and careful handling are smart choices when working with resin and hardener.
How Much Do Stone Coat Epoxy Countertops Cost?
Costs vary depending on countertop size, project complexity, product choices, tools, color additives, primer, topcoat, and whether you DIY or hire a professional. A small bathroom vanity may be inexpensive, while a large kitchen with islands, backsplashes, edges, and repairs can cost much more.
For DIY projects, materials may start in the low hundreds, especially for a small surface. However, budget for more than just the epoxy kit. You may need primer, undercoat, sandpaper, plastic sheeting, painter’s tape, mixing buckets, stir sticks, gloves, brushes, rollers, squeegees, a torch or heat gun, pigments, and possibly a topcoat.
Professional epoxy countertop installation usually costs much more because labor is the expensive part. Epoxy work takes skill, timing, cleanup, and experience. A pro may also produce more consistent edges, seams, and finishes.
Best Surfaces for Epoxy Countertop Resurfacing
Epoxy works best when the existing countertop is solid, stable, clean, and well-adhered. Laminate counters are popular candidates because they are common in older kitchens and often structurally sound even when visually outdated.
Wood and MDF can also work, but they require sealing because porous surfaces may absorb product unevenly. Tile can be coated, but grout lines must be filled and leveled if you want a smooth stone-like finish. Concrete can be an excellent base, but it must be clean, dry, and free from loose sealer or dust.
Epoxy should not be used as a magic blanket over rotten wood, loose tile, swollen particleboard, moisture damage, or unstable surfaces. If the counter underneath is failing, epoxy will not turn it into a superhero. It will simply make the problem shinier.
Design Ideas for Stone Coat Countertops
Classic White Marble
White marble is one of the most popular epoxy countertop looks. A white undercoat, gray veining, subtle movement, and a clear top layer can create a bright, upscale appearance. This works especially well in kitchens with shaker cabinets, brass hardware, or modern farmhouse styling.
Black Marble With Metallic Veins
Black epoxy countertops with gold, copper, silver, or pearl veining create a dramatic luxury look. This style works beautifully for bars, powder rooms, dark kitchens, and statement islands.
Granite-Inspired Speckled Finish
A granite look can be more forgiving than high-contrast marble because speckles and movement help hide crumbs, fingerprints, and minor wear. This is practical for busy kitchens where the countertop sees coffee spills, lunch prep, and the occasional mystery sticky spot.
Concrete Look
Gray epoxy with soft movement can create an industrial concrete-inspired surface without the weight and sealing demands of real concrete. It pairs well with black fixtures, open shelving, and modern minimalist spaces.
Artistic Custom Pour
Epoxy is ideal for creative surfaces. Ocean waves, geode patterns, galaxy colors, embedded objects, and metallic rivers are all possible. Just remember: artistic pours can look amazing, but they may not appeal to every future buyer if you plan to sell your home soon.
DIY Installation Tips for Better Results
Read all instructions before mixing anything. Once resin and hardener meet, your project has officially left the planning stage. Know your working time, cure time, mixing ratio, and temperature range first.
Work in the right environment. Temperature and humidity affect flow and curing. A room that is too cold may slow curing; too hot, and your epoxy may set faster than expected.
Mix slowly and thoroughly. Whipping the epoxy like cake batter creates bubbles. Stir carefully, scrape the sides and bottom of the container, and follow the product’s mixing instructions.
Do a sample board. Practice your colors, veining, and movement on scrap material. This one step can prevent your actual countertop from becoming an expensive abstract painting titled “Panic at the Island.”
Plan your edges. Countertop edges are where many DIY projects reveal themselves. Tape, flood coats, chop brushes, and controlled drips can help create a finished look.
Control dust. Turn off fans that blow dust across the surface. Clean the room beforehand. Keep pets away unless you want a permanent paw-print fossil in your kitchen remodel.
How to Maintain Epoxy Countertops
Daily care is simple. Wipe spills promptly, clean with mild soap and water or a non-abrasive cleaner, and dry the surface with a soft cloth. Avoid harsh chemicals, bleach, abrasive pads, and gritty powders. Cutting boards are a must because knives can scratch the finish.
Use trivets under hot cookware and heat-producing appliances. Even if the product is heat resistant, repeated heat exposure can dull, discolor, or damage the surface over time. Also avoid dragging heavy appliances across the counter. Lift the mixer, toaster oven, or espresso machine instead of scooting it like a tiny kitchen bulldozer.
Are Stone Coat Countertops Worth It?
Stone Coat epoxy countertops are worth considering if you want a dramatic visual upgrade, enjoy DIY projects, and are realistic about the process. They can deliver a custom, high-end look for much less than many replacement countertop materials. They are especially attractive for budget renovations, rental refreshes, bathroom vanities, laundry rooms, bars, craft rooms, and kitchens where the existing counters are ugly but structurally sound.
They may not be the best choice if you want a completely maintenance-free surface, dislike detailed prep work, or expect the durability of natural stone without any care. Quartz, granite, stainless steel, and solid surface materials may be better for homeowners who prefer professional installation and predictable factory-made finishes.
Real-World Experience: What It’s Like Living With Epoxy Countertops
The first thing people notice about Stone Coat-style epoxy countertops is the shine. Freshly cured epoxy can look unbelievably polished, almost like the counter is wearing lip gloss. In a kitchen with good lighting, the surface can make the entire room feel brighter and newer. That “before and after” moment is addictive. One day you have beige laminate from the era of dial-up internet; the next day you have a glossy faux marble counter that makes your coffee maker look underdressed.
But living with epoxy also teaches you a few practical lessons. The most important is that the final result depends more on preparation than artistic talent. Beautiful veining will not save a surface that was greasy, dusty, or poorly sanded. The best DIYers treat prep like the main event. They remove silicone, rough up the surface, repair seams, tape carefully, and clean more than once. The actual pour is exciting, but the quiet boring work beforehand is what makes the countertop last.
Another real-life lesson: perfection is rare, and that is okay. A tiny dust speck, a small ripple, a softer vein than planned, or a drip you had to sand later does not mean the project failed. Handmade surfaces have character. The goal is a beautiful, functional countertop, not a laboratory mirror inspected by countertop detectives with magnifying glasses.
Epoxy also changes how you use the kitchen. Most owners become more careful with hot pans and sharp knives. Cutting directly on the surface is a bad habit, so cutting boards become part of the routine. Trivets become non-negotiable. Gentle cleaners replace harsh scrubbing powders. This is not high-maintenance behavior; it is simply respecting the finish. The same way you would not use marble as a chopping block or quartz as a landing pad for a red-hot skillet, epoxy deserves reasonable care.
One surprisingly helpful experience is choosing a forgiving design. White marble with dramatic gray veins looks gorgeous, but every crumb may audition for attention. A soft granite-inspired pattern or subtle stone movement can be more practical for families, coffee lovers, snackers, and anyone who occasionally makes toast with the enthusiasm of a confetti cannon. Satin or matte topcoats can also make daily wear less obvious than ultra-gloss finishes.
If you are doing the project yourself, the emotional timeline is predictable. First comes confidence. Then comes nervous measuring. Then comes the pour, during which time speeds up and every bubble feels personal. After that, you stare at the counter for hours, wondering if it is curing correctly. Finally, once the tape comes off and the surface hardens, you feel like a renovation wizard. A tired kitchen suddenly looks custom, and you start eyeing every table in the house as a potential epoxy victim.
The best advice from experience is simple: do a sample board, buy enough material, protect the room, keep a wet edge, and do not rush the cure. Give the countertop the time the product requires before putting appliances, dishes, or daily traffic back on it. Epoxy rewards patience. Rush it, and it will remind you that chemistry does not care about your dinner plans.
Conclusion
Stone Coat Countertops offer a creative, budget-conscious way to transform existing counters with epoxy. They can look like marble, granite, quartz, concrete, or something completely custom. When done well, epoxy countertops are glossy, water-resistant, nonporous, and visually impressive. When done poorly, they can bubble, peel, scratch, or cure unevenly. The difference usually comes down to preparation, product knowledge, timing, and patience.
If your countertops are structurally sound and you enjoy hands-on renovation, Stone Coat epoxy can be a rewarding project. It is not effortless, but it is achievable. Think of it as countertop resurfacing with a little science, a little art, and a lot of painter’s tape. Respect the process, use the right safety gear, protect the finish afterward, and your kitchen may get the glow-up it has been quietly begging for.
Note: This article was written from a synthesis of current U.S. manufacturer guidance, home improvement resources, countertop cost references, epoxy safety recommendations, and practical DIY countertop resurfacing knowledge. Always follow the specific instructions and safety data for the product you use.