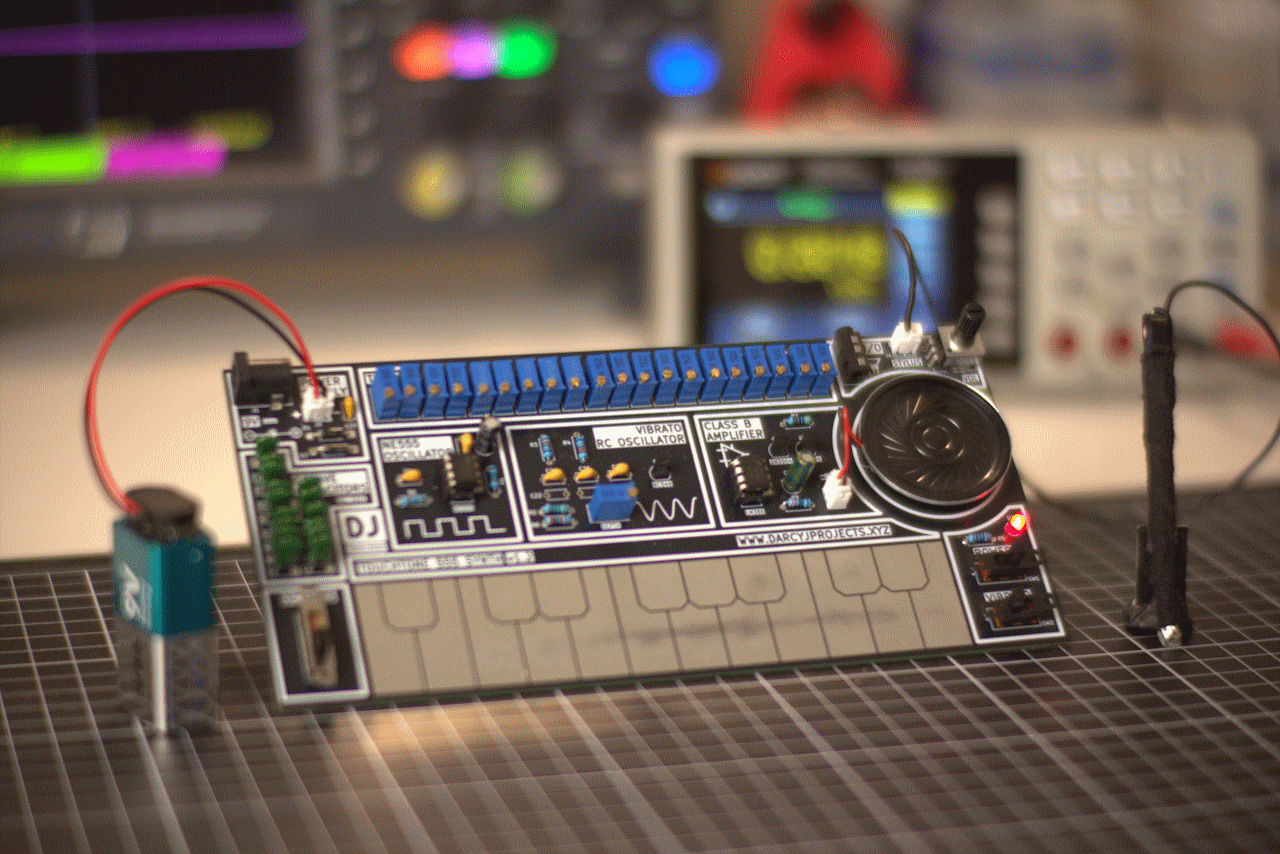

Some electronic parts are so famous they stop being components and become punchlines. The 555 timer is one of them. Need a blinking LED? Use a 555. Need a tone generator? Use a 555. Need a tiny robot to announce its feelings through aggressive beeping? Obviously, use a 555. So when a stylus synth appears on the workbench, inspired by the classic pocket-sized Stylophone, the internet’s most predictable chorus begins: “Should have used a 555.” This time, gloriously, it did.
The project at the center of this tiny analog celebration is a stylus-controlled synthesizer called TouchTone 555, built around the NE555 timer IC in astable oscillator mode. It takes the familiar idea of touching a metal stylus to a printed keyboard and turns it into a hands-on lesson in analog sound, pitch control, circuit loading, vibrato, amplification, decoupling, and the eternal truth that breadboards are where confidence goes to be humbled.
But this is not just a nostalgia toy with a square wave and a charming buzz. It is a reminder that the best DIY electronic music projects often succeed because they are understandable. You can see the signal path. You can hear the capacitor choices. You can feel the tuning drift when a circuit stage misbehaves. And when the 555 starts singing, it is not polished, sterile, or apologetic. It sounds like a calculator discovered punk rock.
Why a Stylus Synth Still Feels Magical
A stylus synth is beautifully simple: a handheld probe touches different points on a conductive keyboard, closing a circuit and selecting different resistance values. Those resistances alter the oscillator frequency, producing different pitches. There is no need for velocity-sensitive keys, menu diving, firmware updates, or a tiny screen that asks you to confirm your life choices. You touch metal, electricity changes course, sound comes out. That directness is the entire charm.
The classic Stylophone became famous because it packaged this interaction into a quirky, affordable, pocket-sized instrument. Its sound was thin, buzzy, and instantly recognizable. That was not a flaw; that was the brand. A stylus synth is not trying to imitate a grand piano. It is trying to sound like a cheerful robot trapped inside a lunchbox. The modern DIY version honors that heritage while giving builders more room to experiment.
TouchTone 555 follows the same broad spirit: a metal contact interface, a single main oscillator, and a deliberately analog signal chain. The big difference is that the project embraces the 555 timer as the core tone generator. That decision gives the build a certain educational elegance. The NE555 is cheap, common, forgiving, and widely documented. It is also just unruly enough to teach real lessons when used for audio.
The 555 Timer: Small Chip, Big Personality
The 555 timer is one of the most beloved integrated circuits in electronics because it sits at the perfect intersection of simplicity and usefulness. It can act as a timer, pulse generator, oscillator, or general-purpose mischief engine. In astable mode, it repeatedly charges and discharges a capacitor through resistors, creating a continuous rectangular waveform. Feed that waveform to an audio stage, and congratulations: the chip has learned to yell in pitch.
In a stylus synth, pitch depends on timing. Change the resistance or capacitance in the oscillator network, and the charge-discharge cycle changes. Shorter timing periods create higher frequencies; longer timing periods create lower notes. That is the basic trick. It is not a digital sample, not a wavetable, not a software instrument wearing vintage sunglasses. It is analog timing translated into sound.
The NE555 is especially appropriate because it is easy to grasp. Pins 2 and 6 can be tied together for astable operation. Pin 7 handles discharge. A timing capacitor fills and empties between internal threshold levels. Pin 3 outputs the pulse train. Pin 5, the control-voltage pin, can be nudged to modulate behavior. On paper, it looks straightforward. On a breadboard, it looks straightforward until the speaker, amplifier, wiring capacitance, power supply, and volume control all start voting on the pitch.
How TouchTone 555 Turns Touch Into Tone
The clever part of a stylus synth is the keyboard. Instead of pressing mechanical keys, the player uses a stylus to bridge contact points. Each key position corresponds to a different resistance path in the oscillator circuit. Touch one pad and the 555 sees one timing resistance. Touch another and it sees a different one. The output frequency changes, and the instrument plays another note.
TouchTone 555 improves the basic idea by using trim potentiometers rather than relying only on fixed resistor values. That matters because real musical tuning is fussy. Resistors have tolerances, capacitors wander, layout affects behavior, and a theoretical note chart can turn into a small herd of confused goats when assembled in the real world. Trim pots let each note be adjusted individually, turning the keyboard from “roughly musical” into something far more playable.
The project also uses capacitor banks to create octave ranges. This is a neat analog solution: instead of asking one timing capacitor to cover every pitch range, a switch selects different capacitance values. Larger capacitors lower the oscillator frequency; smaller capacitors raise it. With a multi-position switch, the instrument can jump between octave regions without needing a microcontroller, DAC, or firmware. It is old-school, tactile, and satisfying in the way only a clicky hardware switch can be.
Square Waves: The Sound of “It Works!”
The 555 naturally produces a rectangular or square-like waveform in astable mode, and that waveform has a strong harmonic structure. In plain English: it sounds buzzy. Not warm like a vintage string machine, not creamy like a filtered sawtooth, but bright, sharp, and wonderfully direct. A square wave is the sound of a circuit raising its hand and refusing to whisper.
For a stylus synth, that is perfect. The classic pocket synth sound has always lived in the land of buzz, chirp, and wobble. The NE555 leans into that identity. It is not embarrassed by its edges. In fact, those edges are what make the instrument cut through background noise. Through a small speaker, the tone has the charmingly rude quality of an arcade cabinet arguing with a doorbell.
Of course, raw square waves can be harsh. That is where filtering, coupling capacitors, amplifier choices, and speaker response come into play. Even a basic audio path changes the character of the sound. A small speaker rolls off low frequencies. A coupling capacitor removes DC offset. A transistor amplifier adds its own imperfections. The result is not laboratory purity, but personality.
The Speaker Problem: Why You Do Not Just Plug It In and Pray
One of the most useful lessons from this kind of project is that an oscillator is not the same thing as an audio amplifier. A 555 output can drive certain loads, but connecting a speaker directly is often a bad idea. Speakers are low-impedance devices. They want current. They also do not appreciate being fed DC offset like it is part of a balanced breakfast.
In a practical synth build, the signal needs conditioning. A coupling capacitor can block DC so the speaker receives the changing part of the waveform rather than a constant push in one direction. An amplifier stage can provide the current needed to move the speaker cone without forcing the 555 to do all the heavy lifting. This is where the project becomes more than “make chip beep.” It becomes audio electronics.
TouchTone 555 went through the familiar builder’s journey: try an approach, discover weird behavior, isolate the problem, revise the circuit, and learn why the schematic is only half the battle. Op-amps, buffers, transistor push-pull stages, and supply filtering all become important. The moment the volume control changes the pitch, the circuit is politely informing you that one stage is loading another. Polite, in this case, means “annoying but educational.”
Buffers, Loading, and the Art of Not Bothering the Oscillator
Analog circuits are social creatures. Unfortunately, some of them are bad roommates. If the amplifier input or volume control interacts too strongly with the 555 output, the oscillator can become unstable or detuned. That is why buffering matters. A voltage follower can isolate the oscillator from the next stage, allowing the 555 to generate tone while the amplifier handles the speaker business.
This is a classic design principle: each stage should do its own job without dragging the previous stage into drama. The oscillator creates the waveform. The buffer protects it. The volume control sets level. The amplifier drives the speaker. The power supply filtering keeps sudden current demands from making the oscillator wobble. When those jobs are separated, the instrument becomes more predictable and more playable.
That predictability is especially important in a musical circuit. In a blinking LED project, a little timing variation may be invisible. In a synth, pitch errors are obvious. The human ear is annoyingly good at detecting when a note is sour. A stylus synth can be charmingly lo-fi, but it still needs enough stability that the player feels in control rather than haunted by a ghost capacitor.
Vibrato: The Wiggle That Makes It Sing
A plain square wave can be fun, but vibrato gives it life. Vibrato is a small, periodic variation in pitch. In a 555-based stylus synth, that can be achieved by modulating the control-voltage behavior of the oscillator. TouchTone 555 uses a separate RC oscillator approach for the vibrato rather than simply throwing another 555 at the job. Somewhere, a 555 meme purist just dropped a solder spool.
Still, the design choice makes sense. A low-frequency oscillator can gently vary the threshold behavior of the main tone generator, causing the pitch to wobble. Add a depth control, and the player can move from subtle shimmer to “the robot is seasick.” That depth control is a particularly nice improvement because vibrato is expressive. Sometimes a note needs a little movement. Sometimes it needs to wobble like a cassette deck falling down stairs.
The important point is that the project keeps the sound-shaping analog. No hidden digital modulation. No software LFO. Just resistors, capacitors, transistors, and a control-voltage path doing their wiggly little dance.
Why This Project Works as an Educational Build
A good beginner-to-intermediate electronics project should reward curiosity. TouchTone 555 does exactly that. At first glance, it is a simple DIY synth. Look closer, and it becomes a guided tour through essential analog concepts. The builder encounters RC timing, oscillator frequency, duty cycle, PCB keyboard layout, tuning networks, audio coupling, decoupling capacitors, buffering, transistor amplification, and practical debugging.
It also teaches humility. The 555 timer is simple, but simple does not mean magical. Power supply noise can creep into the audio. Breadboard wiring can add parasitic effects. Component tolerances can shift notes. A speaker can pull more current than expected. A potentiometer can behave differently in-circuit than it did in your optimistic imagination. This is not failure; this is electronics introducing itself properly.
The best part is that each problem has a visible, testable fix. Add decoupling near the IC. Separate oscillator and amplifier stages. Use AC coupling. Adjust trim pots. Change capacitor values. Probe the waveform. Listen again. The project encourages the builder to think like a designer rather than a parts assembler.
Analog Synth Character in a Digital World
Modern music technology is astonishing. A laptop can run orchestras, modular racks, granular effects, and virtual instruments that would have seemed like science fiction not long ago. But a stylus synth built around a 555 timer offers something different: physical cause and effect.
There is value in hearing a note change because your stylus touched a different pad. There is value in tuning each note manually. There is value in discovering that a capacitor swap can move the entire instrument into a new range. These experiences make electronics less abstract. They also make sound design more playful.
A 555 stylus synth will not replace a professional synthesizer, and it should not try. Its strength is immediacy. It invites experimentation without the pressure of perfection. You can play melodies, make sound effects, annoy nearby mammals, and learn more in one afternoon than you might from ten passive videos. It is not merely a gadget. It is a tiny analog classroom with a speaker.
Design Details That Make the Build Stand Out
1. Tunable Notes With Trim Pots
Using trim potentiometers for individual note adjustment is one of the smartest choices in the design. Fixed resistors are cheaper and cleaner, but trim pots make the instrument tunable after assembly. That is a big deal when real-world components rarely match theoretical values perfectly.
2. Capacitor Banks for Octave Switching
The capacitor bank gives the synth multiple pitch ranges while keeping the design analog. Selecting different timing capacitors changes the oscillator’s frequency range in a direct and understandable way. It is also more fun than it has any right to be.
3. A Separate Vibrato Circuit
The vibrato circuit adds expressiveness and teaches modulation. By influencing the main oscillator through the control-voltage path, the instrument gains movement without abandoning its analog personality.
4. Buffering and Amplification
The revised audio path shows practical engineering thinking. Isolate the 555, control the level, drive the speaker properly, and filter the supply. These are not glamorous choices, but they are the difference between a circuit that “technically works” and one that can actually be played.
What Builders Can Learn From a 555 Stylus Synth
The first lesson is that sound is an excellent debugging tool. If the pitch changes when you touch the volume knob, something is interacting. If the output crackles, look at wiring, grounding, and supply stability. If the notes drift, check timing components and loading. A synth complains audibly, which is both helpful and slightly rude.
The second lesson is that datasheets matter. The 555 is friendly, but it still has electrical limits and behaviors that need respect. Understanding output current, supply voltage, threshold levels, and timing formulas turns guesswork into design. The chip may be old, but it is not a toy in the engineering sense. It is a serious component that happens to be very good at making silly noises.
The third lesson is that layout matters. A circuit that works on a breadboard may behave differently on a PCB, and a PCB with imperfect routing or missed connections can require creative rescue work. That is part of the journey. Every bodge wire is a tiny diploma.
Hands-On Experience: Building, Playing, and Debugging a 555 Stylus Synth
Working with a 555-based stylus synth feels different from building a purely digital music gadget. The experience starts with the parts. An NE555 in an 8-pin package does not look impressive. A few resistors, capacitors, potentiometers, transistors, and a speaker do not scream “musical instrument.” But once the oscillator comes alive, the bench changes. The circuit is no longer a diagram. It has a voice, even if that voice sounds like a tiny vending machine demanding attention.
The first satisfying moment is hearing the raw oscillator. It is usually not beautiful. It may be too loud, too quiet, too high, too low, or so unstable that it seems to be playing jazz against everyone’s will. But it proves the core idea. The 555 is oscillating. The timing network is working. The speaker is converting electricity into air movement. That first beep is the analog equivalent of a campfire spark.
Then comes tuning, which is where patience enters wearing safety glasses. A stylus keyboard with trim pots gives you control, but it also gives you responsibility. Each note needs adjustment. Move one trimmer too far and the scale develops a limp. Change the octave capacitor and the whole range may need a second pass. This is where a tuner app, a small screwdriver, and a calm attitude become essential tools. It can feel slow, but it also makes the instrument personal. You are not loading a preset; you are persuading hardware into music.
Debugging the audio stage is often the most instructive part. Many builders expect the oscillator to be the hard part, but the amplifier usually has other plans. If the 555 output is connected too directly to a low-impedance load, pitch stability can suffer. If the supply rails are noisy, the tone may buzz in ways that are not artistically useful. If the coupling capacitor is missing or poorly chosen, the speaker may receive DC offset or lose too much low-frequency energy. These problems teach more than a perfect kit ever could.
Adding vibrato is another memorable step because it changes the circuit from a tone generator into something more expressive. A plain square wave is fun, but a wobbling square wave has attitude. With a depth control, the player can dial in a tasteful shimmer or full cartoon panic. The effect makes the synth feel alive, especially when sliding the stylus across adjacent pads or holding a note while gradually increasing modulation.
Playing the finished instrument is delightfully imperfect. The stylus interface encourages glides, accidental chirps, and quick melodic stabs. The speaker gives the sound a portable, boxy character. The 555 provides a bright pulse that cuts through the room. It is not a refined concert instrument, but it is incredibly playable in the same way a kazoo is playable: instantly, joyfully, and with only minor concern for neighbors.
The biggest experience-related takeaway is that a 555 stylus synth rewards iteration. Version one may beep. Version two may tune better. Version three may reduce noise. Version four may add a nicer enclosure, a line output, a filter, or a more stable power section. The project naturally invites upgrades. Each improvement is understandable because the circuit is transparent. You can point to a component and explain what it does. That is rare magic in an era when many devices hide their cleverness behind firmware and sealed cases.
In the end, building this kind of synth is not only about making music. It is about developing intuition. You learn how resistance and capacitance shape time, how time becomes frequency, how frequency becomes pitch, and how tiny circuit decisions become audible character. The 555 timer is the star, but the real achievement is the builder’s growing ability to listen to a circuit and understand what it is trying to say.
Conclusion: The 555 Was the Right Kind of Wrong
“Should have used a 555” is funny because it is often lazy advice. The 555 is not the best solution to every problem. It will not fix your Wi-Fi, cook rice, or make your bandmate show up on time. But for a stylus synth, the joke lands because the chip genuinely fits the job. It is simple, expressive, educational, and just imperfect enough to make the project interesting.
TouchTone 555 succeeds because it does not overcomplicate the idea. It takes a classic stylus-controlled instrument concept and rebuilds it with a beloved analog timer at the center. Along the way, it demonstrates practical electronics lessons that matter far beyond synthesizers: isolate stages, respect loads, filter power, tune carefully, and never trust a breadboard until it has earned your confidence.
The result is more than a novelty. It is a tiny analog synth with history in its bones, a square wave in its lungs, and a 555 timer proudly doing what it has done for decades: making engineers smile, beginners curious, and speakers buzz with questionable dignity.