
A fireplace should make comforting noises. A gentle flame hiss? Fine. A little metal ticking as the firebox warms up? Often normal. A blower that suddenly sounds like a coffee grinder arguing with a shopping cart? That deserves attention.
When a fireplace blower is making noise, the culprit may be as simple as dust on the fan wheel or a loose mounting screw. However, grinding, rumbling, squealing, or heavy vibration can also signal a worn blower motor. At that point, cleaning may buy you exactly seven peaceful minutes before the mechanical orchestra starts its second performance.
The good news is that replacing a fireplace blower can be a manageable DIY repair on many gas fireplaces and inserts. The important words are on many. Fireplace designs vary widely, and the manufacturer’s service manual always takes priority over a general guide.
Below, we’ll diagnose common fireplace blower noises, determine whether cleaning or replacement makes sense, and walk through a typical blower replacement process without disturbing the gas system.
What Does a Fireplace Blower Actually Do?
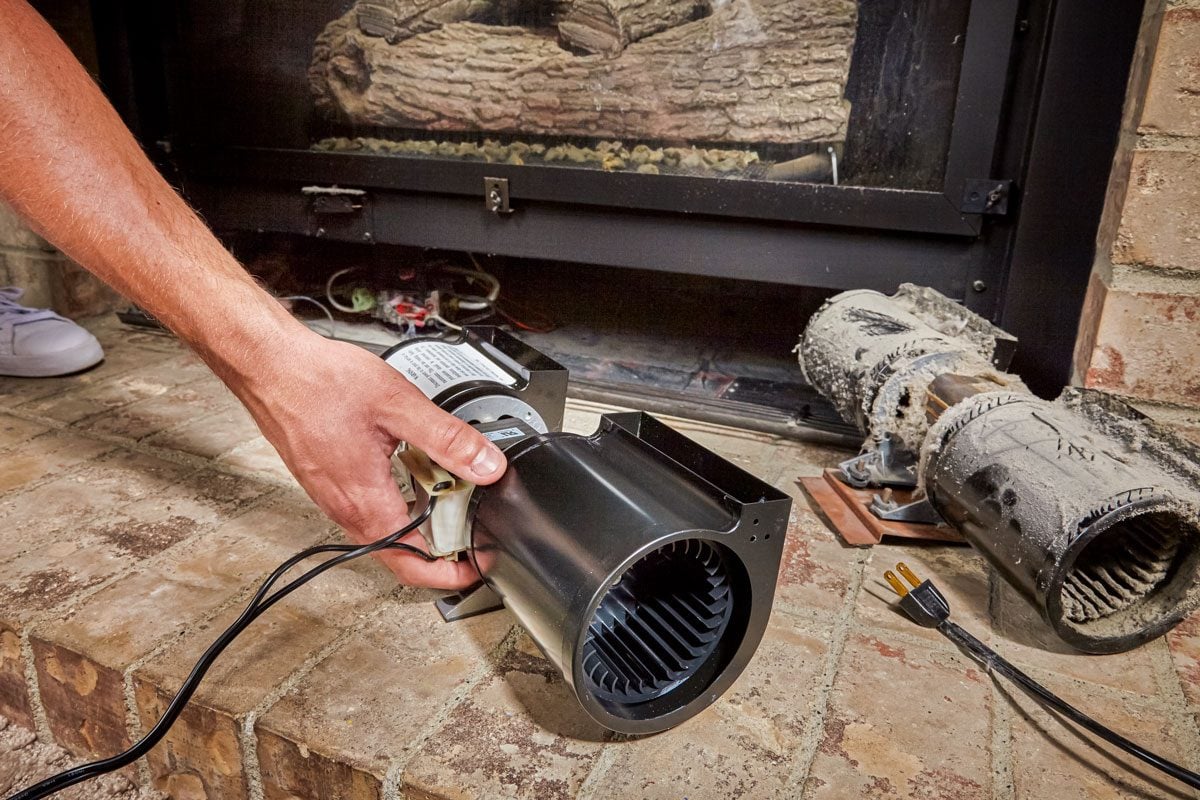
A fireplace blower, sometimes called a fireplace fan or circulation fan, moves room air around the hot portions of the appliance and pushes warmed air back into the living space. It does not create the flame, and on many gas fireplaces it is not the same thing as a combustion or power-vent fan.
That distinction matters. A circulation blower is often located in a lower control compartment, behind a louver, or beneath the firebox. Depending on the model, it may plug into an internal receptacle or connect through a wiring harness.
Many blower systems also include a temperature-sensitive switch, often described as a thermal switch or snap-disc control. This is why a fireplace fan may not start the instant you turn on the flames. The appliance needs to warm up first. Likewise, the fan may continue operating briefly after the burner is turned off while heat remains in the unit.
In other words, a delayed blower is not automatically a broken blower. A blower that sounds as though it is machining its own replacement parts probably is.
Fireplace Blower Making Noise: What the Sound May Mean
Before ordering a replacement, listen carefully. Different noises can point toward different problems.
A Smooth Whir That Changes With Fan Speed
Some fan noise is normal. Fireplace blowers move air, and moving air is not silent. A smooth whir may become more noticeable at higher speed settings.
If the noise has always been present, does not include vibration or scraping, and changes predictably with the blower control, the fan may simply be operating normally.
Rattling or Buzzing
A rattle frequently suggests vibration. The blower housing may be loose, a mounting bracket may not be seated correctly, or another component may be touching the fan assembly.
Loose access panels can create surprisingly dramatic noises too. Before condemning the motor, lightly press on the cool exterior access panel while the blower is running. If the noise changes, the panel or mounting hardware may be the real troublemaker.
Rhythmic Clicking or Scraping
A repeating click that follows fan speed may indicate that the blower wheel is touching a wire, housing edge, or accumulated debris. A slightly shifted motor assembly can also allow rotating parts to make contact.
Turn the fireplace off rather than letting the fan repeatedly strike an obstruction. A wire resting in the path of a blower wheel is not a problem that improves through positive thinking.
Rumbling or Grinding
Deep rumbling and grinding often point to a deteriorating motor or bearing problem, particularly when the sound remains after the blower has been cleaned.
Dust buildup can unbalance a fan and increase vibration, so cleaning is still worth trying. However, a motor that feels rough when manually rotated with the power disconnected or produces persistent grinding is a strong replacement candidate.
Squealing
A high-pitched squeal may be associated with motor wear. Do not automatically reach for household oil or spray lubricant. Many fireplace blower assemblies use bearings that are not intended for routine homeowner lubrication.
Check the manufacturer’s instructions. Spraying a mystery lubricant into a hot appliance can turn a straightforward repair into a much more interesting conversation with a service technician.
Ticking or Popping After the Burner Starts
Not every fireplace noise comes from the blower. Metal firebox components can expand and contract as the appliance heats and cools. If the sound occurs with the fan switched off, the blower may be innocent.
A useful diagnostic trick is to compare the fireplace with the blower off, at low speed, and at higher speed. If the noise follows blower speed, focus your investigation on the fan assembly.
Clean the Blower Before Replacing It
Fireplace blowers live surprisingly dusty lives. Room air passes through the lower fireplace area, carrying pet hair, carpet fibers, and ordinary household dust. Over time, debris can collect on the blower wheel and inside the housing.
Before buying a new motor, try a careful cleaning.
1. Shut Down the Fireplace
Turn the appliance off and let it cool completely. Follow the owner’s manual for shutting down the unit before service. Disconnect electrical power by unplugging the blower or switching off the appropriate circuit breaker when required by the manufacturer’s procedure.
If the fireplace is gas-fired, do not disconnect, loosen, or move a gas line while performing a simple blower repair.
2. Open the Blower Access Area
Many gas fireplaces have a lower louver, decorative front, or access panel that can be removed without opening the sealed firebox. The exact design varies by model.
Use a flashlight and identify the blower before removing anything. This is also an excellent moment to take several phone photos. Future You, crouched on the floor holding two connectors and questioning every decision that led to this moment, will appreciate them.
3. Vacuum Loose Dust
Use a vacuum with a crevice or soft-brush attachment to remove dust from the blower and surrounding compartment. A small soft brush can help loosen debris on the fan wheel.
Avoid aggressively bending fan blades or forcing the wheel to spin at extreme speed with compressed air. The goal is cleaning, not auditioning the blower for aircraft service.
4. Inspect for Obstructions
Look for wires, insulation, debris, or loose components near the rotating blower wheel. Wiring should remain clear of moving components and hot surfaces according to the appliance design.
Also check visible mounting screws and brackets. Tighten only the hardware intended to secure the fan. Do not randomly tighten gas valve components or other unfamiliar fittings.
5. Test the Fireplace
Restore the fireplace to a safe operating condition before testing. Reconnect power, reinstall any protective parts required for operation, and start the appliance according to the manual.
Remember that a thermally controlled blower may require several minutes of fireplace operation before starting.
If cleaning eliminates the noise, congratulations. You have fixed the problem for the cost of electricity and an awkward amount of floor-level stretching.
If grinding, rumbling, or squealing remains, replacement is usually the more sensible next step.
How to Find the Correct Replacement Fireplace Blower
Do not choose a blower because the product photo looks approximately fan-shaped. Fireplace blower compatibility can depend on mounting dimensions, electrical requirements, connector type, motor specifications, control systems, and appliance temperature limits.
Locate the Model and Serial Number
Find the fireplace rating plate or serial-number decal. Depending on the appliance, it may be near the controls, behind a lower access panel, beneath a louver, on a pull-out information card, or on another manufacturer-specified location.
Write down the complete model and serial number. Do not rely on a vague description such as “the black fireplace we bought after moving in.”
Check the Parts Manual
Search the manufacturer’s parts information using the exact fireplace model. Determine whether the manufacturer lists a complete blower assembly, a motor and wheel assembly, or an accessory blower kit.
If the existing fan still runs but the motor is noisy, some designs allow replacement of the motor/fan assembly while retaining controls or brackets. Other fireplaces call for replacement of a complete assembly.
Compare the New and Old Parts Before Installation
With the old blower removed, place it beside the replacement and compare:
- Mounting points and bracket shape
- Overall blower dimensions
- Electrical connectors
- Grounding arrangement
- Wire length and routing
- Fan-wheel position
- Part and model numbers
A small difference may be intentional in a revised manufacturer part, but don’t improvise modifications unless the replacement instructions specifically call for them.
Tools You May Need
The exact tools depend on the fireplace, but a typical blower replacement may require a Phillips screwdriver, nut driver or socket set, flashlight, work gloves, vacuum with a soft attachment, small brush, and a phone for reference photos.
A magnetic parts tray is optional but useful. Fireplace screws have a supernatural ability to roll directly beneath the heaviest object in the room.
How to Replace a Noisy Fireplace Blower
The following steps describe a common gas-fireplace circulation blower arrangement. Your owner’s, installation, or service manual should override any step that differs for your model.
Step 1: Turn Off the Fireplace and Let It Cool
Shut down the fireplace and allow all components to become fully cool. Fireplace glass and metal can remain hot well after the visible flames are gone.
Follow the manufacturer’s shutdown instructions. Disconnect electrical power to the blower system. If the procedure in your model’s manual calls for placing the appliance gas control in an off position for service, follow that procedure exactly.
Step 2: Remove the Lower Access Panel
Remove the louver, control cover, or access panel that conceals the blower. Some panels lift out; others use screws or clips.
Set decorative components on a towel so they are not scratched. Keep all screws organized.
Step 3: Photograph the Existing Wiring
Before unplugging a connector, take clear pictures from several angles. Capture the blower, wiring harness, ground connection, speed-control wiring, and thermal-switch connections that are visible.
Do not assume every fireplace uses the same wire colors or plug arrangement.
Step 4: Disconnect the Blower Wiring
Disconnect the blower according to the service instructions. Many assemblies use quick-connect terminals or plug-style connectors. Pull on the connector body rather than yanking the wire.
If a ground wire is attached to the blower bracket or grounding point, note its exact position.
Stop if you find burned insulation, melted connectors, scorched terminals, or an improvised wiring repair. Those symptoms justify professional electrical diagnosis rather than simply installing a new motor and hoping the smoke marks feel better tomorrow.
Step 5: Remove the Blower Mounting Hardware
Remove the screws, nuts, or clips that secure the blower assembly. Support the fan with one hand as the last fastener comes out.
Depending on the fireplace, the blower may need to slide sideways before it can be lifted from the compartment. Avoid forcing it against gas tubing, control wiring, or the gas valve.
If removing the blower appears to require bending a gas line or disassembling burner components, stop and consult a qualified fireplace service professional.
Step 6: Remove the Old Blower
Carefully work the blower out of the access opening. Pay attention to the original orientation.
Once removed, inspect the old fan. Look for heavy dust, damaged wheel fins, shiny scrape marks, loose motor hardware, or obvious movement in the motor shaft.
Scrape marks are especially useful clues. They can show exactly where the blower wheel was touching its housing or another component.
Step 7: Prepare the Replacement Assembly
Compare the new blower with the original. If the manufacturer instructs you to transfer a bracket, vibration pad, grommet, thermal component, or wiring part, do so now.
Never substitute random foam, ordinary plastic, or household padding near a fireplace to reduce vibration. Components installed in a hearth appliance may be exposed to elevated temperatures and must be suitable for the manufacturer’s application.
Step 8: Install the New Fireplace Blower
Place the replacement blower in the same orientation as the original. Align it with the mounting points and install the specified hardware.
Tighten the mounting fasteners securely, but avoid crushing rubber isolation components or stripping sheet-metal threads.
Before connecting power, gently rotate the blower wheel by hand when the design permits. It should move without contacting wiring or the housing.
Step 9: Reconnect the Wiring
Reconnect the blower wires exactly as specified for your fireplace. Restore the ground connection if one was removed.
Route wires away from the fan wheel and other moving parts. Keep the harness away from hot areas according to the original routing and service instructions.
Compare the finished wiring with your before photos. This simple check catches a surprising number of “why is that plug still in my hand?” situations.
Step 10: Inspect the Compartment
Before closing the access area, confirm that:
- No tools are inside the fireplace compartment
- No loose screws remain near the blower
- The fan wheel rotates freely
- Electrical connections are secure
- Grounding is restored
- Wires are clear of hot and moving components
- No gas components were loosened or disturbed
Step 11: Reinstall Required Covers
Replace the access panel, louver, screen, or other protective parts required by the appliance manufacturer.
Do not operate the fireplace with a required protective component removed simply because you want a better view of the fan. The service manual’s reassembly instructions exist for a reason.
Step 12: Test the New Blower
Restore electrical power and operate the fireplace normally. Allow enough time for a thermally controlled blower to start.
Begin at a lower fan setting, then gradually increase the speed. Listen for rubbing, repeated clicking, or excessive vibration.
A normal blower should produce airflow and some fan sound. What you do not want is grinding, severe rumbling, or a cabinet-shaking rattle.
If the replacement blower makes the same noise as the old one, switch the unit off and investigate mounting alignment, wiring interference, the speed control, and other fireplace components. Two motors making an identical racket can mean the motor was never the real problem.
Common Mistakes When Replacing a Fireplace Blower
Buying a “Universal” Fan Without Confirming Compatibility
A universal blower may fit some applications, but fireplace manufacturers often specify particular assemblies for specific models. Confirm compatibility before ordering.
Forgetting About the Thermal Fan Control
A replacement blower that does not start immediately may be waiting for the fireplace to heat up. Give the system the manufacturer-specified warm-up time before declaring the repair unsuccessful.
Letting Wires Touch the Fan Wheel
A wire can create clicking, scraping, and eventual insulation damage if it enters the blower’s rotating path. Copy the original harness routing carefully.
Ignoring Mounting Vibration
A perfectly healthy motor can become noisy when the assembly is crooked or loose. Confirm that brackets and specified vibration-control parts are properly seated.
Lubricating a Motor Without Instructions
Do not assume every noisy bearing wants oil. Some blower motors use sealed components. Follow the appliance or blower manufacturer’s maintenance directions.
Working While the Fireplace Is Hot
This mistake needs very little explanation. Fireplaces are surprisingly committed to the concept of heat.
When Should You Call a Fireplace Technician?
DIY blower replacement is most appropriate when the manufacturer provides a clear service procedure and the blower is accessible without altering the gas system.
Call a qualified service professional when you notice a gas odor, suspected gas leak, melted wiring, burned terminals, repeated circuit-breaker trips, damaged controls, or a blower that overheats.
Professional service is also the better choice if blower removal requires disturbing gas tubing, the burner, venting components, sealed fireplace glass, or other safety-critical assemblies.
If your model information is missing or the fireplace has been modified by a previous owner, professional identification is much smarter than playing “guess that appliance” with electrical and gas equipment.
How to Keep a New Fireplace Blower Quieter
Once the new blower is running smoothly, a little maintenance can help prevent another dust-powered percussion concert.
Inspect and clean the blower at the intervals recommended by the fireplace manufacturer. Some manufacturers specifically recommend periodic cleaning with a soft brush or vacuum attachment.
Keep the fireplace’s circulating-air openings clear. During seasonal cleaning, look for excessive pet hair, lint, and debris around the lower compartment.
Pay attention to changing sound. A blower that gradually becomes louder is easier to diagnose before it reaches the stage where family members begin turning up the television whenever the fireplace starts.
Finally, keep the model number, serial number, manual, and replacement blower part number in your home maintenance records. The next repair will be much easier when nobody has to crawl around the hearth with a flashlight searching for a twenty-year-old rating plate.
Real-World Lessons From Noisy Fireplace Blower Replacements
The most useful lesson from common fireplace blower repair experiences is that noise descriptions matter. One homeowner may describe a sound as “grinding,” while another calls the exact same sound “a low rumble.” Instead of focusing only on the adjective, notice when the noise begins and how it reacts to fan speed.
Consider a typical scenario: the fireplace is quiet for the first several minutes. Then the blower starts automatically and a rumbling sound immediately appears. Turning the fan control higher makes the rumble faster and louder. When the blower is switched off, the noise disappears even though the burner remains on.
That pattern strongly focuses attention on the circulation blower. In many repairs, removing the assembly reveals a fan wheel coated unevenly with dust. Cleaning it may significantly reduce vibration. If the rumble remains and the motor shaft feels rough, replacing the motor or blower assembly becomes a much more logical repair.
Another common experience involves a sharp, repetitive clicking sound. The natural assumption is a ruined motor. After opening the cool, powered-down access compartment, however, the cause may be a wire harness resting against the edge of the rotating wheel.
This is why careful inspection should come before part replacement. A fifteen-minute visual check can prevent buying an expensive component that was never defective.
Then there is the classic post-replacement panic: the new blower has been installed, the fireplace is burning, and the fan does absolutely nothing.
Five minutes pass. The screwdriver gets blamed. The replacement part gets blamed. The internet gets blamed.
Then the fireplace reaches operating temperature, the thermal fan control closes, and the new blower quietly starts.
Understanding the appliance’s normal operating sequence saves a great deal of unnecessary troubleshooting. Some fireplace blowers are designed to respond to heat rather than start instantly with the flame.
Mounting alignment is another lesson that appears repeatedly in fan repairs. A replacement motor can be mechanically perfect and still sound terrible when the bracket is not seated correctly. Even slight contact between a blower housing and another metal panel can amplify vibration through the fireplace body.
The result is deceptive. The motor sounds defective because the entire fireplace is acting like a speaker cabinet.
A good repair process therefore includes running the blower through its speed range and listening carefully after reassembly. If a rattle changes when an exterior panel is touched, investigate the panel, bracket, or mounting interface rather than immediately ordering blower number three.
One of the best practical habits is photographing every connector before disassembly. Fireplace compartments are often dark, cramped, and filled with wiring that looks perfectly obvious until the blower is sitting on the floor.
A set of reference photos preserves connector orientation and wire routing. More importantly, the photos help you keep wiring away from the new fan wheel. The repair is not finished just because the motor spins; the harness needs to remain secure during repeated heating and cooling cycles.
Homeowners also learn quickly that part numbers matter more than appearances. Two blowers can look nearly identical on a computer screen yet have different mounting brackets or connectors. Starting with the fireplace model and serial number is much more reliable than measuring the old blower and buying something described as “close enough.”
Finally, successful fireplace blower replacement is largely an exercise in knowing where the DIY boundary sits. Removing an accessible fan assembly is one thing. Bending a gas tube out of the way because it is “only in there a little bit” is something else entirely.
The best repair experiences are pleasantly boring: cool the fireplace, disconnect power, document the wiring, remove the correct blower, install the exact replacement, keep wires clear, reassemble the unit, and test it carefully.
No sparks. No mystery screws. No smell of gas. No dramatic video for social media.
In home repair, boring is frequently another word for successful.
Conclusion
A fireplace blower making noise does not always need immediate replacement. Start by identifying whether the sound is normal airflow, thermal expansion, a loose panel, mounting vibration, debris, or actual motor wear. Clean the blower, inspect the rotating wheel, and verify that no wiring is touching moving parts.
If grinding, squealing, or heavy rumbling continues after cleaning, replacing the fireplace blower may restore quiet operation and better heat circulation. The most important steps are choosing the correct model-specific replacement, disconnecting electrical power, documenting every connection, preserving proper wire routing, and following the appliance manufacturer’s instructions.
And remember: the ideal fireplace sound is relaxing. If your blower sounds like it is attempting to escape through the living room wall, it has officially lost its right to be ignored.
Note: This guide describes common circulation-blower service procedures. Fireplace construction and electrical controls vary by manufacturer and model. Always follow the exact appliance manual, and use a qualified fireplace technician when repair work involves gas lines, burners, venting, damaged electrical components, or safety controls.