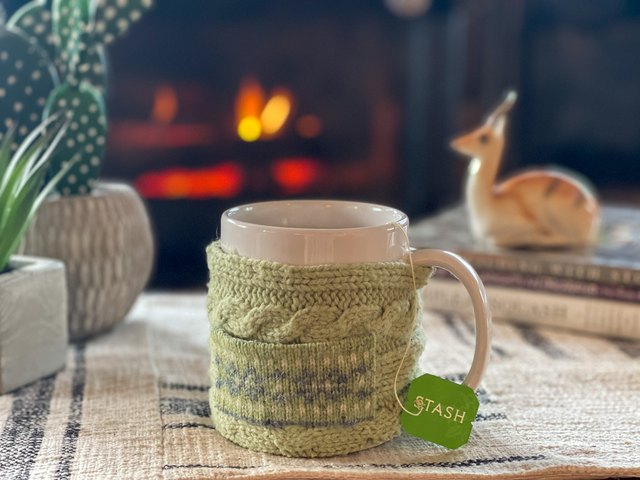

There are two kinds of people in the world: people who finish their tea while it is still hot, and people who discover a sad, lukewarm mug three hours later beside a laptop, a book, or a pile of laundry that was supposed to be folded “real quick.” A handmade mug cozy with a tea bag pocket is for the second groupand honestly, also for the first group, because it is cute enough to convert anyone.
This simple DIY mug cozy wraps around a standard mug, helps protect your hands from hot ceramic, slows heat loss, and adds a tiny pocket for a tea bag, sugar packet, sweetener, cinnamon stick, or encouraging note that says, “You can do hard things, but maybe caffeinate first.” It is also a fantastic beginner sewing project because it uses small fabric pieces, basic straight stitching, and forgiving construction. If your seam wiggles a little, congratulations: you have created handmade charm.
In this guide, you will learn how to make a fabric mug cozy with a tea bag pocket from start to finish, including the best materials, measurements, sewing steps, customization ideas, troubleshooting tips, and real-world maker experience. The result is a practical, giftable, reusable cup accessory that looks polished without requiring a professional sewing room or a degree in textile engineering.
What Is a Mug Cozy with a Tea Bag Pocket?
A mug cozy is a fabric sleeve that wraps around a mug. Unlike disposable cardboard sleeves used for takeout coffee cups, a mug cozy is reusable, washable, and easy to personalize. It usually closes with a button and elastic loop, hook-and-loop tape, snaps, or ties so it can fit around the mug handle.
A tea bag pocket makes the design even more useful. The pocket sits on the outside of the cozy and holds one or two individually wrapped tea bags. This is especially handy for office desks, travel mugs, teacher gifts, book club favors, holiday baskets, and cozy kitchen corners where tea somehow tastes better when everything matches.
The project can be sewn with quilting cotton, cotton canvas, linen blends, cork fabric, felt, or even upcycled denim. For a soft, insulated feel, many makers add cotton batting or fleece between the outer fabric and lining. If you want the cozy to be used around hot mugs only after heating, standard cotton fabric and batting work well. If you plan to microwave the mug while the cozy is attached, use only microwave-safe materials such as 100% cotton fabric, 100% cotton thread, and microwave-safe cotton batting. When in doubt, remove the cozy before reheating. Tea should be dramatic; kitchen safety should not.
Supplies You Need
One of the best things about this DIY tea bag pocket mug cozy is that it is a scrap-friendly sewing project. You do not need yards of fabric. A fat quarter, leftover quilting cotton, or fabric remnants from another project are usually enough.
Materials
- Outer fabric: one piece about 11 inches by 4 inches
- Lining fabric: one piece about 11 inches by 4 inches
- Cotton batting or thin fleece: one piece about 11 inches by 4 inches
- Pocket fabric: one piece about 4 inches by 5 inches
- Elastic cord or a small hair elastic
- One button, about 3/4 inch to 1 inch wide
- Coordinating thread
- Optional: lightweight fusible interfacing for extra structure
- Optional: bias tape, embroidery floss, label, lace, ribbon, or decorative trim
Tools
- Sewing machine or hand-sewing needle
- Fabric scissors or rotary cutter
- Cutting mat and ruler
- Pins or sewing clips
- Iron and ironing board
- Measuring tape
- Fabric marker or chalk
- Point turner, chopstick, or blunt pencil
If you are making several mug cozies as gifts, create a cardboard template first. It saves time and keeps every cozy the same size. Nothing says “handmade with love” like consistency, except maybe cookies, but we are sewing today.
Best Fabric Choices for a Mug Cozy
Quilting cotton is the easiest fabric for beginners because it presses well, stitches cleanly, comes in endless prints, and is widely available. Choose a medium-weight cotton for the outer layer and a coordinating cotton for the lining. For the tea bag pocket, use a contrasting print so the pocket stands out visually.
Cotton canvas gives the mug cozy a sturdier feel, while linen-cotton blends create a natural, farmhouse-style look. Felt can work for a no-fray design, but it may not wash as neatly as cotton. Denim is durable and stylish, especially if you enjoy upcycling old jeans, but it can be bulky around the seams.
Prewashing fabric is a smart move if the cozy will be laundered later. Cotton can shrink slightly, and prewashing helps prevent the finished cozy from puckering after its first wash. Wash light and dark fabrics separately, dry them, and press them flat before cutting. This step is not glamorous, but neither is discovering your perfect cozy has turned into a dollhouse accessory after laundry day.
Recommended Measurements
The measurements in this tutorial fit many standard ceramic mugs that are about 10 to 11 inches around and 3.5 to 4 inches tall. Because mug shapes vary, measure your mug before cutting if you want a custom fit.
Basic Pattern Size
- Main cozy rectangle: 11 inches wide by 4 inches tall
- Pocket piece: 4 inches wide by 5 inches tall
- Elastic loop: 3 inches to 4 inches, depending on stretch
For a smaller mug, reduce the width to about 10 inches. For a large mug, increase it to 12 inches. The cozy should wrap around the mug body without covering the handle. Leave room for the elastic loop on one end and the button on the other.
How to Make a Mug Cozy with Tea Bag Pocket
This step-by-step sewing tutorial uses a button and elastic loop closure because it is beginner-friendly and avoids making a buttonhole. Buttonholes are useful, yes, but they also have a way of making perfectly calm people stare suspiciously at their sewing machines.
Step 1: Measure Your Mug
Wrap a measuring tape around your mug, stopping before the handle. Measure the height of the mug body as well. Your cozy should sit comfortably around the center of the mug without sliding into the handle area or covering the rim. A good finished height is usually between 3 and 3.5 inches.
If your mug tapers toward the bottom, test the paper template around it before cutting fabric. Some mugs look innocent until you try to dress them, and then they reveal their complicated geometry.
Step 2: Cut the Fabric Pieces
Cut one rectangle from the outer fabric, one from the lining fabric, and one from the batting. Each should measure 11 inches by 4 inches for a standard mug. Cut the pocket fabric 4 inches by 5 inches.
For a rounded-end cozy, you can round the corners on the main pieces using a small cup or spool as a guide. Rounded corners look softer and turn more neatly after sewing. For a modern style, leave the corners square and trim them carefully after stitching.
Step 3: Prepare the Tea Bag Pocket
Fold the pocket fabric in half with wrong sides together so it measures 4 inches by 2.5 inches. Press the fold well. The folded edge will become the top of the pocket, which means there is no raw edge where your tea bag slides in and out.
For extra detail, topstitch along the folded edge about 1/8 inch from the top. This gives the pocket a finished look and helps it stay flat. You can also add a tiny embroidered tea cup, a heart, or the word “steep” if your sewing machine has decorative stitches.
Step 4: Attach the Pocket to the Outer Fabric
Place the outer fabric right side up. Position the pocket on top, also right side up, about 1.5 inches from the right edge and centered vertically. Pin or clip it in place.
Sew around the left side, bottom, and right side of the pocket using a 1/8-inch seam allowance. Do not sew the top closed unless you enjoy pockets that hold only disappointment. Backstitch at the beginning and end to reinforce the pocket opening.
If you want a divided pocket, sew one vertical line down the center. This creates two narrow compartments: one for a tea bag and one for a sugar packet. It is small-space organization at its finest.
Step 5: Layer the Cozy Pieces
Lay the batting down first. Place the outer fabric on top of the batting with the pocket facing up. Then place the lining fabric on top with the right side facing down. The outer and lining fabrics should be right sides together, with the pocket sandwiched inside.
Fold the elastic cord into a loop and place it between the outer fabric and lining on one short end. The loop should point inward, and the raw ends should stick out slightly beyond the edge. Pin securely. This loop will later wrap around the button.
Step 6: Sew Around the Cozy
Sew around the cozy with a 1/4-inch seam allowance. Leave a 2-inch to 3-inch opening along the bottom edge for turning. Sew slowly over the elastic ends and backstitch several times so the loop is firmly anchored.
Trim the corners to reduce bulk, being careful not to cut through the stitching. If your cozy has rounded corners, clip small notches around the curves so they turn smoothly.
Step 7: Turn and Press
Turn the cozy right side out through the opening. Use a point turner, chopstick, or blunt pencil to gently push out the corners. Press the cozy flat, folding the raw edges of the opening inward so they line up with the sewn edge.
Pressing is the secret handshake of sewing. It makes beginner projects look cleaner, sharper, and more intentional. Skipping the iron is possible, but the cozy may look like it woke up late for school.
Step 8: Topstitch the Edges
Topstitch all the way around the cozy about 1/8 inch from the edge. This closes the turning opening and gives the project a professional finish. If your batting is thick, lengthen your stitch slightly so the fabric feeds smoothly.
You can add a second row of stitching for a quilted look. Straight lines, diagonal lines, or a simple rectangle around the pocket all work beautifully. Quilting also helps keep the batting from shifting when the cozy is washed.
Step 9: Sew on the Button
Wrap the cozy around your mug and stretch the elastic loop to the opposite short end. Mark where the button should go. Remove the cozy from the mug and sew the button securely by hand.
Test the fit. The cozy should be snug enough to stay in place but not so tight that the mug looks like it is wearing a corset. Adjust the button placement if needed.
Step 10: Add the Tea Bag
Slide an individually wrapped tea bag into the pocket. Add a sugar packet, honey stick, or small note if you like. Your mug cozy with tea bag pocket is now ready for use, gifting, or dramatic placement beside a novel and a rainy window.
Safety Notes for Hot Drinks and Microwaves
A mug cozy is designed to make holding a warm mug more comfortable, but it is not a substitute for common sense. Always test the mug temperature before gripping it. Hot liquid can still spill, and ceramic can become very hot.
If you want a microwavable mug cozy, every material must be microwave-safe. Use 100% cotton fabric, 100% cotton thread, and batting specifically labeled for microwave-safe projects. Avoid metallic prints, metallic thread, synthetic fleece, polyester batting, plastic snaps, and decorative trims if the cozy will go near a microwave. The safest everyday habit is to remove the cozy before reheating and put it back on afterward.
Design Ideas and Customization
This project is small, which makes it perfect for experimenting. Try seasonal fabrics for Christmas, fall, spring florals, or Halloween. Make a “tea lover” version with botanical prints, a coffee-themed version with espresso fabric, or a minimalist linen version with a leather-look button.
For teacher gifts, pair the cozy with a mug, tea bags, and a handwritten note. For coworker gifts, choose neutral fabrics and add a pocket for instant coffee or sweetener. For wedding favors, use fabric in the couple’s colors and tuck a custom tea blend into the pocket. For craft fairs, make sets in popular themes such as cottagecore, farmhouse, cats, books, bees, mushrooms, or cheerful retro prints.
Personalization Options
- Add a monogram with embroidery or iron-on vinyl.
- Use patchwork strips for a scrap-busting mug cozy.
- Sew a tiny label into the side seam.
- Use decorative topstitching in contrasting thread.
- Add lace or cotton trim above the pocket.
- Make the pocket larger for cocoa packets.
- Create a reversible cozy by choosing a pretty lining fabric.
Just remember that embellishments can affect washing and heat safety. If the cozy is mostly decorative and removed before microwaving, you have more creative freedom. If it might be heated, keep the materials plain, natural, and microwave-appropriate.
Common Mistakes and How to Fix Them
The Cozy Is Too Loose
Move the button farther from the edge so the elastic stretches more tightly. If the cozy is much too wide, sew a new seam along one short end to reduce the length.
The Cozy Is Too Tight
Move the button closer to the edge or replace the elastic loop with a slightly longer one. A tight cozy can pull awkwardly around the mug and may pop open.
The Pocket Looks Wavy
Press the pocket before sewing, topstitch the folded edge, and use pins or clips to hold it flat. Lightweight interfacing can also help if your fabric is thin.
The Corners Are Bulky
Trim the seam allowance at the corners and grade the batting slightly smaller than the fabric layers. Press carefully after turning.
The Cozy Slides Down the Mug
The mug may be tapered, or the cozy may be too tall. Try a shorter cozy height, tighter closure, or a mug with straighter sides.
Care Instructions
Most cotton mug cozies can be spot cleaned or machine washed on a gentle cycle. Use cool water, mild detergent, and air dry or tumble dry low. Press with an iron if needed. If your cozy has delicate trim, hand washing is safer.
Tea stains happen. Coffee stains happen. Life happens. A darker lining or patterned fabric is more forgiving for daily use. White fabric looks beautiful until one enthusiastic chai latte decides to become modern art.
Why This DIY Mug Cozy Makes a Great Handmade Gift
A mug cozy with tea bag pocket is small, affordable, useful, and personal. It feels thoughtful without being overly complicated. You can make one in under an hour once you understand the steps, and you can batch-sew several at a time by cutting all the pieces first, preparing all the pockets, and then assembly-line stitching.
It is also a wonderful beginner sewing project because it teaches essential skills: measuring, layering fabric, sewing a pocket, turning a project right side out, topstitching, and attaching a closure. Those techniques transfer to larger projects like pouches, placemats, quilted bags, and home decor accessories.
For sellers, this cozy can be a strong craft fair item because it is lightweight, easy to display, and simple to bundle with mugs or tea samplers. Offer different sizes, label them clearly, and consider including care instructions. Customers love items that feel both charming and practical.
Extra Maker Experience: What I Learned Making Mug Cozies with Tea Bag Pockets
The first thing you notice when making a mug cozy with a tea bag pocket is that mugs are surprisingly opinionated. One mug is straight and cooperative. Another curves dramatically like it is auditioning for a pottery documentary. A third has a handle so large it seems designed for a medieval knight. Because of this, the best experience comes from testing your paper template around the actual mug before cutting fabric. That tiny step prevents a lot of seam-ripping later.
Another lesson is that fabric choice changes the whole personality of the cozy. Quilting cotton creates a crisp, cheerful look and is the easiest to sew. Linen blends look elegant and relaxed, but they may shift more while stitching. Denim looks stylish but adds bulk, especially near the elastic loop. If you are a beginner, start with cotton. Once you have made one or two, then invite the fancy fabrics to the party.
The pocket placement matters more than it seems. If the pocket sits too close to the edge, the tea bag can interfere with the closure. If it sits too low, it may curve under the mug and look awkward. The sweet spot is usually centered vertically and placed slightly away from the button side. I like putting the pocket where it is visible when the mug faces forward, almost like a tiny apron. A mug apron. Fashion has peaked.
Pressing after every major step makes the biggest visual difference. Press the pocket fold. Press after turning. Press before topstitching. A well-pressed cozy looks neat even if the stitching is not perfect. Without pressing, the edges can puff up and the pocket can look wrinkled. The iron is basically the project’s photo filter.
Topstitching is another detail that makes the cozy look store-quality. A narrow 1/8-inch topstitch around the edge keeps everything flat and closes the turning gap neatly. If you are nervous about sewing close to the edge, move to 1/4 inch. Consistency matters more than being tiny. Use a slightly longer stitch length if the layers feel thick.
Buttons deserve attention, too. A big wooden button looks cozy and handmade. A shiny vintage button feels sweet and nostalgic. A novelty button shaped like a teapot may cause unreasonable happiness. However, the button needs to be smooth enough for the elastic loop to slide over it. If the button has sharp edges or an unusual shape, test it before sewing it on permanently.
For gifting, presentation takes this project from “cute” to “where did you buy this?” Wrap the cozy around a mug, tuck tea into the pocket, add a honey stick, and tie everything with cotton ribbon. For winter gifts, add cocoa mix. For a wellness basket, pair it with herbal tea and a small candle. For a teacher, coworker, or neighbor, it is thoughtful without being too personal.
If you plan to make multiple cozies, batch sewing is your best friend. Cut all rectangles at once, press all pockets at once, sew all pockets at once, and then assemble the cozies. This rhythm is faster and helps each cozy look consistent. It also lets you use fabric scraps efficiently. Small leftover pieces from quilting, apron-making, or pillow projects suddenly become useful instead of living forever in the mysterious scrap bin.
The final lesson is simple: do not chase perfection so hard that you miss the joy of the project. A mug cozy is meant to be warm, useful, and personal. Slightly uneven topstitching will not ruin it. A pocket that leans a millimeter to the left will still hold tea. Handmade items carry the maker’s touch, and that is exactly why people love them.
Conclusion
Learning how to make a mug cozy with a tea bag pocket is a satisfying way to turn small fabric scraps into something charming, practical, and gift-worthy. With a few rectangles of fabric, a little batting, a button, and an elastic loop, you can create a reusable cozy that keeps hands comfortable and tea close by. The project is beginner-friendly, quick to sew, easy to customize, and perfect for holidays, craft fairs, office gifts, or your own quiet tea ritual.
Whether you choose cheerful quilting cotton, rustic linen, bold patchwork, or a soft seasonal print, the basic technique stays the same: measure, cut, sew the pocket, layer the cozy, turn, press, topstitch, and finish with a button. Once you make one, you may immediately want to make five more. This is normal. Fabric scraps are persuasive little creatures.