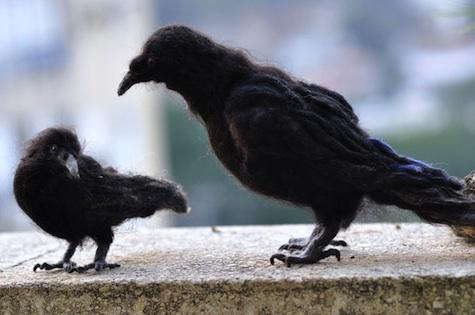

Needle felted wool crows are tiny feathered troublemakers made from wool, patience, and a sharp little needle that absolutely does not care about your confidence level. They can look spooky, whimsical, realistic, cottagecore, gothic, Halloween-ready, or like they are judging your life choices from a bookshelf. In other words, they are perfect.
At first glance, a crow may seem like a simple subject for needle felting. Black bird, beak, wings, done. But anyone who has ever watched a real crow knows there is much more happening. Crows are intelligent, expressive, social, and full of attitude. Capturing that personality in wool is what makes a needle felted crow so charming. A small tilt of the head can turn a plain black bird into a suspicious little philosopher. A glossy bead eye can make it look as if it knows where you hid the good snacks.
This guide explores what makes needle felted wool crows special, how they are made, what materials work best, how to design them with character, and why these handmade birds have become a favorite among fiber artists, collectors, seasonal decorators, and anyone who enjoys crafts with a little mystery in their feathers.
What Are Needle Felted Wool Crows?
Needle felted wool crows are three-dimensional fiber sculptures made by repeatedly poking wool fibers with a barbed felting needle. The needle catches and tangles the wool, gradually turning loose fiber into a firm shape. Unlike sewing, knitting, or crocheting, needle felting is a sculptural craft. You are not following stitches; you are shaping fluff into form. It feels a little like magic, except the wand is sharp and the magic occasionally pokes your finger.
A wool crow usually begins with a simple core shape. Many makers use undyed core wool for the inside because it felts quickly and creates a firm foundation without wasting decorative fiber. Once the body, head, and wings are shaped, darker wool is added as the visible coat. Black, charcoal, blue-black, smoky gray, and even deep purple fibers can be blended to create a crow that looks more lifelike than flat black wool alone.
The finished piece may be tiny enough to sit on a desk, large enough to perch on a mantel, or detailed enough to become a collectible art doll. Some crows are made with wire armatures inside their legs or feet so they can stand, perch, or grip a branch. Others are soft, round, and intentionally stylized, like a crow that discovered marshmallows and never looked back.
Why Crows Are Such a Great Needle Felting Subject
Crows have one of the best silhouettes in the bird world. Their shape is instantly recognizable: rounded head, strong beak, compact body, layered wings, sturdy feet, and that confident posture that says, “Yes, I own this parking lot.” For needle felting, that strong shape is helpful. You do not need hundreds of colors to make the bird readable. You need good proportions, texture, and expression.
The American crow is commonly seen across many parts of the United States, from city parks and farms to roadsides, beaches, yards, and open woods. That familiarity makes it a wonderful craft subject. People recognize crows quickly, and many have personal memories attached to them: a crow calling from a tree, a group gathering on a fence, or one clever bird investigating something shiny with suspicious enthusiasm.
Crows also carry rich visual and symbolic appeal. They can feel mysterious without being gloomy, elegant without being fussy, and playful without becoming cartoonish. For Halloween decor, a needle felted wool crow adds gothic charm. For nature-inspired home decor, it brings woodland personality. For handmade gifts, it says, “I made you a bird with opinions,” which is frankly more memorable than another mug.
Essential Materials for Needle Felted Wool Crows
Wool for the Core
Core wool is the practical workhorse of a needle felted crow. It is usually less refined than colorful topcoat wool and is used to build the basic structure. For a crow, core wool can form the body, head, wing bases, and upper legs. It should be firm enough to hold shape but not so hard that adding surface fiber becomes difficult.
A good core should feel dense when squeezed, not floppy. If the body is too soft, the crow may slump over time or lose its crisp bird shape. Think of the core as the skeleton wearing a wool sweater. If the skeleton is made of pudding, the sweater will not save it.
Topcoat Wool and Color Blending
Black wool is the obvious choice, but the best needle felted wool crows rarely use plain black alone. Real crow feathers can reflect blue, violet, green, or silver depending on the light. To imitate that effect, blend black wool with touches of charcoal, dark navy, deep purple, or glossy fibers such as silk or viscose. Use these highlights sparingly. A crow should shimmer, not look like it fell into a craft glitter storm.
Carded batts work well for smooth coverage, while roving can be pulled into wispy strips for feather texture. Wool locks can also be used on wings or chest areas for a more dramatic, wild-feather look. The key is layering. Add small amounts, felt lightly at first, then build depth gradually.
Felting Needles
Felting needles come in different gauges and shapes. Coarser needles are useful for quickly firming the core, while finer needles are better for surface detail and finishing. A beginner can start with a small variety pack rather than worrying too much about every technical difference. The main rule is simple: use a larger needle for rough shaping, a finer needle for details, and do not poke like you are angry at the wool. The wool did nothing wrong.
Felting Mat
A foam pad, wool mat, or brush-style felting mat protects your table and helps the needle move safely through the fiber. Never felt directly on your lap, your desk, or any surface you enjoy owning in its original condition. A proper mat also helps prevent needle breakage because the needle can enter and exit cleanly.
Wire Armature and Feet
For standing crows, a wire armature can be used inside the legs and feet. Thin craft wire, floral wire, or aluminum armature wire can form toes and a perch grip. Wrap the wire with wool and felt carefully around it. This gives the crow stability and lets it stand on a twig, miniature fence, pumpkin stem, or decorative base.
If you prefer a simpler project, skip the wire and make a seated crow with tucked feet. It will still look adorable, and it will not demand an engineering degree from your Saturday afternoon.
How to Make a Needle Felted Wool Crow
Step 1: Build the Body Shape
Start with core wool and roll it into an oval shape. Felt it evenly, turning it as you work. A crow body should be slightly rounded in the chest and narrower toward the tail. Keep poking until the shape holds together and feels firm. Do not make it rock-hard yet, because you may want to adjust proportions as the head and wings are added.
Step 2: Shape the Head
Make a smaller wool ball for the head. Crows have a rounded head that flows into the beak area, so avoid making it too perfectly spherical. Attach it to the body by leaving loose fibers at the neck and felting them into the body. Add extra wool around the shoulders and throat to create a natural transition. A strong neck area helps the crow look alert rather than like a black snowman with a beak.
Step 3: Add the Beak
The beak gives the crow its identity. You can needle felt a beak from dark gray or black wool, or you can sculpt one from polymer clay and attach it securely. A wool beak is softer and more handmade-looking; a clay beak gives a sharper, more realistic finish. For a wool beak, roll a tiny cone, felt it firmly, attach it to the face, and refine the shape with a fine needle.
Keep the beak proportionate. Too small and the bird may look like a chickadee in dramatic clothing. Too large and it becomes a raven, which is not a disaster, but it may start demanding its own article.
Step 4: Create Wings and Tail Feathers
Wings can be made as flat felted shapes and attached to the sides of the body. Use black wool as the base, then add feather lines with thin strips of charcoal or blue-black fiber. The wings should follow the curve of the body and end near the tail.
For the tail, felt several narrow feather shapes or one tapered fan shape. Attach it firmly to the back of the body. Crows have a strong, practical tail shape, so avoid making it too fancy unless you are intentionally creating a fantasy crow. In that case, add all the drama you want. Fantasy crows have no committee to answer to.
Step 5: Add Eyes and Expression
Small black glass beads, safety eyes, or felted wool dots can be used for the eyes. For realistic crows, glossy black eyes work beautifully because they catch light. Placement matters more than size. Set the eyes slightly forward and level, then add tiny wool eyelids or brow shading to create expression.
A tilted head makes the crow look curious. A lowered head makes it look sneaky. A raised head makes it look proud. This is where needle felted wool crows become addictive: one tiny adjustment and suddenly the bird has a full personality and possibly a suspicious backstory.
Step 6: Finish the Surface
Add thin layers of topcoat wool over the core and felt lightly. Work in the direction of the feathers. Use a fine needle to smooth visible holes and secure loose fibers. If you want a fluffy folk-art style, leave the surface slightly fuzzy. If you prefer realism, spend more time refining the silhouette and smoothing the outer layer.
Final details might include wing highlights, chest texture, leg wraps, claw shapes, or a small perch. Many makers mount their felted crows on driftwood, mossy bases, miniature pumpkins, book stacks, or natural branches. A crow on a branch is classic. A crow on a tiny stack of spell books is also classic, depending on your household.
Design Styles for Needle Felted Wool Crows
Realistic Wool Crows
A realistic needle felted crow focuses on anatomy, feather direction, and natural posture. Use subtle color variation, a defined beak, smooth head shaping, and carefully layered wings. Study reference photos before you begin. Look at the curve of the back, the angle of the beak, and how the feet grip a surface. Realism is not about adding every feather; it is about choosing the right details.
Whimsical Crows
Whimsical crows are rounder, softer, and more expressive. They might wear tiny scarves, hold miniature stars, perch on mushrooms, or sit beside a felted moon. These designs work well for ornaments, nursery decor, seasonal displays, and handmade gifts. The proportions can be exaggerated: bigger head, shorter body, oversized eyes, or a charmingly dramatic beak.
Gothic and Halloween Crows
Needle felted wool crows are natural stars of Halloween decor. Add a witch hat, a pumpkin base, a crescent moon, or a tiny “Nevermore” sign for literary flair. Dark purple highlights, smoky gray wings, and vintage-style bases can make the piece feel atmospheric without becoming too spooky for everyday display.
Rustic Farmhouse Crows
For rustic decor, keep the crow simple and natural. Use matte wool, a twig perch, dried moss, muted ribbon, or a small wooden base. This style looks great on shelves, entry tables, and fall mantels. It says “handmade nature charm” rather than “a bird is here to judge the casserole.”
Common Mistakes and How to Avoid Them
Using Only Flat Black Wool
Flat black can hide all your hard work. Add depth with charcoal, gray, navy, or deep violet highlights. Even a tiny amount of color variation can reveal the wing shape and feather layers.
Leaving the Core Too Soft
A soft core makes details harder to attach. Felt the body and head until they are firm enough to hold pressure. If you press gently and the shape collapses, keep felting.
Making the Beak Too Bulky
A bulky beak can throw off the entire bird. Build it slowly and check the silhouette from the side. Crows have strong beaks, but they should still look balanced with the head.
Ignoring the Feet
Feet do not need to be hyper-realistic, but they should support the pose. If your crow stands, use wire or attach it to a stable base. A beautiful crow that keeps face-planting into the decor is not mysterious. It is just having a rough day.
How to Display Needle Felted Wool Crows
Needle felted wool crows are surprisingly versatile. They look wonderful on bookshelves, mantels, writing desks, entryway tables, and seasonal displays. A single crow on a natural branch can feel elegant and minimal. A group of three can create a tiny wool gathering that looks like it is planning something.
For fall decor, pair a wool crow with pumpkins, dried leaves, acorns, and warm-toned candles. For Halloween, add black lace, antique books, faux cobwebs, or moon-shaped ornaments. For year-round nature decor, place the crow with moss, stones, pinecones, and botanical prints.
If you sell handmade pieces online or at craft fairs, photograph the crow in natural light. Use a clean background and show scale with a hand, mug, book, or small branch. Buyers want to know whether they are getting a tiny desk bird or a crow large enough to supervise the entire living room.
Caring for Needle Felted Wool Crows
Wool sculptures are sturdy but not indestructible. Keep needle felted crows away from pets, young children, moisture, and direct rough handling. Dust them gently with a soft brush or a cool, low-air setting from a hair dryer held at a distance. Do not wash them in water unless the maker specifically says it is safe.
Store seasonal crows in a breathable box with tissue paper. Avoid crushing the wings, beak, or feet. If the surface becomes fuzzy over time, you can carefully trim stray fibers with small scissors or lightly felt them back down with a fine needle.
Buying Handmade Needle Felted Wool Crows
If you prefer collecting over making, handmade needle felted wool crows are often available from fiber artists, craft marketplaces, local art fairs, and seasonal handmade shops. Look for clean shaping, secure attachments, balanced posture, and expressive details. A good felted crow should feel intentional from every angle, not just from the front.
Prices can vary widely depending on size, detail, materials, and artist experience. A small simple ornament may be affordable, while a realistic crow with wire feet, layered wings, glass eyes, and a custom base may cost much more. Handmade fiber sculpture takes time. Every feather line represents repeated needle pokes, careful shaping, and probably at least one moment when the artist whispered, “Why did I choose birds?”
Experience Notes: What Making Needle Felted Wool Crows Teaches You
Making needle felted wool crows teaches patience in a way few crafts do. At the beginning, the wool looks like a suspicious black dust bunny. Then, after enough careful poking, it slowly becomes a body, then a bird, then a bird with attitude. The transformation is satisfying because it does not happen all at once. It appears gradually, as if the crow has been hiding inside the wool and finally decides you are competent enough to meet it.
One of the biggest lessons is that shape matters before detail. Beginners often want to add eyes, wings, and feathers right away, but a crow needs a strong foundation first. If the body is too round, it may look like an owl. If the head is too small, it loses character. If the tail is too short, the silhouette becomes confusing. Taking time to block out the body, neck, head, and tail makes every later detail easier.
Another useful experience is learning how much black wool can trick the eye. On a real crow, light reveals feather layers. On a felted crow, solid black can make everything disappear. Adding charcoal to the wing edges, a touch of blue-black across the back, or a soft gray line under the throat can make the whole piece come alive. The goal is not to make a colorful bird. The goal is to help the viewer see the bird clearly.
The eyes are often the turning point. Before the eyes go in, the project is a wool shape with a beak. After the eyes are placed, it becomes a character. This is also the moment when many makers start talking to the crow. That is normal. The crow may not answer, but it will look like it is thinking about it.
Working on the feet can be humbling. Wire toes are tiny, bendy, and occasionally dramatic. Wrapping them with wool takes slow hands and a light touch. But once the crow can grip a twig or stand on a base, the whole sculpture feels more complete. A perched crow has presence. It occupies space like a real bird, even if it weighs almost nothing.
Needle felted wool crows also teach when to stop. It is easy to keep poking, smoothing, trimming, and adjusting until the piece loses its freshness. Handmade charm often lives in tiny imperfections: a curious head tilt, a slightly ruffled chest, a wing that looks wind-touched. The best felted crows do not need to be flawless. They need to feel alive.
For anyone new to this craft, a crow is a rewarding project because it can be simple or advanced. A beginner can make a small round crow ornament with a felted beak and bead eyes. An experienced fiber artist can create a realistic sculpture with layered feathers, wire feet, and subtle color blending. Both versions have value. Both can make people smile. And both prove that wool, when properly encouraged by a barbed needle, can become something wonderfully strange and memorable.
Conclusion
Needle felted wool crows combine fiber art, nature study, seasonal decor, and handmade personality in one compact little bird. They are simple enough for beginners to attempt, yet detailed enough to keep experienced makers happily occupied for hours. With core wool, dark topcoat fibers, a few felting needles, and a good sense of humor, loose wool can become a crow that looks curious, clever, mysterious, or mildly disappointed in your snack choices.
Whether you make one for a Halloween display, a woodland shelf, a handmade gift, or your own growing flock of wool birds, a needle felted crow offers something special: character. It is not just a craft project. It is a tiny sculpture with a gaze, a pose, and a story. And if it ends up looking like it knows your secrets, congratulations. That means you did it right.