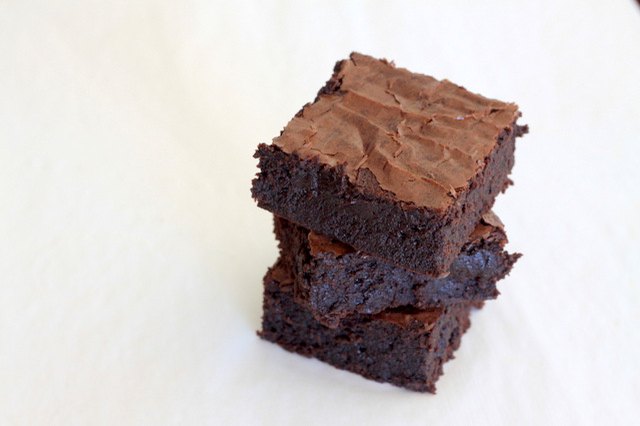

If dessert had a popularity contest, homemade brownies would show up late, win by a landslide, and leave with chocolate on their face. They are simple enough for a Tuesday night, impressive enough for a party, and forgiving enough that even a slightly messy batch still tastes like a hug wearing a cocoa-scented sweater.
This guide gives you one dependable homemade brownies recipe built for the sweet spot: fudgy centers, chewy edges, glossy crackly tops, and deep chocolate flavor without needing a pastry degree or a kitchen torch. The goal is not just to hand you a recipe and wave goodbye. It is to show you why each step works, how to adjust the texture, and how to avoid the common brownie crimes: dry middles, greasy tops, cakey disappointments, and that tragic moment when the whole slab sticks to the pan like it signed a lease.
Whether you call them fudgy brownies, chewy brownies, chocolate brownies, or “the reason I bought vanilla ice cream,” this recipe is designed to become your go-to. Keep it simple, bake it carefully, and let the brownies cool before slicing. Yes, cooling is hard. No, staring at the pan does not count as patience.
Why This Homemade Brownies Recipe Works
The best homemade brownies balance fat, sugar, eggs, flour, cocoa, and chocolate. That sounds serious, but it is really just delicious kitchen math. Too much flour and you get chocolate cake pretending to be a brownie. Too little structure and the center may collapse into pudding. Too much mixing after the flour goes in and the brownies can turn tough. The magic comes from using the right ingredients in the right order.
This recipe uses melted butter for rich flavor, a little neutral oil for chewiness, chopped chocolate for a silky fudgy base, and cocoa powder for bold chocolate intensity. Granulated sugar helps create that shiny, paper-thin top, while brown sugar adds moisture and a subtle caramel note. Eggs provide structure, and one extra egg yolk makes the center richer without pushing the brownies into cake territory.
The method also matters. Whisking the warm chocolate mixture with sugar helps dissolve some of the sugar crystals, which supports a glossy top. Stirring the flour in gently keeps the crumb dense and tender. Baking until a toothpick comes out with moist crumbsnot wet batter, not bone-dry crumbsis the secret handshake of excellent brownies.
Ingredients for the Best Fudgy Homemade Brownies
This recipe makes one 8-inch square pan, which gives you 16 generous brownies or 9 “I make my own rules” brownies.
Brownie Ingredients
- 10 tablespoons unsalted butter, cut into pieces
- 2 tablespoons neutral oil, such as canola or vegetable oil
- 4 ounces bittersweet or semisweet chocolate, chopped
- 1 cup granulated sugar
- 1/2 cup packed light brown sugar
- 2 large eggs, at room temperature
- 1 large egg yolk, at room temperature
- 2 teaspoons pure vanilla extract
- 3/4 cup unsweetened cocoa powder
- 2/3 cup all-purpose flour, spooned and leveled
- 1 teaspoon instant espresso powder, optional
- 1/2 teaspoon fine salt
- 3/4 cup chocolate chips or chopped chocolate, optional
- 1/2 cup toasted walnuts or pecans, optional
About the Chocolate
For the deepest flavor, use a chocolate bar you would happily snack on. Semisweet chocolate makes the brownies sweeter and classic. Bittersweet chocolate gives a darker, more grown-up flavor. Unsweetened cocoa powder adds intensity without adding extra moisture, which helps keep the brownies dense and fudgy.
About the Pan
A light-colored metal 8-inch square pan is ideal because it conducts heat evenly and helps the edges set without overbaking the center. Glass pans hold heat longer and may require a slightly lower oven temperature or a few extra minutes of careful watching. Dark metal pans can brown the edges faster, so check early.
Step-by-Step Instructions
1. Prepare the Pan
Preheat the oven to 350°F. Line an 8-inch square metal baking pan with parchment paper, leaving a little overhang on two sides. Lightly grease the parchment. This makes it easy to lift the brownies out after baking, which means fewer broken corners and fewer “quality control” scraps mysteriously disappearing into your mouth.
2. Melt the Butter, Oil, and Chocolate
In a medium saucepan over low heat, melt the butter, oil, and chopped chocolate together, stirring often. Remove the pan from the heat as soon as the mixture is smooth. You can also do this in a microwave-safe bowl in 20-second bursts, stirring between each burst. The goal is smooth and glossy, not bubbling like a chocolate volcano.
3. Whisk in the Sugars
Add the granulated sugar and brown sugar to the warm chocolate mixture. Whisk for about 45 seconds, until the mixture looks shiny and slightly thicker. It may look a bit grainy, and that is fine. Warm chocolate and butter help dissolve some of the sugar, which improves texture and encourages that crinkly top brownies are famous for.
4. Add the Eggs and Vanilla
Let the mixture cool for 3 to 5 minutes so it is warm, not hot. Add the eggs, extra yolk, and vanilla extract. Whisk until the batter is glossy and smooth. This is one of the few moments when enthusiastic whisking is welcome. Once the flour enters the room, enthusiasm must put on slippers and calm down.
5. Add the Dry Ingredients
In a separate bowl, whisk together the cocoa powder, flour, espresso powder, and salt. Add the dry ingredients to the chocolate mixture and fold gently with a spatula until just combined. Stop when you no longer see streaks of flour. Overmixing can build gluten, and gluten is great for bread but not invited to the fudgy brownie party.
6. Fold in Extras
If using chocolate chips, chopped chocolate, or toasted nuts, fold them in gently. Extra chocolate creates pockets of melted richness. Toasted nuts add crunch and a warm, roasted flavor that keeps the brownies from feeling one-note.
7. Bake Until Moist Crumbs Appear
Spread the batter evenly into the prepared pan. Bake for 28 to 34 minutes, checking at 28 minutes. Insert a toothpick into the center. It should come out with moist crumbs attached. If it comes out coated in shiny raw batter, bake a few more minutes. If it comes out completely clean, the brownies may be overbaked, though still highly edible with ice cream. Dessert has a generous appeals process.
8. Cool Before Slicing
Let the brownies cool in the pan for at least 1 hour. For the cleanest slices, cool completely, then chill for 20 to 30 minutes before cutting. Use the parchment overhang to lift the slab out of the pan, then slice with a sharp knife. Wipe the knife between cuts for bakery-style squares.
How to Tell When Brownies Are Done
The toothpick test for brownies is different from the toothpick test for cake. Cake should usually come out clean. Brownies should not. For fudgy homemade brownies, you want moist crumbs clinging to the toothpick. The edges should look set and slightly pulled away from the pan, while the center should appear soft but not liquid.
If the top is shiny and crackly but the middle jiggles like pudding, the brownies need more time. If the center is firm and the toothpick is dry, they are probably overbaked. Brownies continue to set as they cool, so it is better to remove them slightly early than slightly late.
Fudgy, Chewy, or Cakey: How to Adjust the Texture
For Extra Fudgy Brownies
Use bittersweet chocolate, do not add baking powder, and pull the pan when the toothpick shows moist crumbs. You can also reduce the flour by 1 tablespoon for a denser center. Let the brownies cool fully before slicing so the chocolate and butter have time to set.
For Chewier Brownies
Keep the oil in the recipe and use brown sugar. A small amount of oil helps create that nostalgic boxed-mix chew, while butter brings flavor. This combination gives the best of both worlds: chewy edges, rich flavor, and a center that does not dry out the next day.
For Cakier Brownies
Add 1/4 teaspoon baking powder and increase the flour by 2 tablespoons. Bake until the toothpick shows fewer crumbs. The result will be lighter and more cake-like, perfect for people who enjoy brownies with a softer crumb and a little more lift.
Common Brownie Mistakes and How to Fix Them
My Brownies Are Dry
The most common reason is overbaking. Check early, especially if your oven runs hot or you are using a dark pan. Measuring too much flour can also dry out brownies, so spoon flour into the measuring cup and level it off instead of scooping directly from the bag.
My Brownies Are Too Gooey
Gooey is good. Raw is not. If the center is wet batter, return the pan to the oven for 3 to 5 minutes. If the brownies are already cooled and still too soft, chill them. Cold brownies firm up and slice more neatly.
My Brownies Do Not Have a Shiny Top
A shiny top depends on sugar dissolving properly and eggs being mixed well into the batter. Whisk the sugars into the warm chocolate mixture, then whisk the eggs and vanilla until glossy. Also avoid reducing the sugar too much, because sugar plays a texture role, not just a sweetness role.
My Brownies Taste Flat
Add enough salt and use vanilla. A small amount of espresso powder can deepen the chocolate flavor without making the brownies taste like coffee. If the brownies still taste dull, upgrade the cocoa powder or chocolate next time.
Best Brownie Mix-Ins and Toppings
This homemade brownies recipe is excellent plain, but it also welcomes upgrades. Stir in chocolate chips for extra richness, toasted walnuts for crunch, or crushed pretzels for a salty twist. Swirl peanut butter, Nutella, or caramel over the top before baking for dramatic bakery-style brownies.
For a simple dessert plate, serve warm brownies with vanilla ice cream and a drizzle of hot fudge. For a party, dust the cooled brownies with powdered sugar or cocoa. For a holiday tray, add peppermint chips or a thin layer of chocolate ganache. For a midnight snack, stand in the kitchen and eat one directly over the sink like a responsible adult.
How to Store Homemade Brownies
Store cooled brownies in an airtight container at room temperature for up to 3 days. For a firmer texture, refrigerate them for up to 5 days. Bring chilled brownies to room temperature before serving, or warm one in the microwave for 8 to 10 seconds to soften the chocolate.
Brownies also freeze well. Wrap individual squares tightly in plastic wrap, place them in a freezer-safe bag, and freeze for up to 3 months. Thaw at room temperature. This is useful if you want portion control, though brownies in the freezer are still brownies in the house, so proceed with optimism and honesty.
Food Safety Note for Brownie Batter
Brownie batter contains raw flour and raw eggs, so avoid tasting it before baking. Flour is a raw agricultural product, and baking is what makes the batter safe to eat. If you want edible brownie batter, use a recipe specifically designed for that purpose with heat-treated flour and no raw eggs.
Serving Ideas for Every Occasion
For Weeknight Dessert
Serve brownies slightly warm with a glass of milk. They are rich enough to feel special but simple enough that you do not need to announce a baking project to the household.
For Birthdays
Stack brownie squares on a platter, add candles, and call it a brownie tower. It is easier than frosting a layer cake and far less likely to slide sideways during the song.
For Potlucks
Chill the brownies before slicing, then place each square in a paper liner. They travel well, look tidy, and disappear quickly. Bring the recipe because someone will ask.
Kitchen Experiences That Prove This Is the Only Homemade Brownies Recipe You’ll Need
The first time you make brownies from scratch, you may wonder why anyone buys a boxed mix. Then you remember boxed mixes are fast, familiar, and require very little decision-making. Fair. But homemade brownies have one advantage that is hard to beat: control. You decide how dark the chocolate tastes, how chewy the edges get, whether nuts are welcome, and whether the middle stays fudgy enough to make a fork seem like a reasonable tool.
One of the best lessons from baking brownies repeatedly is that small details matter, but they do not need to make you nervous. For example, lining the pan with parchment paper feels optional until the day you skip it and spend ten minutes negotiating with a stuck corner. After that, parchment becomes less of a suggestion and more of a lifestyle. The same goes for cooling. Warm brownies smell incredible, but they slice like a chocolate landslide. Cool brownies behave. They stand tall, cut cleanly, and still taste rich.
Another useful experience: the edge pieces and center pieces are basically two different desserts living in the same pan. Edge lovers want chew, structure, and a little caramelized crispness. Center lovers want soft, dense chocolate luxury. This recipe gives both sides something to cheer for. If your household argues about brownie geography, consider it a sign of success. Peace was never the point; dessert was.
Mix-ins also teach restraint. It is tempting to add marshmallows, caramel, peanut butter cups, nuts, chips, cookie chunks, and maybe a small parade. But brownies are already rich. Too many add-ins can make them heavy, overly sweet, or difficult to bake evenly. Choose one or two upgrades and let the chocolate stay in charge. A handful of toasted walnuts and extra chopped chocolate is elegant. A peanut butter swirl is bold. Crushed pretzels are fun. All three together may require a committee meeting.
Brownies are also one of the best desserts for sharing because they are sturdy. Cakes need plates. Pies need confidence. Brownies need a napkin and someone willing to admit they want the corner piece. They work for lunchboxes, bake sales, office treats, family movie nights, and “I had a day” emergencies. A batch on the counter can make a normal kitchen feel like a tiny bakery, minus the 4 a.m. alarm and commercial mixer.
The final experience worth remembering is this: brownies reward attention, not perfection. Your chocolate may melt a little unevenly. Your top may crack in unexpected patterns. Your slices may not look like they belong behind glass at a pastry shop. None of that means failure. If the center is fudgy, the flavor is deep, and people go back for seconds while pretending they are “just evening out the row,” you made excellent homemade brownies.
Conclusion
The only homemade brownies recipe you need is the one that delivers every time: rich chocolate flavor, a fudgy center, chewy edges, and a crackly top that makes people lean closer before taking the first bite. This recipe uses smart baking basicsmelted butter, a touch of oil, real chocolate, cocoa powder, enough sugar for texture, and careful bakingto create brownies that taste homemade in the best possible way.
Remember the key rules: use good chocolate, measure flour correctly, do not overmix after adding dry ingredients, bake until moist crumbs appear, and let the brownies cool before slicing. Follow those steps and you will have a dependable dessert for birthdays, potlucks, holidays, late-night cravings, and any moment when life clearly needs more chocolate.
Note: This article was written from scratch in standard American English and synthesizes practical baking knowledge from reputable U.S. culinary and food-safety guidance. Source links are intentionally omitted as requested.