
Printing an Excel spreadsheet should be easy. Click print, grab your paper, feel productive, maybe even reward yourself with coffee. Then Excel politely prints 17 pages, three of which contain one lonely column, two of which are blank, and one of which looks like it was formatted by a raccoon wearing bifocals.
The good news: you do not have to print the entire worksheet just because Excel has 1,048,576 rows available for emotional support. Whether you need a small sales summary, a filtered expense report, a selected table, or a clean one-page handout for a meeting, Excel gives you several ways to print only the part you need.
In this guide, you will learn how to print part of an Excel spreadsheet using three simple methods: printing a selection, setting a print area, and using filters or hidden rows and columns to control what appears on paper. We will also cover print preview, scaling, margins, gridlines, page breaks, and the little settings that keep your spreadsheet from turning into a paper-based escape room.
Why Print Only Part of an Excel Spreadsheet?
Excel worksheets are often built for working, not printing. A single worksheet might include raw data, formulas, lookup tables, notes, calculations, charts, pivot tables, and three mysterious columns named “final_final_USE_THIS.” When you print the whole thing, you may get far more information than anyone needs.
Printing only part of a spreadsheet helps you:
- Save paper and ink.
- Keep reports focused and professional.
- Protect private or irrelevant data.
- Avoid printing blank rows, extra columns, or helper calculations.
- Create cleaner handouts for meetings, invoices, inventory sheets, schedules, and dashboards.
The best method depends on your goal. If you need a quick one-time printout, use Print Selection. If you print the same range regularly, use Set Print Area. If you need to print only matching records, such as this month’s invoices or open orders, use filters, hiding, and page setup.
Before You Print: Check the Layout First
Before choosing a method, take ten seconds to preview your spreadsheet. In Excel, go to File > Print or press Ctrl + P on Windows. On Mac, press Command + P. The preview pane shows what will actually print, not what you hope will print. Excel is honest in Print Preview, sometimes brutally.
Look for these common problems:
- The selection spills onto multiple pages.
- Columns are cut off.
- Headers do not repeat on later pages.
- Gridlines are missing.
- The page orientation should be landscape instead of portrait.
- The printout is too small because scaling is too aggressive.
If your spreadsheet is wide, try Landscape Orientation. If it barely misses one page, use Scale to Fit. If the printed report is unreadable, do not force it onto one page just to win a wrestling match with the printer. A clear two-page report is better than a one-page report that requires a magnifying glass and emotional resilience.
Method 1: Print Selected Cells for a Quick One-Time Printout
The fastest way to print part of an Excel spreadsheet is to select the cells you want and choose Print Selection. This method is perfect when you need a quick printout and do not want to change the worksheet’s saved print settings.
When to Use Print Selection
Use this method when you need to print a range only once. For example, you might want to print cells A1:F20 from a project tracker, a small invoice table, a weekly schedule, or the summary section at the top of a large report.
How to Print Selected Cells in Excel
- Open your Excel workbook.
- Click and drag to highlight the cells you want to print.
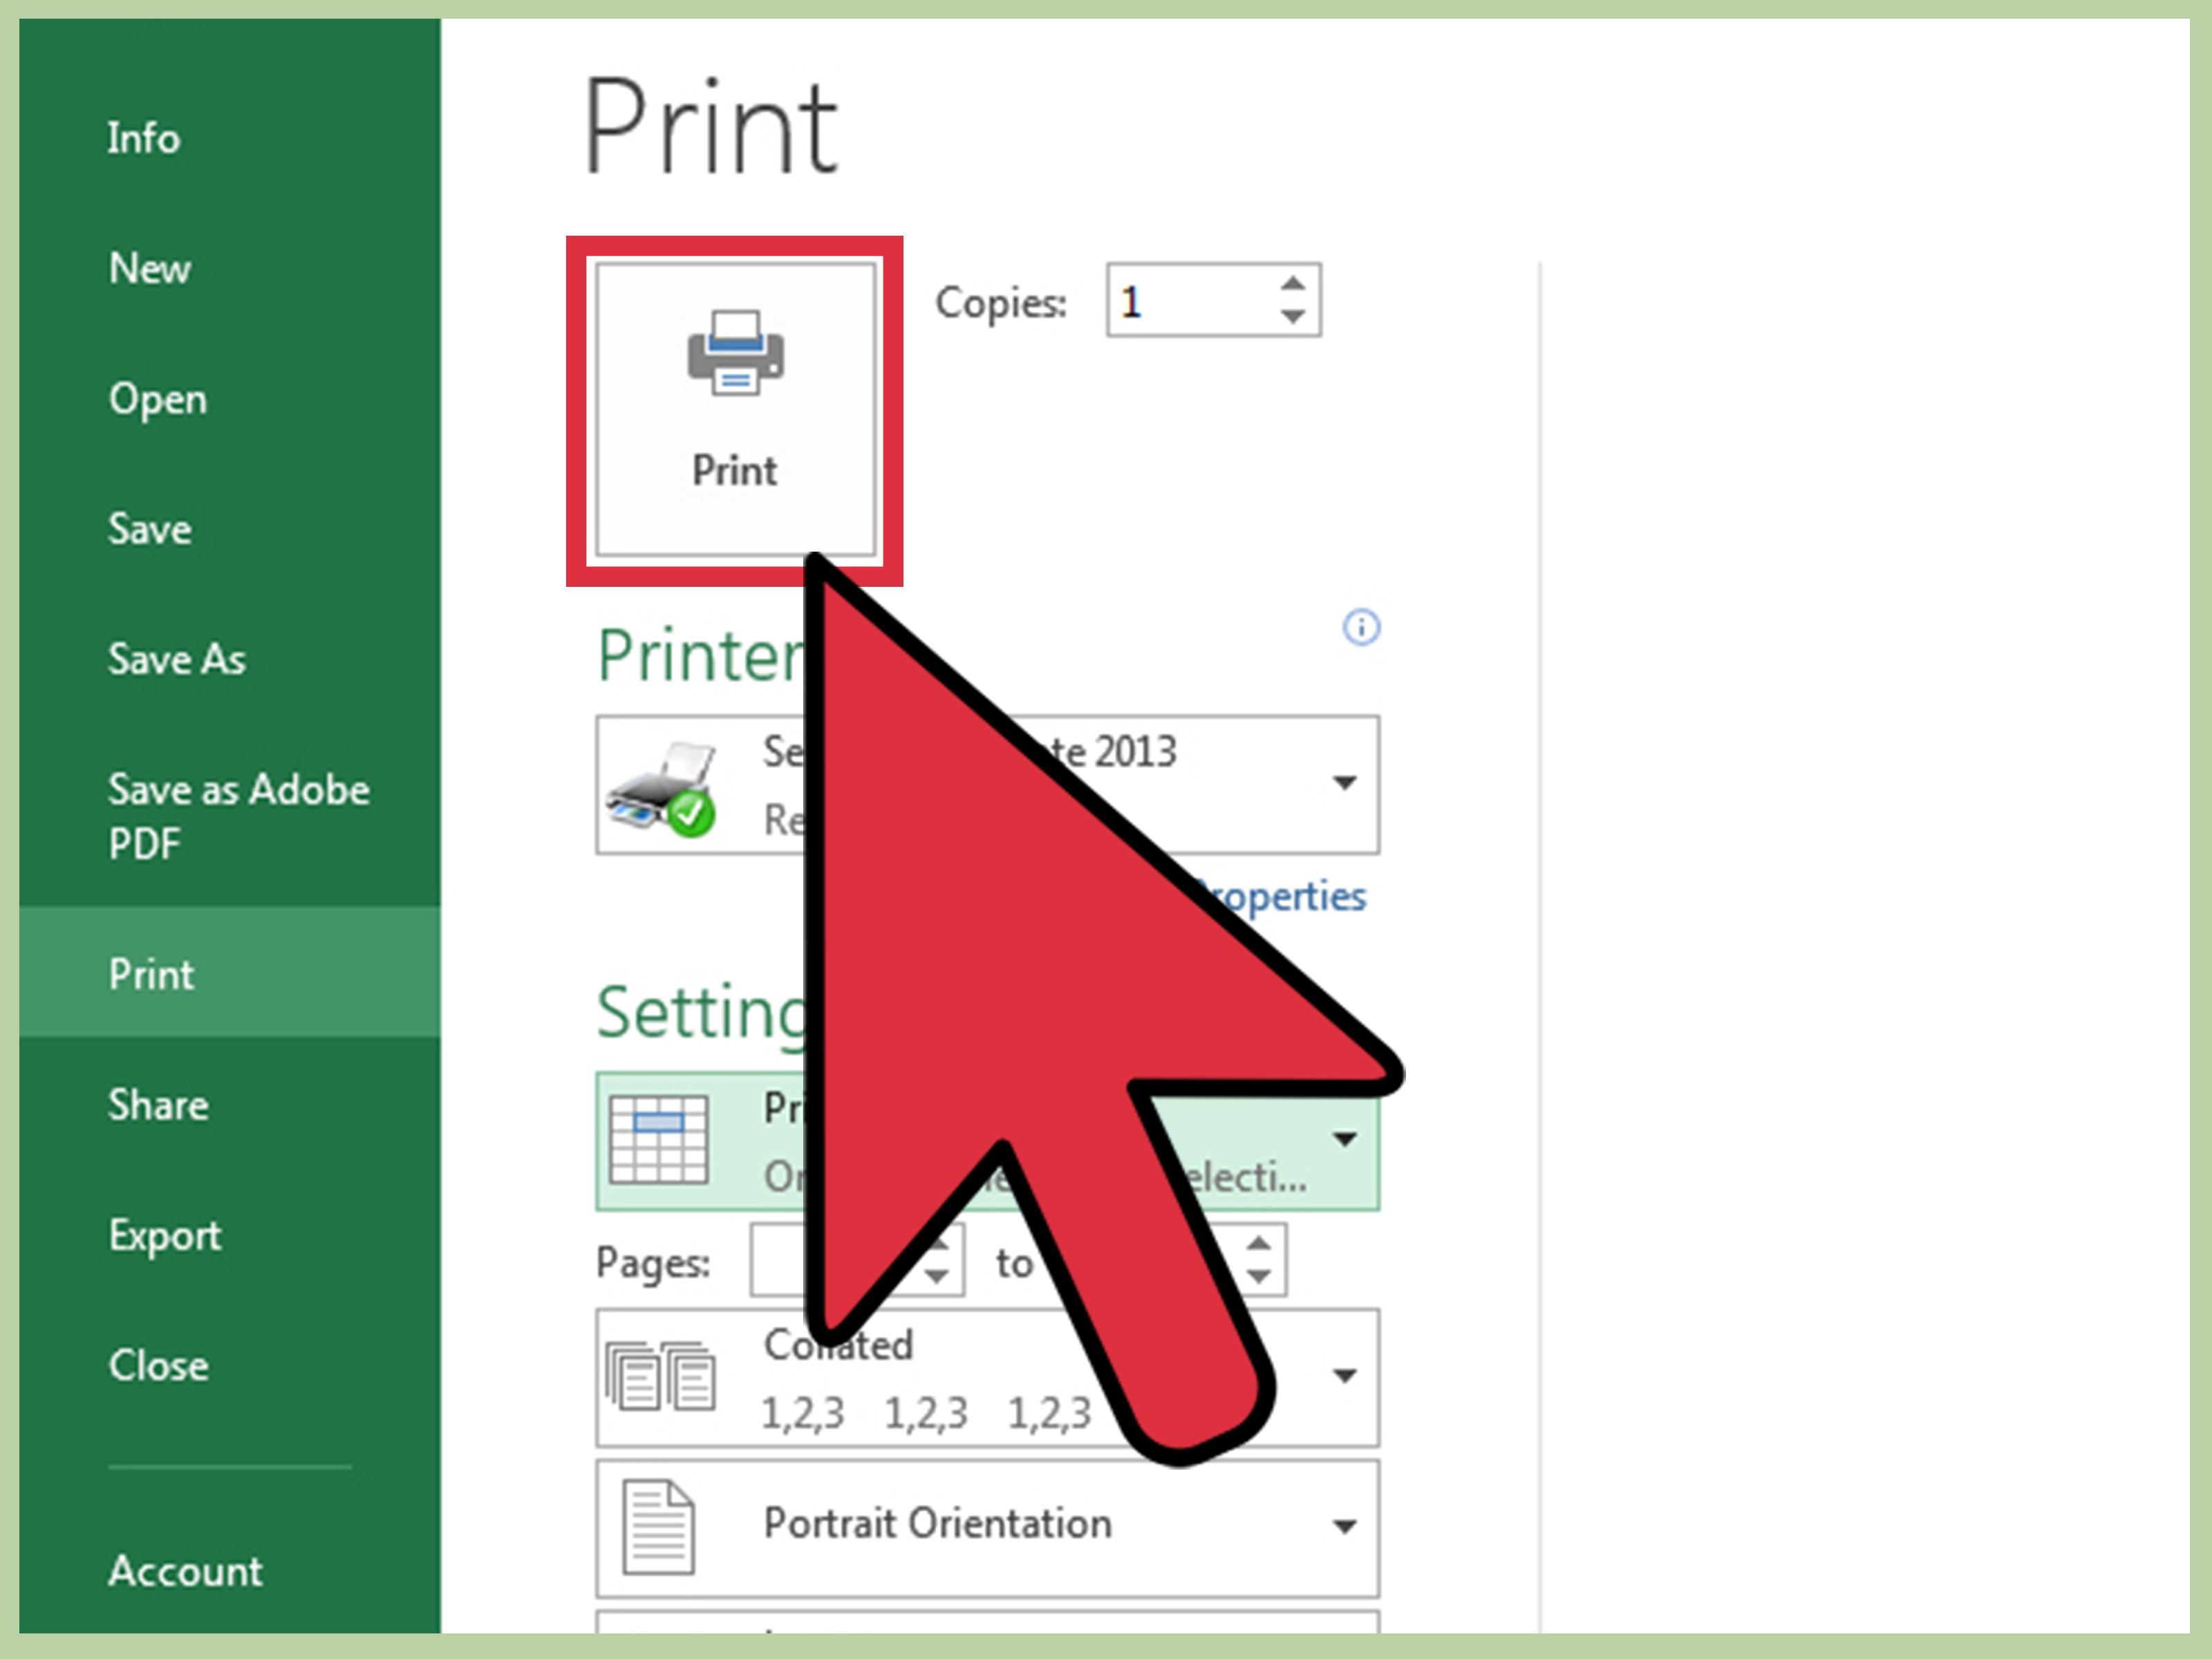
- Go to File > Print, or press Ctrl + P.
- Under Settings, open the dropdown that usually says Print Active Sheets.
- Choose Print Selection.
- Check the preview carefully.
- Click Print.
That is it. Excel prints only the cells you selected. The rest of the worksheet stays exactly where it is, quietly minding its own business.
Example: Printing a Small Sales Summary
Imagine you have a sales worksheet with customer names, product codes, regions, monthly revenue, notes, and formulas. Your manager only wants the summary table in cells A1:E12. Select A1:E12, go to File > Print, choose Print Selection, and preview it. If the table looks cramped, change orientation to landscape or choose narrow margins.
Pros and Cons of Print Selection
Pros: It is fast, simple, and temporary. You do not need to save a special print setting.
Cons: You must select the cells every time. If you forget to choose Print Selection, Excel may print the active sheet instead. That is how innocent spreadsheets become office confetti.
Method 2: Set a Print Area for Repeated Printing
If you often print the same part of a worksheet, setting a Print Area is the smarter option. A print area tells Excel, “This is the range I care about. Please stop inviting the rest of the worksheet to the party.”
Once a print area is set, Excel remembers it with the workbook. The next time you print that worksheet, Excel prints only the defined area unless you clear or change it.
When to Use Set Print Area
Use this method for recurring reports, invoice templates, dashboards, checklists, sign-in sheets, order forms, budget summaries, or any worksheet where the printable section stays mostly the same.
How to Set a Print Area in Excel
- Select the cells you want to print.
- Go to the Page Layout tab.
- In the Page Setup group, click Print Area.
- Choose Set Print Area.
- Go to File > Print to preview the result.
For example, if your printable invoice is in cells A1:H35, select that range and set it as the print area. Excel will ignore the notes, formulas, helper tables, and random experiments outside that range when printing.
How to Clear a Print Area
If Excel keeps printing only one part of your worksheet and you want the full sheet back, the print area may still be set. To remove it:
- Click anywhere in the worksheet.
- Go to Page Layout.
- Click Print Area.
- Choose Clear Print Area.
After clearing the print area, Excel returns to printing according to the active sheet, workbook, or selection settings you choose in the Print menu.
How to Add to an Existing Print Area
If your report grows, you can add more cells to the print area. Select the new cells, go to Page Layout > Print Area, and choose Add to Print Area. Keep in mind that non-adjacent print areas may print on separate pages. That can be useful for separate tables, but surprising if you expected one seamless report.
Use Page Break Preview to Inspect the Print Area
After setting a print area, go to View > Page Break Preview. This view shows how Excel divides the printout into pages. You can often drag page break lines to adjust where pages split. It is especially helpful for wide reports, monthly summaries, and worksheets with many columns.
Pros and Cons of Set Print Area
Pros: It is reliable, saved with the workbook, and ideal for recurring reports.
Cons: It can confuse users later if they forget the print area exists. If someone says, “Excel refuses to print my whole sheet,” check the print area before blaming the printer, the network, or Mercury retrograde.
Method 3: Use Filters, Hidden Rows, and Page Setup to Print Only What Matters
The third method is best when the data you want to print changes based on criteria. Instead of manually selecting cells, you can filter the worksheet, hide unnecessary rows or columns, and then print the visible report.
When to Use Filters or Hidden Rows
Use this method when you need to print only certain records from a larger table. Common examples include:
- Only unpaid invoices.
- Only orders from one region.
- Only employees in one department.
- Only products with low inventory.
- Only rows from a specific month or quarter.
How to Print Filtered Data
- Click inside your data table.
- Go to Data > Filter.
- Use the dropdown arrows in the column headers to choose the records you want.
- Hide any columns that should not appear in the printout.
- Go to File > Print.
- Preview the result before printing.
Filtered rows are hidden from view, so your printout focuses on the visible data. If you only want open orders, filter the Status column to show “Open.” If you only want February expenses, filter the Date column for February. Excel becomes much more cooperative once you give it clear instructions.
How to Hide Columns Before Printing
Sometimes the rows are right, but the columns are not. You may want to print customer names, invoice dates, and totals, but not internal notes or formula columns. To hide columns:
- Select the column letters you do not want to print.
- Right-click the selection.
- Choose Hide.
- Print the worksheet or selected area.
- Unhide the columns when finished.
To unhide columns, select the columns on both sides of the hidden area, right-click, and choose Unhide.
Use Print Titles for Multi-Page Reports
If your filtered data spans several pages, repeat the header row on every printed page. Go to Page Layout > Print Titles. In the Rows to repeat at top box, select the row containing your column headers. This keeps page two, three, and four from looking like anonymous number soup.
Pros and Cons of Filters and Hidden Rows
Pros: This method is flexible and excellent for large tables where the printable records change often.
Cons: You need to be careful. Hidden rows and columns can be easy to forget. Before sharing or saving the workbook, clear filters and unhide anything that should be visible to other users.
How to Make the Printed Spreadsheet Look Better
Choosing the right print range is only half the job. A good spreadsheet printout should be readable, aligned, and not appear to have been squeezed through a pasta maker. Use these settings to polish the result.
Change Page Orientation
For narrow tables, Portrait works well. For wide tables with many columns, choose Landscape. Go to Page Layout > Orientation, then select the option that fits your data best.
Use Scale to Fit Carefully
In the Page Layout tab, the Scale to Fit options let you fit a printout to a certain number of pages wide or tall. For example, setting width to 1 page can keep all columns on one page. However, avoid shrinking large tables too much. If the font becomes tiny, your printer has not created a report; it has created a vision test.
Adjust Margins
Margins can make or break a printout. Go to Page Layout > Margins and choose Narrow if your table almost fits. You can also use custom margins to center the table horizontally or vertically on the page.
Print Gridlines When Helpful
Excel gridlines do not always print by default. If you want visible cell borders, go to Page Layout and check Print under Gridlines. For professional reports, consider using actual cell borders instead, because they give you more control over what appears on paper.
Add Headers and Footers
Headers and footers are useful for report names, dates, page numbers, file names, and confidentiality notes. Go to Insert > Header & Footer, or use the Page Setup dialog from the print settings. This is especially useful for reports that will be handed out, filed, or emailed as PDFs.
Common Problems and Quick Fixes
Problem: Excel Prints Blank Pages
Blank pages often happen because Excel thinks there is data, formatting, or a print area extending beyond the visible table. Clear unnecessary formatting, check the used range, and review the print area. In Print Preview, look at the page count before printing.
Problem: Columns Are Cut Off
Switch to landscape orientation, reduce margins, or use Fit Sheet on One Page or Fit All Columns on One Page. If the data still looks too small, consider printing across two pages instead of forcing everything onto one.
Problem: The Wrong Range Keeps Printing
A saved print area is probably active. Go to Page Layout > Print Area > Clear Print Area, then print again.
Problem: Headers Disappear After Page One
Use Print Titles to repeat the header row. This makes multi-page reports much easier to read.
Problem: The Printout Looks Too Tiny
Check your scaling. If Excel is trying to fit a giant sheet onto one page, reduce the printed range, hide unnecessary columns, or allow the report to print across more pages.
Which Method Should You Use?
Use Print Selection when you need a quick, one-time printout. It is the spreadsheet equivalent of grabbing only the slice of cake you want instead of carrying away the whole bakery.
Use Set Print Area when the same part of the worksheet needs to be printed repeatedly. This is the best choice for templates, dashboards, invoices, and standard reports.
Use Filters and Hidden Rows or Columns when the printable data changes depending on conditions. This is ideal for lists, databases, inventory sheets, sales reports, and anything where you need “only the rows that match this rule.”
Practical Experience: What Actually Works Best in Real Life
In everyday spreadsheet work, printing part of an Excel file is rarely about the button itself. The button is easy. The real challenge is knowing what the reader needs to see. A worksheet may be useful on-screen because it includes formulas, notes, helper columns, and backup calculations. But a printed report should usually be cleaner, shorter, and more focused.
One practical habit is to create a dedicated “Print View” area inside the workbook. For example, if you manage a monthly sales tracker, keep the full data table on one sheet and create a summary section at the top or on a separate sheet. Then set the print area only around that polished summary. This prevents you from repeatedly selecting ranges and reduces the risk of printing internal notes or unfinished calculations.
Another helpful experience-based tip: always preview before printing to paper. This sounds obvious, but many Excel printing disasters happen because someone trusts the worksheet view. Normal worksheet view shows cells, not pages. Print Preview shows page breaks, scaling, margins, and whether that last column has wandered onto page two like a lost tourist. A five-second preview can save ten pages of regret.
For reports shared with clients, managers, or classmates, avoid shrinking too much. Excel’s “fit to one page” option is tempting, especially when the table is only slightly too wide. But if a report becomes hard to read, it fails its main job. Instead, hide nonessential columns, shorten long headings, use landscape orientation, or print the report on two pages with repeated headers. Readability beats page-count perfection.
Filtering is especially powerful for recurring operational reports. Suppose you track customer orders with columns for order number, customer, region, sales rep, order status, invoice amount, and delivery date. Instead of creating separate worksheets for every region, you can filter the Region column, hide internal columns, and print only the visible results. This keeps one source of truth while still producing targeted printouts.
However, hidden rows and columns require discipline. Before sending a workbook to someone else, clear filters and unhide columns unless the hidden structure is intentional. Many spreadsheet misunderstandings begin with the phrase, “Wait, where did that data go?” If you need a clean printable report and a complete working file, consider saving a PDF of the printout rather than sending the filtered workbook.
For teams, the best workflow is usually this: build the complete data table, create a clean reporting section, set a print area, add print titles if the report spans pages, and save the workbook with those settings. That way, anyone can open the file, press Ctrl + P, review the preview, and print the correct section without needing to remember twelve steps. Future-you will appreciate this. Future-you is busy and does not want to negotiate with page breaks before a meeting.
Finally, test your print settings after changing column widths, adding new rows, inserting logos, or updating formulas. Even small layout changes can push a report onto an extra page. Excel is powerful, but it is not psychic. Give it a clear print area, sensible scaling, and a clean layout, and it will usually behave like a professional tool instead of a paper-launching goblin.
Conclusion
Learning how to print part of an Excel spreadsheet is one of those small skills that saves time, paper, ink, and office sanity. For a quick job, select the cells and choose Print Selection. For a recurring report, use Set Print Area. For large lists, use filters and hidden rows or columns to show only the records that matter.
The secret is not just printing less. It is printing smarter. Preview your work, choose the right orientation, adjust margins, repeat headers when needed, and avoid shrinking your data into microscopic spreadsheet dust. With these three simple methods, you can turn oversized Excel worksheets into clean, focused, professional printouts.
Note: This article is written for publication and synthesizes current Excel printing guidance and practical spreadsheet workflow knowledge into original, reader-friendly content.
SEO Tags